


If you are working with a Spring based micro-services application then having a centralized service to manage configuration of all your micro-services at a central place is very important. Spring Cloud Config supports multiple backends such as filesystem, git repository, s3 bucket, relational databases via JDBC, etc.
Almost all the tutorials you find on the internet are about the git backend. However, sometimes, you want to use a JDBC backend for your config as relational databases are universally available and well supported. The aim of this tutorial is to show how to use Spring Cloud config with JDBC as a backend. We will use the PostgreSQL Database for this purpose.
Spring Cloud Config Server Example
So let’s start by creating a new project with Spring Initializer. Let’s go to https://start.spring.io/ and create a new Spring Project with Maven, Spring Boot 3.0.1 and JDK 17.
Please enter the following data:
- Project: Maven
- Language: Java
- Group:
com.mi - Artifact:
cloud-config-demo - Name:
cloud-config-demo - Description: Demo project for Spring Boot
- Package Name:
com.mi.cloudconfigdemo - Packaging: Jar
- Java: 17
- Dependencies:
- Config Server
- Spring Data JDBC SQL
- Spring Web
- Spring Security
- PostgreSQL Driver
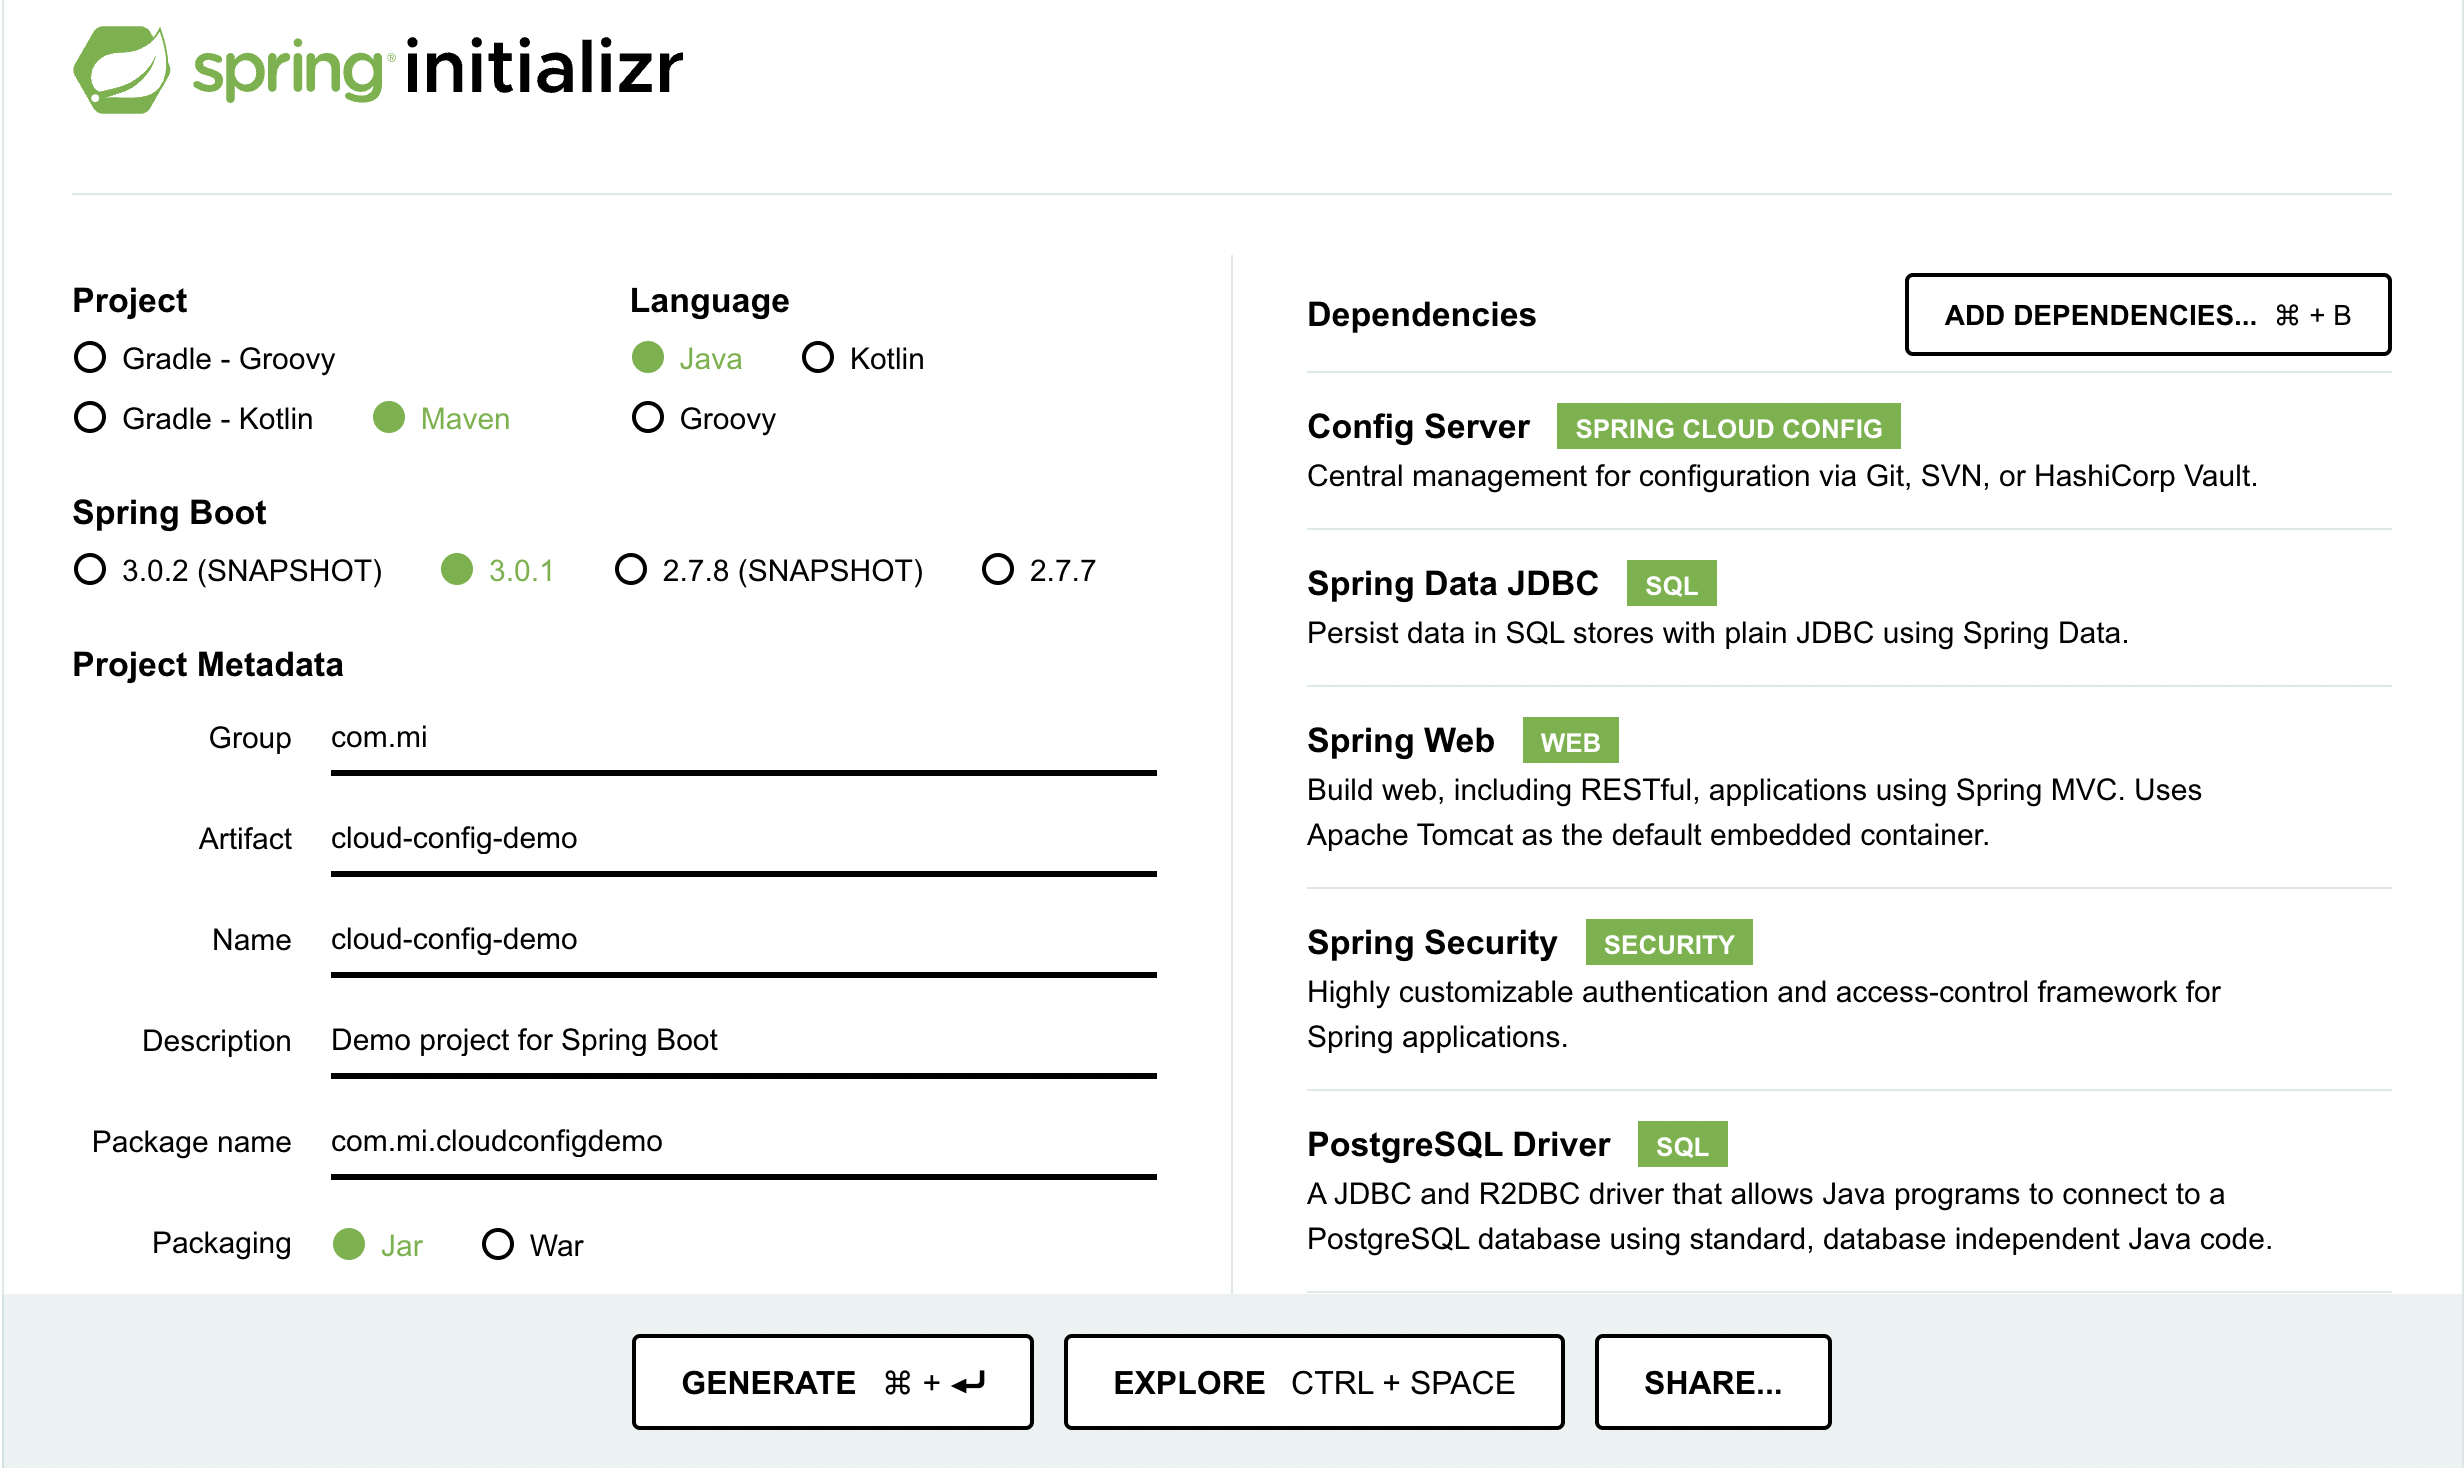
Then click on Generate Project.
To enable the cloud config server we need to use the @EnableConfigServer annotation to our class which has @SpringBootApplication.
File: ./src/main/java/com/mi/cloudconfigdemo/CloudConfigDemoApplication.java
package com.mi.cloudconfigdemo;

import org.springframework.boot.SpringApplication;
import org.springframework.boot.autoconfigure.SpringBootApplication;
import org.springframework.cloud.config.server.EnableConfigServer;

@SpringBootApplication
@EnableConfigServer
public class CloudConfigDemoApplication {

	public static void main(String[] args) {
		SpringApplication.run(CloudConfigDemoApplication.class, args);
	}

}
Now we need to add the required properties to our application.properties file.
File: ./src/main/resources/application.properties
server.port=8888
spring.security.user.name=configUser
spring.security.user.password=configPass

spring.datasource.hikari.connection-timeout=5000
spring.datasource.hikari.maximum-pool-size=10
spring.datasource.driver-class-name=org.postgresql.Driver
spring.datasource.url=jdbc:postgresql://localhost:5432/cloud-config?useSSL=false
spring.datasource.username=postgres
spring.datasource.password=mobisoft
spring.jpa.show-sql=true

spring.profiles.include=jdbc
logging.level.root=DEBUG
Here note that we have used the line spring.profiles.include=jdbc. This line enables the JDBC backend for the Spring Cloud Config server. Rest of the properties are related to the Spring Security and Spring JDBC.
Now to store our application properties, we will need to create a table in our databases. Also we will need to add a couple of entries to this table:
create table PROPERTIES (
  "ID" serial primary key,
  "CREATED_ON" timestamp ,
  APPLICATION text,
  PROFILE text,
  LABEL text,
  "KEY" text,
  "VALUE" text
 );

INSERT INTO PROPERTIES ("CREATED_ON", APPLICATION, PROFILE, LABEL, "KEY", "VALUE") VALUES (NULL,'clientapp','dev','latest','prop1','value1');
INSERT INTO PROPERTIES ("CREATED_ON", APPLICATION, PROFILE, LABEL, "KEY", "VALUE") VALUES (NULL,'clientapp','dev','latest','prop2','value2');
To run the project we need to run:
./mvnw spring-boot:run
This should start the cloud config server on the address http://localhost:8888/. Now let’s access the config via an API call. We will use the curl utility to call the API.
The format for the API URL is: {base-path}/{application-name}/{profile}/{label}
So in our case the URL will be: http://localhost:8888/client-app/dev/latest. So the command is:
curl --location --request \
GET 'http://localhost:8888/clientapp/dev/latest' \
-u 'configUser:configPass'
Here note that we are using the Spring Security Basic Auth to access the API. That’s why we need to use the -u 'configUser:configPass' option in the command. This username and password is defined in our application.properties file.
{
  "name": "clientapp",
  "profiles": [
    "dev"
  ],
  "label": "latest",
  "version": null,
  "state": null,
  "propertySources": [
    {
      "name": "clientapp-dev",
      "source": {
        "prop1": "value1",
        "prop2": "value2"
      }
    }
  ]
}
At this point our setup for the Spring Cloud Config Server is ready. However as you may have noted we are storing the config values as plain text in the DB. It’s better to store sensitive config values encrypted in the DB.
To do this we need add the encryption key in the application.properties file.
File: ./src/main/resources/application.properties
encrypt.key=6hjH65aVFMlouK9Y
Spring Cloud Config provides 2 endpoints to encrypt and decrypt data. However, these are POST endpoints. Since we are using default Spring Security Configuration, CSRF token protection gets applied to these APIs. However, since we are using these for service to service communication without any browser, the CSRF protection is meaningless for us. So let’s disable it. Add the following class to your project:
file: ./src/main/java/com/mi/cloudconfigdemo/WebSecurityConfig.java
package com.mi.cloudconfigdemo;

import org.springframework.context.annotation.Bean;
import org.springframework.context.annotation.Configuration;
import org.springframework.security.config.annotation.web.builders.HttpSecurity;
import org.springframework.security.web.SecurityFilterChain;

@Configuration
public class WebSecurityConfig {

    @Bean
    public SecurityFilterChain filterChain(HttpSecurity http) throws Exception {
        http
          .csrf()
          .disable();
        return http.build();
    }

}
Now we can run and use the encrypt and decrypt endpoints. Let’s use curl command for the same. Let’s say we want to encrypt the text Value+=1$% I am purposefully adding some symbols there as passwords tend to use special characters.
curl -X POST 'http://localhost:8888/encrypt' \
--header 'Content-Type: text/plain' \
--data-raw 'Value+=1$%' \
-u 'configUser:configPass'
This should give output:
be68c61f97816e4ba611e12c7604950dd9b37520edbba351fbfab25aa0564879
Please note that on Mac ZSH I get a ‘%’ character at the end of the encrypted value. We need to ignore this.
Now let’s decrypt this value to check if we get our original data back:
curl -X POST 'http://localhost:8888/decrypt' \
--header 'Content-Type: text/plain' \
--data-raw 'be68c61f97816e4ba611e12c7604950dd9b37520edbba351fbfab25aa0564879' \
-u 'configUser:configPass'
This should give output:
Value+=1$%
So it’s working for us. Now let’s store this value in the DB. Use the following SQL for the same:
UPDATE PROPERTIES SET "VALUE" = '{cipher}cf73ca5363b85abfbb3961bb1c30562154d6f1894d25c9ba0c81005e1ad68cf4' WHERE "KEY" = 'prop2';
Here note that we are prefixing the value with {cipher}. This tells Spring Cloud Config that this value is encrypted.
Now let’s start the application and call the config API to check if we get the proper config value in the output:
curl --location --request \
GET 'http://localhost:8888/clientapp/dev/latest' \
-u 'configUser:configPass'
{
  "name": "clientapp",
  "profiles": [
    "dev"
  ],
  "label": "latest",
  "version": null,
  "state": null,
  "propertySources": [
    {
      "name": "clientapp-dev",
      "source": {
        "prop1": "value1",
        "prop2": "Value+=1$%"
      }
    }
  ]
}
As you can see we are getting the expected output from the API for the prop2 property.
Spring Cloud Config Client Example
Now that we have the server application working, let’s now create the client service and get it’s config from the server we have set up.
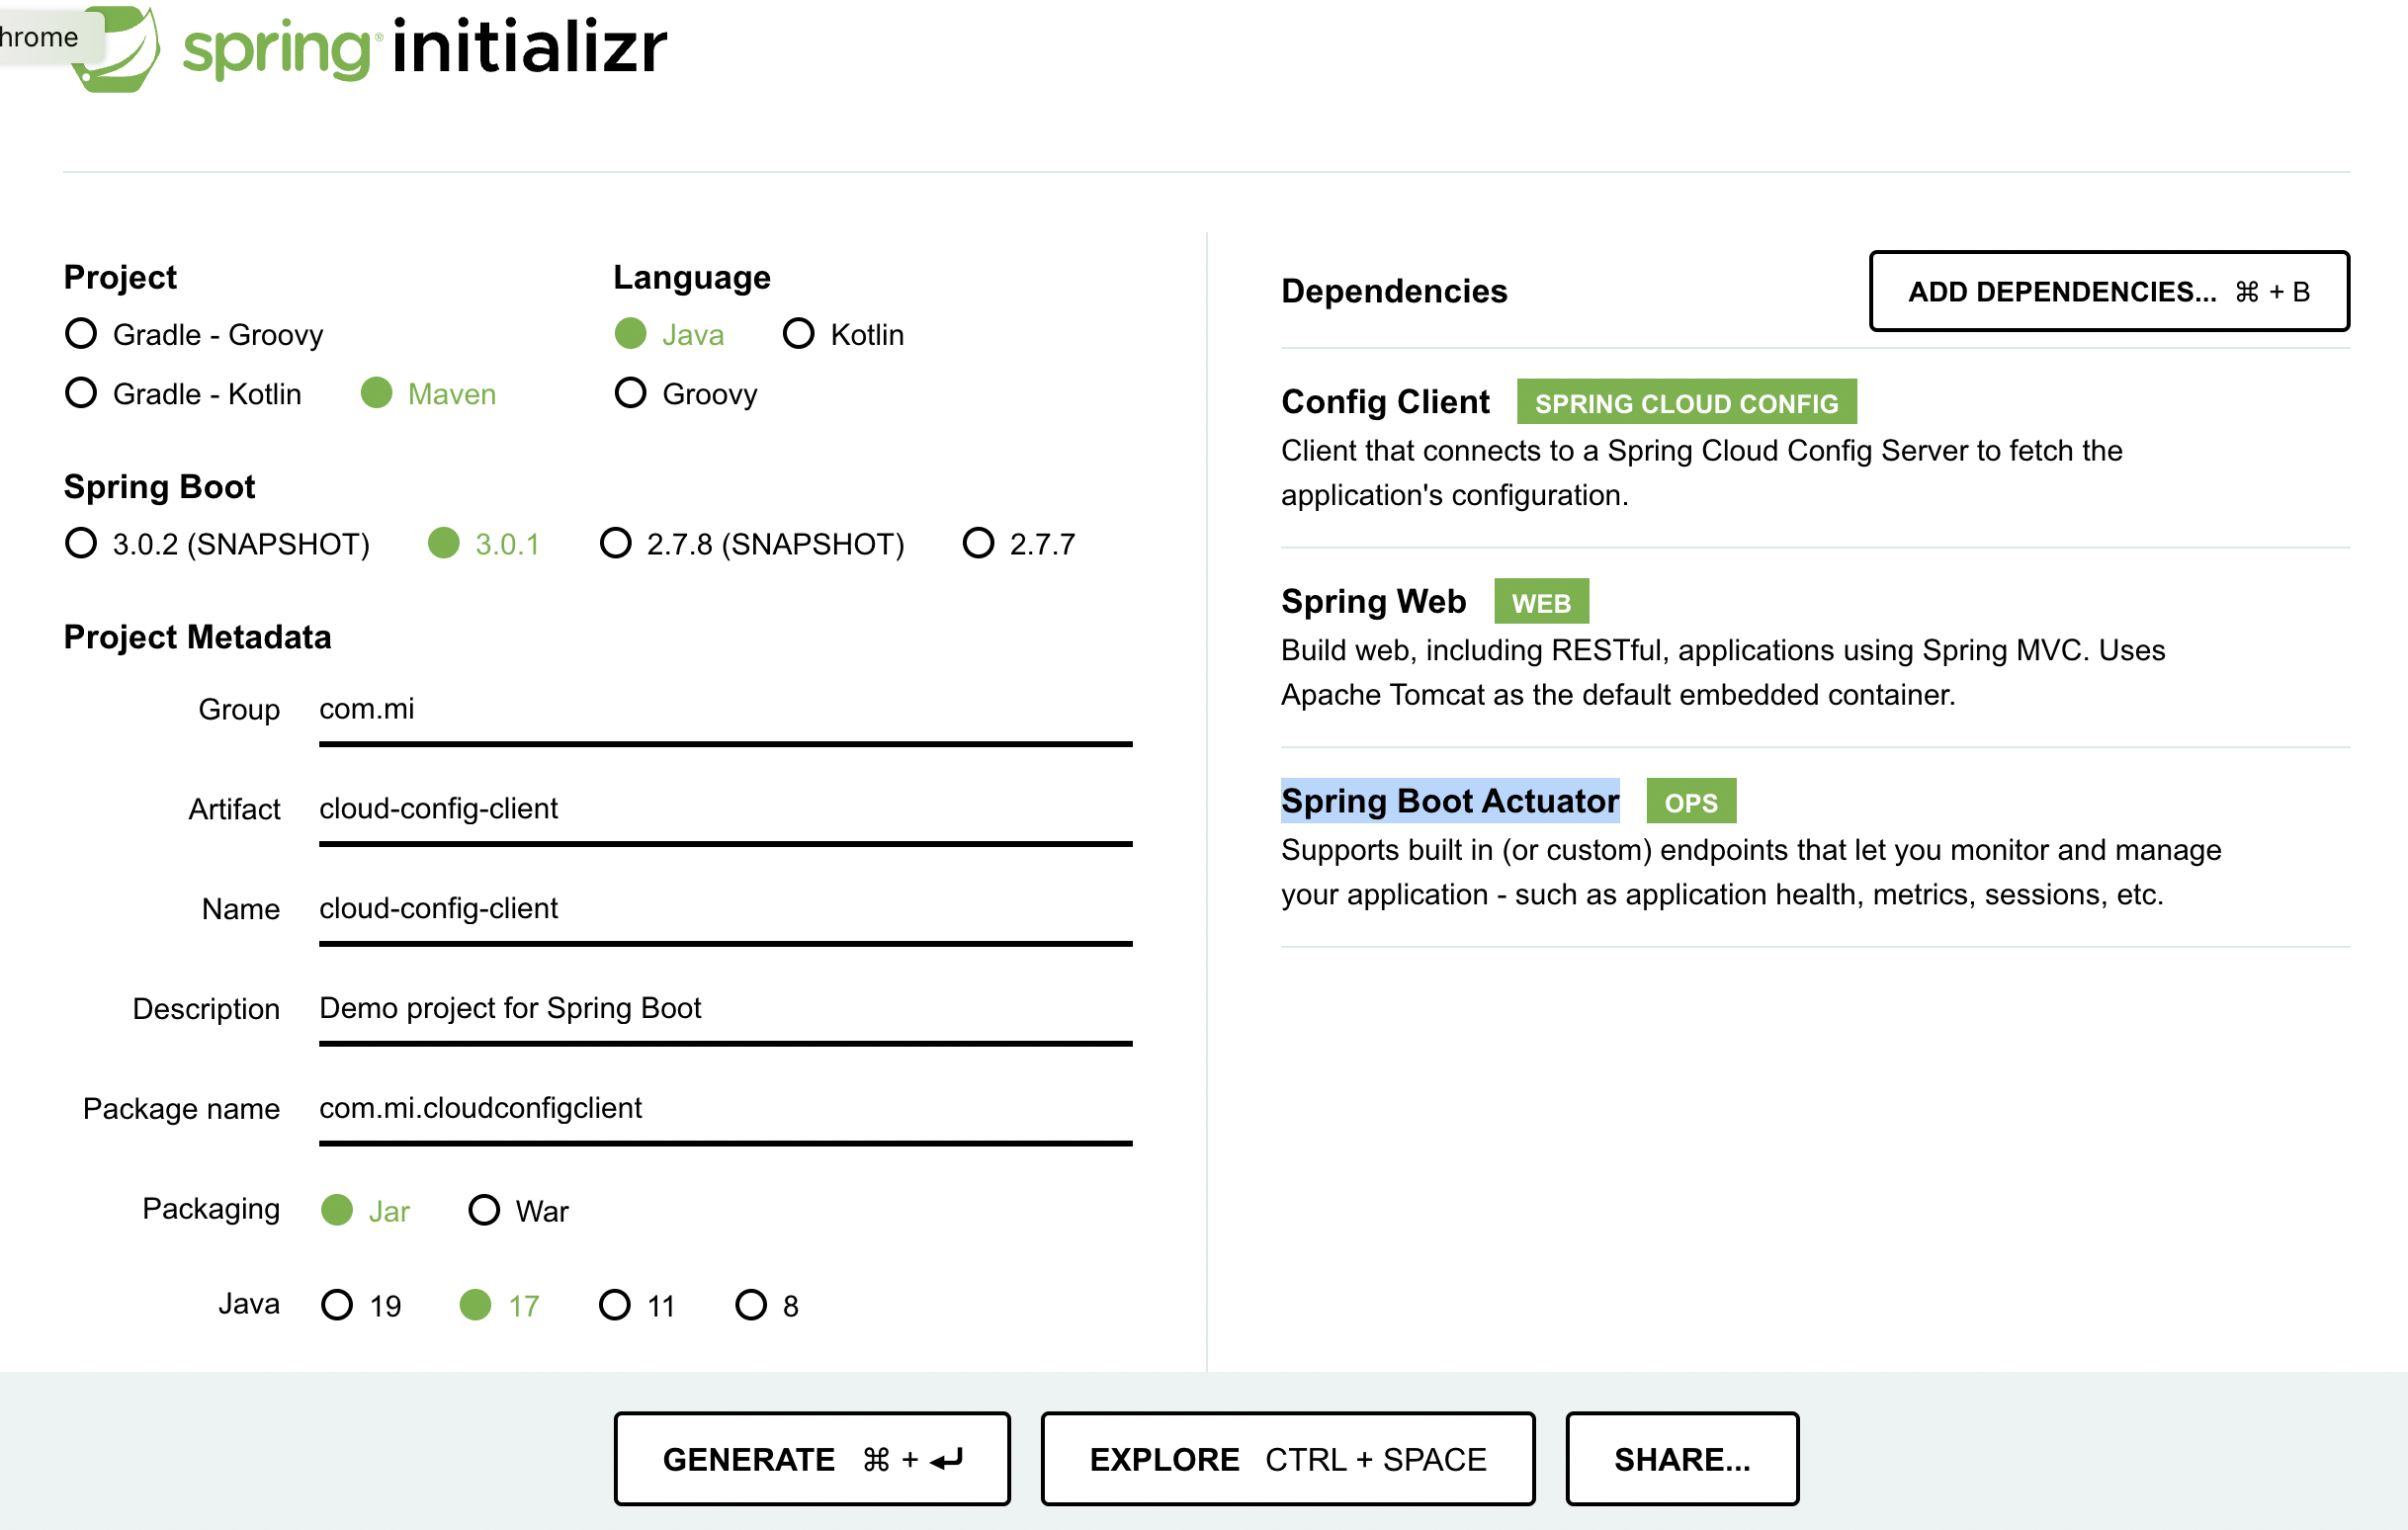
Let’s again go to https://start.spring.io/ and create a new Spring Project with Maven, Spring Boot 3.0.1 and JDK 17.
- Project: Maven
- Language: Java
- Group:
com.mi - Artifact:
cloud-config-client - Name:
cloud-config-client - Description: Demo project for Spring Boot
- Package Name:
com.mi.cloudconfigclient - Packaging: Jar
- Java: 17
- Dependencies:
- Config Client
- Spring Web
- Spring Boot Actuator
Let’s set the application properties first.
File: ./src/main/resources/application.properties
spring.application.name=clientapp
spring.profiles.active=dev
spring.cloud.config.label=latest

spring.config.import=configserver:http://localhost:8888
spring.cloud.config.username=configUser
spring.cloud.config.password=configPass

management.endpoints.web.exposure.include=health,info,refresh
Here note that the spring.application.name must be the same as that of the application in in your Cloud Config on the server side. Same should be the case for spring.profiles.active and spring.cloud.config.label.
Next we set the parameters to access the Cloud Config Server. These properties are: spring.config.import, spring.cloud.config.username and spring.cloud.config.password. These properties should also match their corresponding values on the server side.
At the last we specify that we want to expose the health, info and refresh endpoints from the Spring Boot Actuator project.
Next let’s add a TestConfig class.
File: ./src/main/java/com/mi/cloudconfigclient/TestConfig.java
package com.mi.cloudconfigclient;

import org.springframework.beans.factory.annotation.Value;
import org.springframework.stereotype.Component;

@Component
public class TestConfig {

	@Value("${prop1}")
	private String prop1;

	public String getProp1() {
		return prop1;
	}

	public void setProp1(String prop1) {
		this.prop1 = prop1;
	}
}
Here note that we are using @Value annotation to load the prop1 value from the Spring Cloud Config Server. Next let’s create an API where we can use this value.
File: ./src/main/java/com/mi/cloudconfigclient/TestController.java
package com.mi.cloudconfigclient;

import org.springframework.beans.factory.annotation.Autowired;
import org.springframework.core.env.Environment;
import org.springframework.web.bind.annotation.GetMapping;
import org.springframework.web.bind.annotation.RequestMapping;
import org.springframework.web.bind.annotation.RestController;

@RestController
@RequestMapping("/test")
public class TestController {

	@Autowired
	private Environment env;

	@Autowired
	private TestConfig testConfig;

	@GetMapping
  public String props() {
	  String prop = env.getProperty("prop1");
    return prop + ":" + testConfig.getProp1();
  }

}
Here we have created a Rest Controller and mapped the GET '/test' path to it. We have 2 autowired members TestConfig and Environment. This is to show you the 2 ways to access the properties from the config. First is the @Value annotation and the second is using Environment.getProperty method.
Now first run the server and the client using the same command ./mvnw spring-boot:run in the respective directories.
./mvnw spring-boot:run
Now let’s access the API and check the output:
curl --location --request GET 'http://localhost:8080/test'
It should output:
value1:value1
Changing the remote config
Now let’s change the value of Prop 1 from the server application and see if gets reflected in the client service. Run the following query to change the value:
UPDATE PROPERTIES SET "VALUE" = 'ChangedValue' WHERE "KEY" = 'prop1';
Now you can call the config API using curl to check the output of the API.
curl --location --request \
GET 'http://localhost:8888/clientapp/dev/latest' \
-u 'configUser:configPass'
{
  "name": "clientapp",
  "profiles": [
    "dev"
  ],
  "label": "latest",
  "version": null,
  "state": null,
  "propertySources": [
    {
      "name": "clientapp-dev",
      "source": {
        "prop1": "ChangedValue",
        "prop2": "Value+=1$%"
      }
    }
  ]
}
So here we can see that in the config API output the value of the prop1 has changed to ChangedValue.
Now let’s we call the client test service:
curl --location --request GET 'http://localhost:8080/test'
It still outputs
value1:value1
To refresh the config, we need to call Spring Boot Actuator ‘refresh’ API.
curl --location --request POST 'http://localhost:8080/actuator/refresh'
It outputs:
["prop1"]
This shows that the value of `prop1` has changed.
So let’s call the client test service again.
curl --location --request GET 'http://localhost:8080/test'
It outputs
ChangedValue:value1
So there is a point to note that property loaded with Environment.getProperty updated at the runtime, however the property loaded with @Value annotation didn’t update. The reason for this is that the TestConfig bean is a singleton. So its instance is already created when the application starts.
To download the complete code for this tutorial please click here.
Conclusion
In this tutorial we saw how to implement Spring Cloud Config Server and Spring Cloud Config Client. We also saw how to encrypt the sensitive property values at rest. Hope this should help you to use Spring Cloud Config in your next microservices project.
Author's Bio:

Pritam Barhate, with an experience of 14+ years in technology, heads Technology Innovation at Mobisoft Infotech. He has a rich experience in design and development. He has been a consultant for a variety of industries and startups. At Mobisoft Infotech, he primarily focuses on technology resources and develops the most advanced solutions.