Docker is an open-source platform that helps streamline work for developers. It gives teams a practical way to build, move, and run applications with containerization. Over time, it has become one of those tools you expect to find in any modern software project. Deployments go faster, and the whole system runs smoothly.
The changes in how we build, ship, and manage applications since Docker came out are huge. Many beginners struggle to distinguish between a docker image and a docker container.
Let’s break that down together, talk through how these pieces connect, and take a look at what each one does during the container lifecycle when it’s time to get your app running.
If you’re looking to streamline development and deployment pipelines, explore our devOps services for docker and CI/CD

Docker Images vs. Containers Flowchart
Prerequisites
Basic Understanding of Virtualization
Picture virtualization as running several “computers” inside one physical machine. It’s a helpful starting point. docker containers are similar, just lighter and less resource-hungry. Instead of spinning up full virtual machines, containers share parts of the machine’s system to operate apps independently.
Familiarity with Command-Line Interfaces
You’ll need to use the terminal, a black window where you type Docker container commands. If you know how to switch folders or run a basic script, you’re already set to move through the process more easily.
Docker Installed
To follow along, docker needs to be set up on your device. It’s available for Windows, Mac, and Linux. You can grab the installer from Docker’s official site.
Basic Knowledge of Containers
Knowing what a container is always helps. Think of it as a lightweight, self-contained package for apps. If you’ve bumped into Kubernetes before, you’re halfway there. Kubernetes exists to manage lots of containers across their lifecycle states.
You can also hire docker consultants for container strategy and lifecycle management to optimize your workflows

What is a Docker Image?
A docker image acts like a starter kit for software. It’s a lightweight, standalone file that has everything an app needs: the application code, the required dependencies like libraries, runtime, system tools, frameworks, plus any custom settings packed inside.
Once you build an image, it’s read-only. You can’t change it without building a new one. In practice, it’s your template,something you “stamp out” docker containers from, over and over.
Key Characteristics of Docker Images
- Immutable: Once built, an image remains unchanged. Any modification requires creating a new image.
- Portable: Can be shared and deployed across different environments.
- Layered Structure: Built using a layered file system that optimizes storage and reuses common layers.
- Versioned: Each image can be tagged with different versions (e.g., nginx:1.21, python:3.9).
- Reusable: You can share and reuse images across different environments. They are typically stored in a Docker registry like Docker Hub, where you can pull public images or push your own.
What is a Docker Container?
A Docker container comes to life when an image runs. Think of the image as a recipe, and the container as the chef working live in its own kitchen.
A container starts as an image, but once it’s running, it becomes a secluded space for your app. Each container runs independently. It happens when sharing the host’s kernel; this keeps things light and quick.
When you launch an app in a container, Docker creates a sandboxed environment where everything operates separately from the rest of your system. Containers are flexible, as they include a writable layer. So, data can change how your app runs and adapt on the fly throughout the container lifecycle.
Key Characteristics of Docker Containers
Ephemeral by Default
Stop or delete a container, and you lose what’s inside, but the image remains untouched.
Isolated
Every container gets its own space to run, but you can let them talk to each other if that’s needed.
Lightweight
Since they share the host’s kernel, containers use a lot less overhead than old-school virtual machines.
Configurable
Change containers with different environment settings, adjust their networks, or attach storage; each container can be set up the way you need.
Learn more about docker container monitoring with prometheus and grafana for real-time insights
Relationship Between Docker Images and Containers
Docker Images as Templates
A Docker image is a read-only template that needs code, libraries, dependencies, and environment variables. It acts as a blueprint for creating containers.
Containers as Live Instances
When you run an image with the docker run command, it creates a container. It runs the app from that image and maintains its own isolated environment.
Multiple Containers from One Image
You can launch many containers from one image. Each container runs independently, even though they share the same base image. This runs identical apps with different configurations.
Additional Details
Layered Architecture
Docker builds images in layers. Each layer records a change, such as installing a package or adding a file. These layers remain cached, so Docker can reuse them. This reduces storage use and speeds up image build and push/pull processes. When a container starts, it adds a writable layer on top so changes can occur while it runs.
Immutability of Images
Once you build an image, you cannot change it directly. To modify it, you need to create a new one. You can do this by adjusting a container and committing changes to the dockerfile before rebuilding.
Reusability and Efficiency
Thanks to the layered structure, docker images are highly efficient. Shared layers minimize redundancy, speed up deployment, and support multiple containers across different lifecycle stages.
For a deeper dive into automation, explore our detailed guide on CI/CD pipeline with docker and aws.
Docker Installation Steps for Containers and Images
Step 1: Update Your System First
Make sure your package index is up to date. Open your terminal and run
sudo apt-get updateStep 2: Install Required Packages
Docker installation requires some dependencies like ca-certificates, curl, and GnuPG. Install them with
sudo apt-get install -y ca-certificates curl gnupgStep 3: Create a Keyrings Directory
Docker recommends storing its GPG key in a dedicated keyring directory. Let’s create it
sudo install -m 0755 -d /etc/apt/keyringsStep 4: Add Docker’s Official GPG Key
Next, download and save Docker’s official GPG key
curl -fsSL https://download.docker.com/linux/ubuntu/gpg | \sudo gpg --dearmor -o /etc/apt/keyrings/docker.gpgThis step ensures the packages you install stay authentic and safe.
Step 5: Set Permissions on the GPG Key
Make the key readable by the apt system:
Sudo chmod a+r /etc/apt/keyrings/docker.gpgStep 6: Update Your Package Index Again
After adding the Docker repository, update the package index again:
sudo apt-get updateStep 7: Install Docker Engine & Plugins
 sudo apt-get install -y \
    docker-ce \
    docker-ce-cli \
    containerd.io \
    docker-buildx-plugin \
    docker-compose-plugin
This installs everything you need to build docker images and manage container lifecycles.
Step 8: Add Your User to the Docker Group
Docker requires sudo for commands by default. If you want to run Docker as a regular user, add your user to the Docker group.
sudo usermod -aG docker ubuntuImportant: You’ll need to log out and log back in for the new group membership to take effect!
Step 9: Fix Common Docker Installation Issues
If you find any error while installing it, there should be sources.list.d missing, so you want to create that file using the below command
sudo mkdir /etc/apt/sources.list.dsudo chmod 666 /var/run/docker.sockStep 10: Test Your Docker Installation and Running Containers
Finally, test that Docker is working:
docker psIf you see an empty list of containers without errors, congratulations. Docker is installed and ready to use! To strengthen your DevOps security posture, check out how DevSecOps with SonarQube and OWASP helps mitigate risks early.
Simple Example: Docker Image Build and Container Lifecycle
Step 1: Pull the Docker Image
docker pull python:3.11Step 2: Run a Container from an Image
docker run python:3.11 python --versionPython 3.11.xDocker Compose Example with PostgreSQL
Create a YAML file named docker-compose-postgresql-16.yml.
version: '3.8'
services:
  db:
    image: postgres:16
    restart: always
    environment:
      POSTGRES_USER: postgres
      POSTGRES_PASSWORD: mobisoft
      POSTGRES_DB: your_database_name
    ports:
      - '5433:5432'
    volumes:
      - $HOME/myapp/postgres_16:/var/lib/postgresql/data
    deploy:
      resources:
        limits:
          memory: 512M
Step 1: Docker Compose File for PostgreSQL Lifecycle Management
docker compose -f docker-compose-postgresql-16.yml --compatibility up 
Step 2: Check Docker Images and Running Containers
docker images
Step 3: Check Docker Images and Running Containers
docker ps
Step 4: Access a Running PostgreSQL Container
docker exec -it docker_postgres_1 psql -U postgres 
Postgres Service file
[Unit]
Description=postgresqlService
Requires=postgresql16.service
After=docker.service
[Service]
Restart=always
User=phapalnavnath
Group=docker
# Shutdown container (if running) when unit is stopped
ExecStartPre=docker compose -f /home/phapalnavnath/docker/docker-compose-postgresql-16.yml --compatibility down -v# Start container when unit is started
ExecStart=docker compose -f /home/phapalnavnath/docker/docker-compose-postgresql-16.yml --compatibility up# Stop container when unit is stopped
ExecStop=docker compose -f /home/phapalnavnath/docker//docker-compose-mysql8.yml --compatibility down -v
[Install]
WantedBy=multi-user.target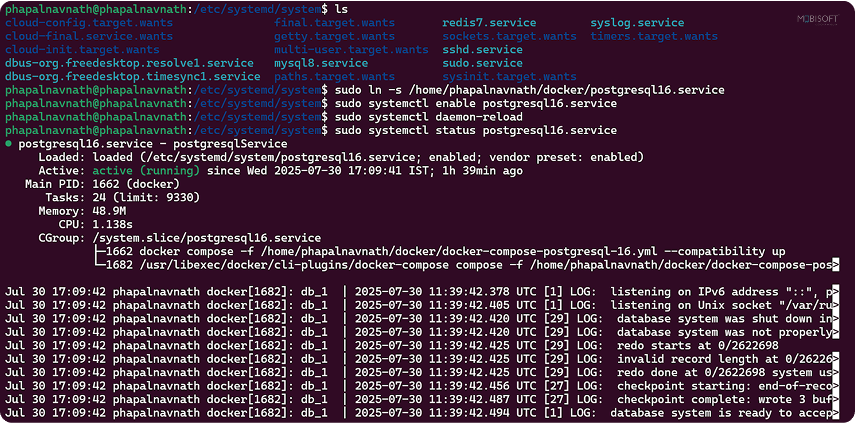

# Create a symlink if the file was originally outside /etc/systemd/system
sudo ln -s /home/phapalnavnath/docker/postgresql16.service# Reload systemd so it recognizes the new service
sudo systemctl enable postgresql16.service# Enable the service to auto-start at boot
sudo systemctl daemon-reload# Start the service now
sudo systemctl status postgresql16.servicedocker psdocker exec -it docker_db_1 psql -U postgres Benefits
- Auto-recovery: Systemd restarts PostgreSQL if it crashes.
- Boot time: The system starts it automatically when the machine boots.
Docker Compose Example with MySQL Containers
Step 1: Create a MySQL Docker Compose File
version: '3.8'
services:
  mysql:
    image: mysql:8.0
    container_name: mysql-db
    restart: always
    environment:
      MYSQL_ROOT_PASSWORD: mobisoft
      MYSQL_DATABASE: mydatabase
      MYSQL_USER: myuser
      MYSQL_PASSWORD: userpassword
    ports:
      - '3307:3306'

  volumes:
      - mysqldata:/var/lib/mysql
    deploy:
      resources:
        limits:
          memory: 512M
volumes:
  mysqldata:/var/lib/mysql
Step 2: Start the containers
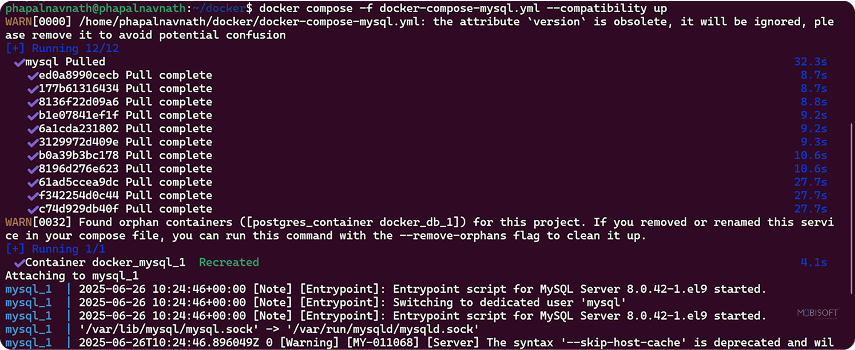
docker compose -f docker-compose-mysql.yml --compatibility up Step 3: Docker images

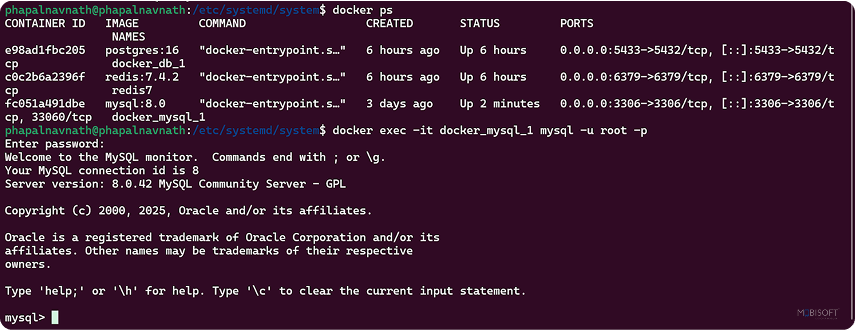
Step 4: Check running containers
docker ps
Step 5: Access the MySQL client running inside a Docker container.
docker exec -it 677f4fa66b86 mysql -u root -p
MySQL Service file
[Unit]
Description=mysqlService
Requires=mysql.service
After=docker.service
[Service]
Restart=always
User=phapalnavnath
Group=docker
# Shutdown container (if running) when unit is stopped
ExecStartPre=docker compose -f /home/phapalnavnath/docker/mysql/docker-compose-mysql8.yml --compatibility down -v# Start container when unit is started
ExecStart=docker compose -f /home/phapalnavnath/docker/docker-compose-mysql8.yml --compatibility up
# Stop container when unit is stopped
ExecStop=docker compose -f /home/phapalnavnath/docker//docker-compose-mysql8.yml --compatibility down -v
[Install]
WantedBy=multi-user.target
sudo ln -s /home/phapalnavnath/docker/mysql.service
sudo systemctl enable mysql.service
sudo systemctl daemon-reload
sudo systemctl status mysql.service
docker ps
docker exec -it docker_mysql_1 mysql -u root -pBenefits
- Auto-recovery: If PostgreSQL crashes, systemd will restart it
- Boot time: Starts automatically when the machine boots
Docker Compose Example: Running a Multi-Container Application
Step 1: Create a Docker Compose File for Multiple Services
version: "2.1"

services:
  yelb-ui:
    image: mreferre/yelb-ui:0.10
    depends_on:
      - yelb-appserver
    ports:
      - "8080:80"
    environment:
      - UI_ENV=test
    mem_limit: 512m

  yelb-appserver:
    image: mreferre/yelb-appserver:0.7
    depends_on:
      - redis-server
      - yelb-db
    ports:
      - "4567:4567"
    environment:
      - RACK_ENV=test
    mem_limit: 512m


 redis-server:
    image: redis:4.0.2
    ports:
      - "6379:6379"
    mem_limit: 512m

  yelb-db:
    image: mreferre/yelb-db:0.6
    ports:
      - "5432:5432"
    mem_limit: 512m
Step 2: Start All Containers Together
docker compose -f docker-compose.yml --compatibility up 
Step 3: Check Running Containers and Lifecycle States
docker ps
Step 4: Access the Application

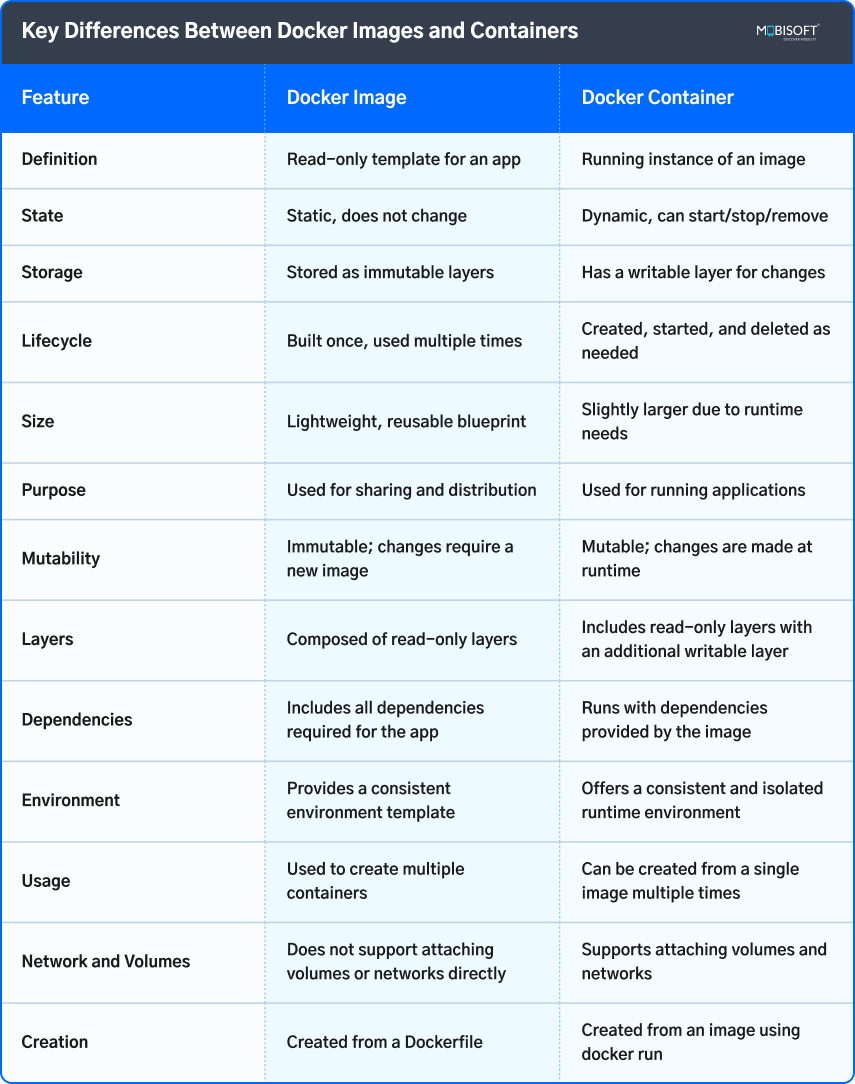
Key Differences Between Docker Images and Containers
Conclusion
Understanding the difference between Docker images and containers is crucial for modern development. Think of an image as the recipe and the container as the dish. Images define the blueprint, while containers represent the runtime state and lifecycle.
Using both together lets you build scalable applications, manage container lifecycle states, and optimize deployments across environments. For CTOs, CROs, and engineering leaders, mastering this distinction ensures smoother DevOps pipelines, better scalability, and efficient resource management. To scale your engineering capabilities, you can hire devOps engineers for docker and cloud automation




 September 1, 2025


