Introduction
Adopting modern application deployment tools and techniques has transformed how we manage and deliver software. Among these advancements, Docker stands out as a pivotal technology for containerizing applications and simplifying application deployment by packaging software and its dependencies into portable containers. When combined with the AWS CI/CD pipeline, Docker enables seamless automation, enhanced scalability, and improved efficiency, making it ideal for both small-scale projects and enterprise-level solutions.
In this Docker AWS tutorial, we will provide a step-by-step guide on deploying a Java application into a Docker container using AWS CI/CD pipeline. Additionally, we will discuss the significance of Docker as a core technology, highlight its benefits, and demonstrate how Docker Compose simplifies the management of multi-container applications.

Why We Chose AWS CI/CD
AWS’s ecosystem stands out for its seamless integration, scalability, and automation capabilities, making AWS Docker integration particularly powerful. Here's why it worked for us:
- Scalability: Services like EC2 automatically scale based on demand, ensuring cost efficiency and high availability.
- Seamless Integration: AWS services such as CodePipeline, CodeBuild, and CodeDeploy integrate seamlessly with tools like ECR, RDS, and ALB, ensuring a smooth and automated CI/CD pipeline AWS.
- Automation: Automating builds, tests, and deployments eliminated manual errors and saved valuable time.
Best Practices We Can Follow
- IAM Roles: Grant only the necessary permissions to ensure robust security.
- Resource Tagging: Makes cost tracking and resource identification more efficient.
- Cost Optimization: Periodically assess and optimize resource usage for better cost management.
Prerequisites
1 AWS Account
An active AWS account with necessary permissions.
2 EC2 Instance
An Amazon EC2 instance will serve as the deployment server. This instance should be running a supported operating system (e.g., Amazon Linux, Ubuntu).
3 IAM Roles
Create IAM roles with the appropriate permissions:
- CodeDeploy Role: This role allows CodeDeploy to interact with other AWS services on your behalf. It should have policies like
AWSCodeDeployRole.
- EC2 Instance Role: Attach this role to your EC2 instance to allow it to communicate with CodeDeploy and other AWS services. It should include permissions such as
AmazonS3ReadOnlyAccessandAWSCodeDeployFullAccess.
4 Source Control Repository
Set up a source control repository where your application code resides. This can be AWS CodeCommit, Gitlab, GitHub, or Bitbucket.
5 Amazon S3
A configured S3 bucket to store deployment artifacts, logs, or backup configurations.

Dockerizing an Applications
Containerization forms the foundation of our deployment strategy. Here's how we containerize applications with Docker:

- Defining a Dockerfile: Specify the steps required to create the application image. Below is a sample Dockerfile for a Java application:
# Use an official OpenJDK runtime as a parent image

FROM public.ecr.aws/docker/library/openjdk:17

# Set the working directory

WORKDIR /app

# Copy the application JAR file to the container

COPY target/java-app.jar /root/ROOT.jar

# Copy the entrypoint.sh to the container

COPY ./entrypoint.sh /sbin/

# Expose the application port

EXPOSE 8080

WORKDIR /root/

# Define the command to run the application

ENTRYPOINT /sbin/entrypoint.sh
Build the Docker Image:
docker build -t $IMAGE_REPO_NAME:$IMAGE_TAG .
Managing and Versioning Docker Images with Amazon ECR
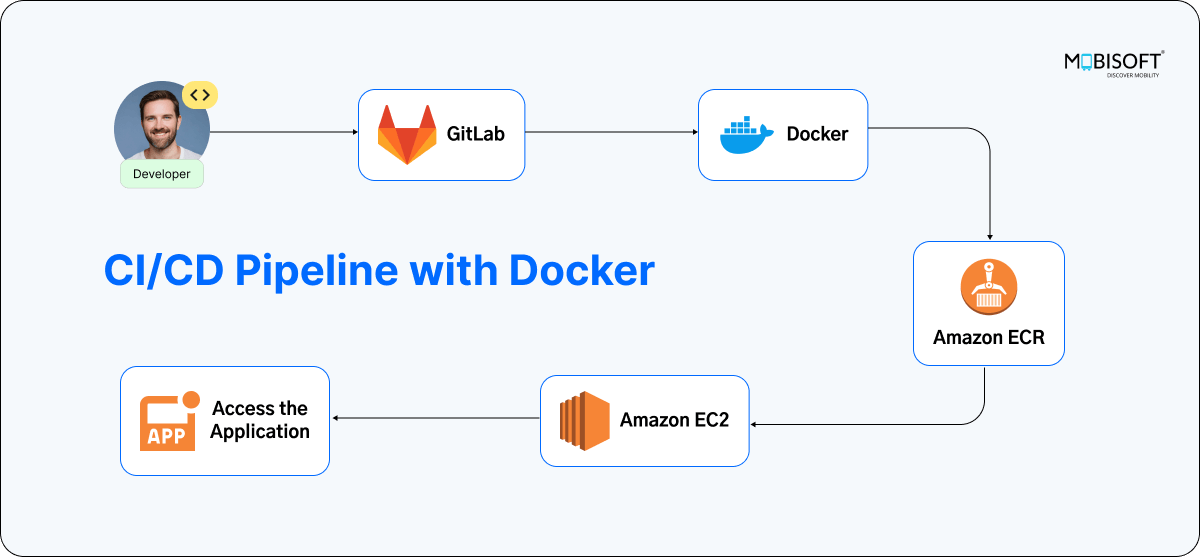
Amazon Elastic Container Registry (ECR) plays a crucial role in managing and versioning our Docker AWS integration.
Here’s how we do it:
Create a Repository in AWS ECR.

Using ECR ensures version control and simplifies deployments.
Automating Deployment with AWS CodePipeline
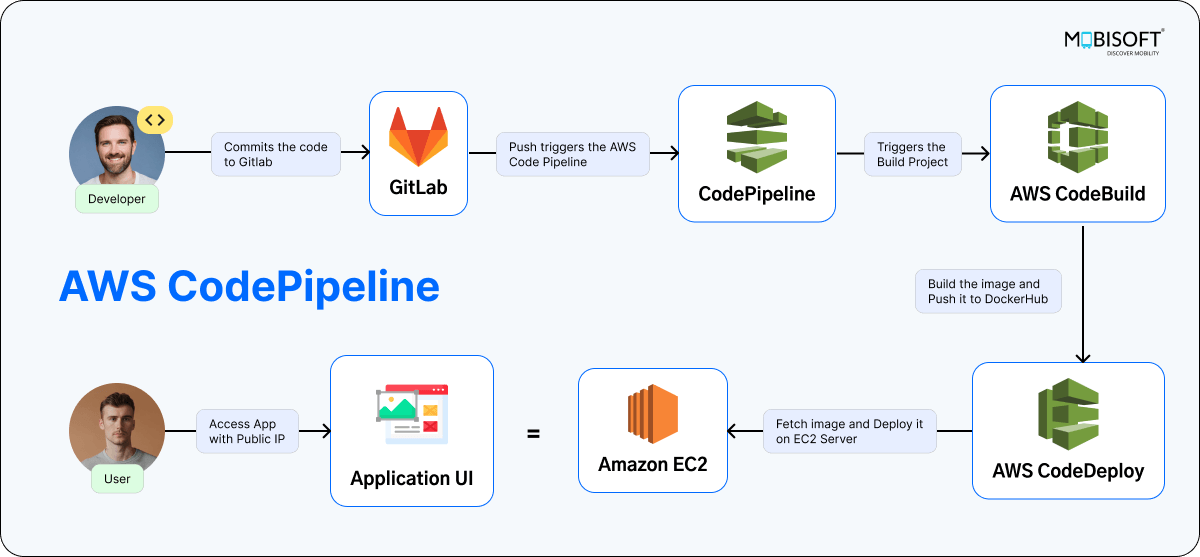
AWS CodePipeline manages the entire CI/CD pipeline AWS seamlessly. Here’s how we organized it:
- Source Stage: Retrieves the latest code from our GitLab, GitHub, or Bitbucket repository.
- Build Stage (CodeBuild): Generates the Docker image and uploads it to Amazon ECR, guided by the buildspec.yml configuration file.
BuildSpec File:
version: 0.2


phases:
  install:
    runtime-versions:
      java: corretto17 # Use Amazon Corretto 17 for Java
      docker: 20 # Use Docker for containerization
    commands:
      - echo "Installing dependencies..."
      - mvn clean install -DskipTests # Download Maven dependencies without running tests


  pre_build:
    commands:
      - echo "Pre-build phase started..."
      - echo "Logging in to Amazon ECR..."
      - aws ecr get-login-password --region $AWS_DEFAULT_REGION | docker login --username AWS --password-stdin $AWS_ACCOUNT_ID.dkr.ecr.$AWS_DEFAULT_REGION.amazonaws.com


  build:
    commands:
      - echo "Building the application..."
      - mvn package -DskipTests
      - echo "Building the Docker image..."
      - docker build -t $IMAGE_REPO_NAME:$IMAGE_TAG .
      - echo "Tagging the Docker image..."
      - docker tag $IMAGE_REPO_NAME:$IMAGE_TAG $AWS_ACCOUNT_ID.dkr.ecr.$AWS_DEFAULT_REGION.amazonaws.com/$IMAGE_REPO_NAME:$IMAGE_TAG


  post_build:
    commands:
      - echo "Pushing the Docker image to ECR..."
      - docker push $AWS_ACCOUNT_ID.dkr.ecr.$AWS_DEFAULT_REGION.amazonaws.com/$IMAGE_REPO_NAME:$IMAGE_TAG
      - echo "Build and push complete."


artifacts:
  files:
    - appspec.yml
    - scripts/install_dependencies.sh
    - scripts/configure_application.sh
    - scripts/start_application.sh
    - scripts/validate_service.sh
Configure Artifact Storage
Using Amazon S3 as an Artifact Repository. This is a key part of our Docker AWS tutorial for automating deployment workflows.
1 Setting Up the S3 Bucket:
- Access the S3 service in the AWS Management Console.
- Select Create Bucket and assign a unique name (e.g., projects-artifacts).
- Choose a region near your deployment target for reduced latency.
- Enable Versioning to maintain a history of all artifact versions.
2 Configuring Bucket Permissions:
Grant the necessary permissions to allow CodePipeline and CodeBuild to upload build artifacts seamlessly.
- Attach an IAM policy to the relevant roles:
{
  "Version": "2012-10-17",
  "Statement": [
    {
      "Effect": "Allow",
      "Action": [
        "s3:PutObject",
        "s3:GetObject",
        "s3:ListBucket"
      ],
      "Resource": [
        "arn:aws:s3:::project-artifacts",
        "arn:aws:s3:::project-artifacts/*"
      ]
    }
  ]
}
Deploy Stage:
The appspec.yml file defines deployment instructions:
AppSpec File:
version: 0.0
os: linux


files:
  - source: 'appspec.yml'
    destination: /path_of_your_desired_directory/
  - source: 'scripts/install_dependencies.sh'
    destination: /path_of_your_desired_directory/
  - source: 'scripts/configure_application.sh'
    destination: /path_of_your_desired_directory/
  - source: 'scripts/start_application.sh'
    destination: /path_of_your_desired_directory/
  - source: 'scripts/validate_service.sh'
    destination: /path_of_your_desired_directory/  # Replace with your desired directory


hooks:
  BeforeInstall:
    - location: scripts/install_dependencies.sh
      timeout: 300
      runas: root


  AfterInstall:
    - location: scripts/configure_application.sh
      timeout: 300
      runas: root


  ApplicationStart:
    - location: scripts/start_application.sh
      timeout: 300
      runas: root


  ValidateService:
    - location: scripts/validate_service.sh
      timeout: 300
      runas: root
CodeDeploy Agent:
Ensure that the CodeDeploy agent is installed and running on all Ubuntu server EC2 instances.
sudo apt update
sudo apt install ruby-full
sudo apt install wget
cd /home/ubuntu
wget https://bucket-name.s3.region-identifier.amazonaws.com/latest/install
chmod +x ./install
sudo ./install auto
systemctl status codedeploy-agent
systemctl start codedeploy-agent
CodeDeploy manages synchronized deployments and automatically rolls back changes if required.
Integrating with CodePipeline
- Go to AWS CodePipeline and create a new pipeline.
- In the Source Provider section, select your Git repository.
- Provide the repository URL and specify the branch you want to monitor.
- In the Build stage, set the artifact location to the previously created S3 bucket.
- In the Deploy stage, choose CodeDeploy as the deployment provider.
- Associate the CodeDeploy application with the corresponding deployment group.

Automating On-Premises Deployment with AWS CI/CD
For on-premises server, we need to follow the following steps as prerequisites
Step 1: Create an IAM user with the necessary permissions.
Step 2: Generate the codedeploy.onpremises.yml file to store the credentials.
⇒ vim /etc/codedeploy-agent/conf/codedeploy.onpremises.yml
Step 3: Register the IAM user with the on-premises instance:
⇒ aws deploy register-on-premises-instance --instance-name <InstanceName> --iam-user-arn <ARN> --region <Region>
⇒ aws deploy add-tags-to-on-premises-instances --instance-names <InstanceName> --tags Key=Name,Value=<Name> Key=Environment,Value=<Env>
Step 4: Use the following command to list the registered servers:
⇒ aws deploy list-on-premises-instances --region <regionname>
Note: These steps can be followed for configuring CodeBuild, CodeDeploy, and CodePipeline as well.
Managing and Securing Environment Variables
For sensitive information like database credentials, we utilize:
- AWS Secrets Manager: Provides secure storage for secrets such as passwords.
⇒ aws secretsmanager create-secret --name my-app/db-password --secret-string "mypassword"
Managing Rollbacks
AWS CodeDeploy streamlines the rollback process. If a deployment fails, it automatically reverts to the last stable version, minimizing downtime and ensuring a smooth continuous deployment with Docker.
Conclusion
Adopting AWS CI/CD has revolutionized our deployment process. By leveraging Docker containerization alongside AWS services like EC2, ECR, and CodePipeline, we've created an efficient, automated, and scalable system. This shift allows our team to prioritize innovation and deliver value, while AWS takes care of the complex tasks.
CI/CD with Docker and AWS are ideal solutions for modernizing deployment workflows. They drive automation and equip your team to deliver faster, more reliably, and at scale.


 January 16, 2025


