Implementing push notifications is a crucial feature for enhancing user engagement in modern mobile applications. In this comprehensive step-by-step guide, we’ll walk you through the process of integrating react native push notifications using Firebase Cloud Messaging (FCM). Whether you’re a seasoned developer or just starting, this guide will help you set up and configure FCM for your apps using React Native, ensuring reliable delivery of notifications and a seamless user experience. If you're building a cross-platform app, our react native app development expertise can streamline your project.
What Are Push Notifications in React Native?
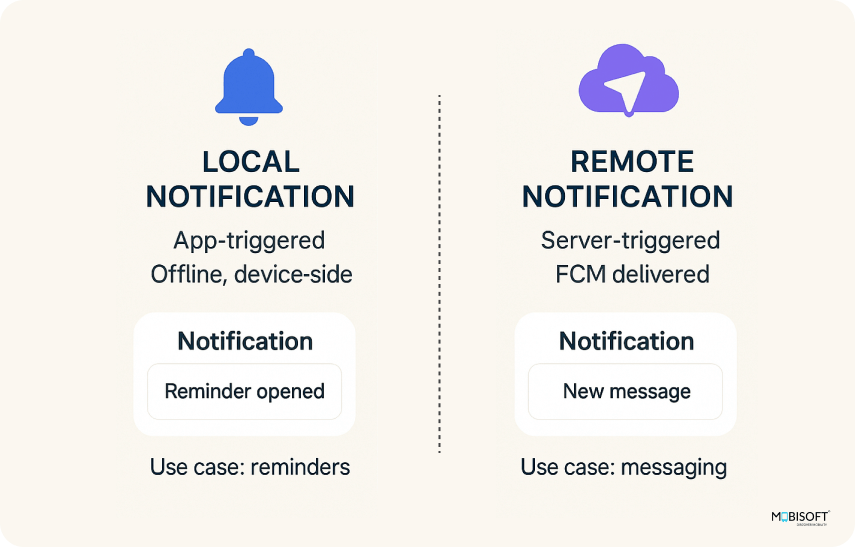
Firebase Cloud Messaging (FCM) is a free, cross-platform messaging solution from Google that enables app developers to send notifications and messages using React Native to users on Android, iOS, and web applications.
FCM allows developers to target messages to individual devices, groups of devices, or users subscribed to specific topics, making it a powerful tool for user engagement, retention, and real-time communication.
To use FCM, developers must set up a Firebase project, configure their app to use FCM, and implement client side and server side logic to send and receive push notifications in react native.
Why Use Firebase Cloud Messaging in React Native Apps?
Firebase Cloud Messaging (FCM) is widely used for react native push notifications in apps because it offers several key advantages:
- Free and Cross-Platform: FCM is a cost free service that supports both Android and iOS, allowing you to implement push notifications in react native across platforms with a single solution.
- Native Integration with React Native: The react native firebase messaging module provides a straightforward JavaScript API to interact with FCM, enabling seamless integration and native performance in react native notifications.
- Reliable and Efficient Delivery: FCM ensures reliable and battery efficient message delivery between your server and user devices, making it suitable for real-time communication and user engagement.
- Flexible Targeting and Personalization: You can target messages to individual devices, groups, or topics, and send both notification and data messages for personalized and dynamic user experiences.
- Advanced Features: FCM supports scheduling, custom data payloads, analytics integration, and A/B testing for optimizing notification campaigns without additional coding.
- Simplifies Complexity: FCM abstracts away the underlying differences between Apple and Google’s push notification systems in react native, letting you manage notifications from a unified platform.
- Scalability and Security: Built on Google’s infrastructure, FCM scales easily for apps with millions of users and provides secure message delivery.
These features make FCM a robust, flexible, and developer friendly choice for implementing react native firebase push notifications. For more technical details, refer to the official Firebase Cloud Messaging (FCM) Documentation.
Step 1. Step-by-Step Prerequisites for React Native Push Notification Setup
Below are the prerequisites for this react native push notifications tutorial:
1. A working React Native project
2. Node.js and npm
3. A Firebase Console account and a project created for your app.
4. An iOS or Android device
Step 2. How to Set Up Firebase Cloud Messaging for React Native
Here are very brief steps for setting up an FCM account, adding your app, and enabling Cloud Messaging:
- Create a Firebase Project:
Go to the Firebase Console, click "Add project," and follow the prompts to create a new project. - Add Your App to Firebase:
Inside your Firebase project, click "Add app" and select your platform (Android/iOS). Register your app by entering the package name or bundle ID. - Enable Cloud Messaging:
In the Firebase Console, navigate to Project Settings > Cloud Messaging. Cloud Messaging is enabled by default for new projects, but you can manage API access and server keys here if needed. - Download Config Files:
For Android: Download google-services.json.
For iOS: Download GoogleService-Info.plist.
For advanced cloud data syncing, consider firebase cloud firestore integration.
Step 3. Integrating Firebase Push Notifications in Android (React Native)
In this step, we will set up FCM for Android. First, download the ‘google-services.json’ file from the FCM console. And add it to the path ‘android/app’.
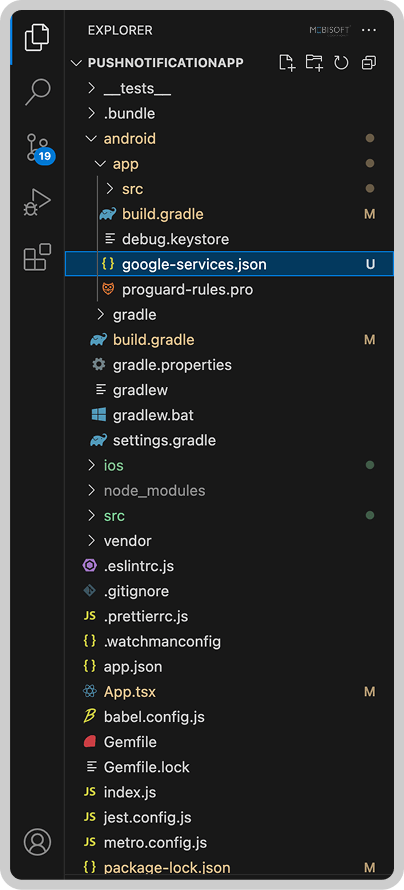
Now we will modify a few files to add the FCM SDK for the Android app.First, open the file in the path: ‘android/build.gradle’ and add one more line in the dependencies.
classpath("com.google.gms:google-services:4.4.2")
Next, open the file in path: `android/app/build.gradle` and scroll down to the dependencies section and add the following lines.
implementation platform('com.google.firebase:firebase-bom:33.1.1')
implementation 'com.google.firebase:firebase-analytics'
implementation 'com.google.firebase:firebase-analytics'
Now, add the following line at the bottom of the gradle file content.
apply plugin: "com.google.gms.google-services"
We have completed the modifications to the build.gradle files. The next step is to install the required packages.
Install the required Firebase libraries @react-native-firebase/app and @react-native-firebase/messaging for React Native.
Run below commands in the terminal
npm install @react-native-firebase/app
npm install @react-native-firebase/messaging
This completes the whole Android setup. In the next step, we will perform the iOS setup for push notifications and the FCM SDK.
Step 4. Integrating Firebase Push Notifications in iOS (React Native)
First, download the ‘GoogleService-Info.plist’ file from the FCM console. And add it to the root directory of the iOS project in Xcode. The react native project explorer should look like this.
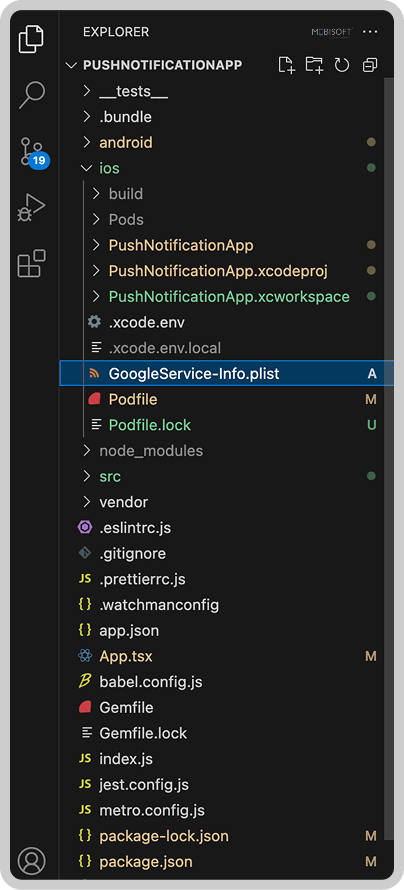
Enable Push Notifications and Background Modes (Remote Notifications) in the application's Xcode project capabilities.
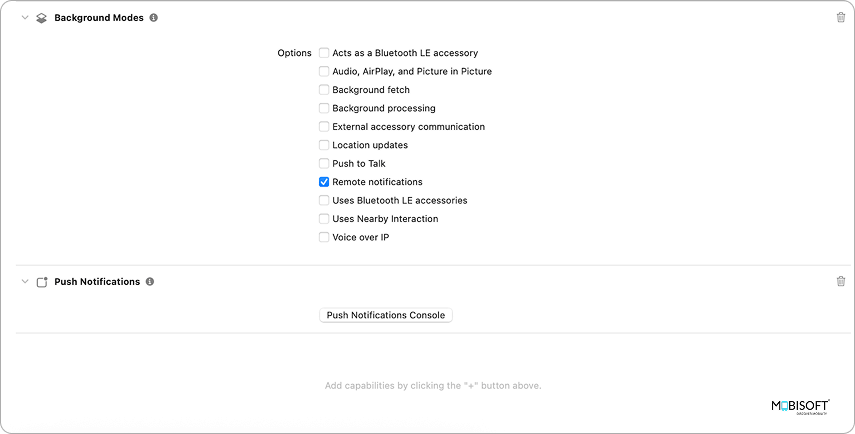
Open the AppDelegate file. Add the FirebaseCore SDK in the import section.
import FirebaseCore
Then, initialize the Firebase SDK in the ‘didFinishLaunchingWithOptions’ method. Add the below line at the start of the method.
FirebaseApp.configure()
After this step, we have successfully set up react native push notifications for the iOS application.
Step 5. Create FCM Service File for Handling React Native Notifications
In this step, we will write a service file for push notifications handling methods.Let's create a folder ‘src/services’ in the root directory of the project. Now, create a new file ‘fcmService.ts’ in this folder structure. And write down the code below in this file.
import messaging, { type FirebaseMessagingTypes } from '@react-native-firebase/messaging';
import {Alert} from 'react-native';

#1
async function requestUserPermission(): Promise<void> {
 const authStatus = await messaging().requestPermission();
 const enabled =
   authStatus === messaging.AuthorizationStatus.AUTHORIZED ||
   authStatus === messaging.AuthorizationStatus.PROVISIONAL;

 if (enabled) {
   console.log('Authorization status:', authStatus);
 }
}

#2
export async function getFCMToken(): Promise<void> {
 const fcmToken = await messaging().getToken();
 if (fcmToken) {
   console.log(fcmToken);
 } else {
   console.log('Failed', 'No token received');
 }
}

#3
// Foreground Notifications: When the application is opened and in view.
messaging().onMessage(async (remoteMessage: FirebaseMessagingTypes.RemoteMessage) => {
 Alert.alert('A new FCM Message arrived!!!', JSON.stringify(remoteMessage));
});

// Background Notifications: When the application is open, however in the background (minimised).
messaging().setBackgroundMessageHandler(async (remoteMessage: FirebaseMessagingTypes.RemoteMessage) => {
 console.log('Message handled in the background!!!', remoteMessage);
});

export default requestUserPermission;
- Firstly, we have created an async function
‘requestUserPermission()’to request notification permissions from the user. Then‘authStatus’will store the result of the permission request. - Next, we created a function
‘getFCMToken()’to generate the FCM device token. - Then we have added some listeners when the push notification is received, and are handling them.
Step 6. Initialize Push Notifications in the App.tsx (React Native Setup)
In this last step, we will consume the service methods to initialize the FCM SDK and generate the FCM device token. Use the below code in your App.tsx file.
import requestUserPermission, { getFCMToken } from './src/service/fcmService';
import messaging from '@react-native-firebase/messaging';
...
useEffect(() => {
   requestUserPermission();
   getFCMToken();

   messaging()
     .getInitialNotification()
     .then(remoteMsg => {
       if (remoteMsg)
         console.log(remoteMsg);
     });

   const unsubscribe = messaging().onMessage(async remoteMessage => {
   });

   return unsubscribe;
 }, []);
Ensure that both the `requestUserPermission` and `getFCMToken` methods are imported into `App.tsx`. Subsequently, call these methods within the `useEffect` hook, alongside the `initialNotification` method. The ‘onMessage’ function sets up a listener for incoming foreground push notifications and returns an unsubscribe function to remove the listener when it's no longer needed.
With this step, we have finished setting up push notification implementation using the FCM SDK.
Need help building or scaling your app? hire react native developers with proven experience in push notification integration.
Step 7. Testing Firebase Push Notifications in React Native via Console
Next, we will move to the FCM console. We will send a test notification from the FCM console to our application. Once you fill out the notification form, you will be asked for the FCM token. You can see that in the ‘fcmService.js’ file, we have already logged the generated FCM token within the ‘getFCMToken()‘ method. Grab this token from the debug terminal and paste it into the FCM token input and hit the ‘Test’ button. You will receive the push notification.
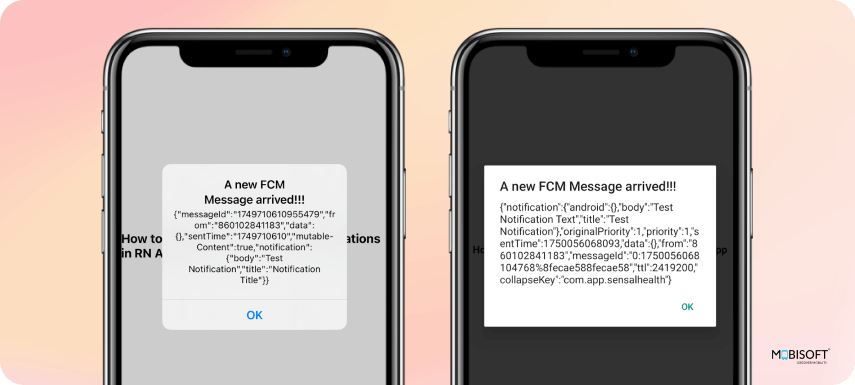
If your app is in the foreground, you will see something like below.
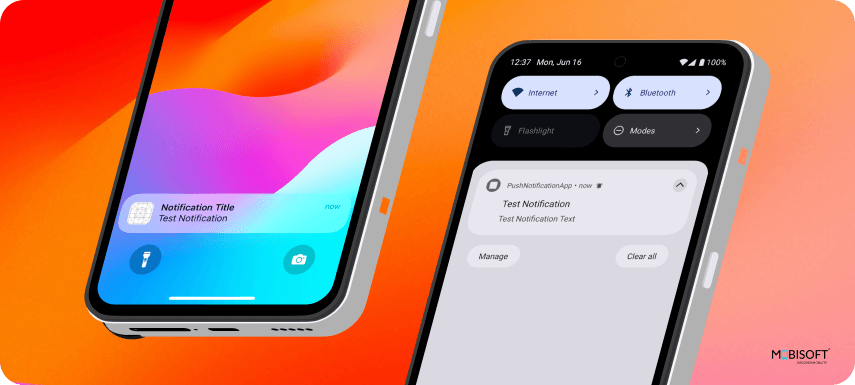
If your app is in the background/suspended state, you will see the notification like this.
Conclusion: Best Practices for React Native Push Notifications Integration
Congratulations on successfully integrating react native push notifications using Firebase! By following the steps detailed in the guide, you should now be able to effectively send and receive push notifications. This will be a valuable tool for keeping your users engaged and well informed.
For businesses aiming to enhance digital experiences, our mobile app development services cover complete backend and notification implementation.
We hope this react native push notifications tutorial helps you implement push notifications using FCM in your apps. You’ve now completed the full react native push notification setup. For more insights on budgeting your build, check out our guide on mobile app development cost. To view the react native push notifications example code, download the source from our GitHub repository.
Note: Before running the application, make sure to add the google-services.json file to the Android project and the GoogleServices-Info.plist file to the iOS project.




 June 19, 2025


