Application execution is at the core of what makes the user experience in Flutter. Flutter runs on a single-threaded event loop, alternating between UI rendering and business logic, and thus is efficient and reactive.
But when computationally intensive work interferes with this event loop, it creates performance problems such as UI freeze, commonly known as UI Jank or stuttering. This is where isolates in Flutter are a lifesaver. By breaking down heavy work into isolates, we can ensure that the UI stays responsive and smooth.
Here we will explore the WHAT, WHY, and HOW of Isolates.
What Are Dart Isolates in Flutter?
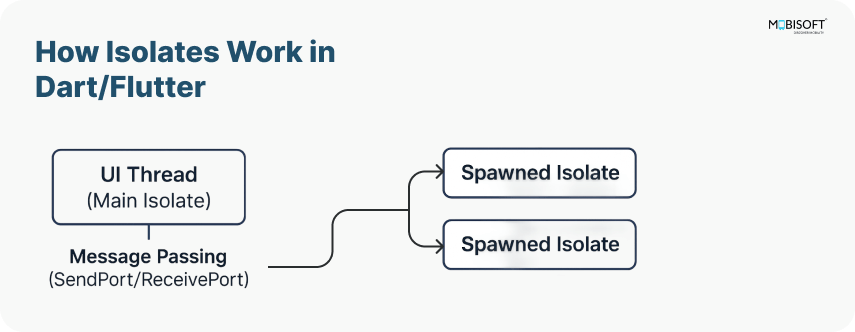
An Isolate in Flutter is an independent worker thread that runs concurrently with the main thread, that is, the UI thread. As the name indicates, Dart isolates functions independently of one another. Isolates do not share memory, unlike threads in languages such as C++ or Java. Each isolate has its memory and its event loop. The only way to communicate between isolates is through ports, which are established during the isolate’s creation using dart isolate communication mechanisms.
Why Use Flutter Isolates for Performance Optimization?
Non-blocking Operations
Flutter concurrency becomes essential in improving performance. Isolates allow you to run tasks in parallel without blocking the main UI thread, making your app more responsive.
Heavy Computations
Tasks such as complex algorithms or processing large files can be offloaded to an isolate. This is especially useful when you need to isolate heavy computation in Flutter and prevent UI lag.
Concurrency
If your app needs to perform multiple tasks concurrently, like handling background tasks, downloading files, and processing data, Flutter concurrency isolates can be an effective tool.
Leveraging the right isolation strategy can drastically improve responsiveness and resource efficiency in production-grade apps. As a Flutter app development company, we specialize in performance optimization using isolates.

How Flutter Background Processing Works with Isolates
The core of Flutter is centered on the user interface and its related work. But if you try to run a heavy operation, download a file, decode a video, or work with a huge file on this thread, it will slow down the flow and lock the app in place. To avoid this, Flutter background processing using isolates offers a structured way to move these tasks off the UI thread.

Flutter Isolate Life Cycle and Best Practices
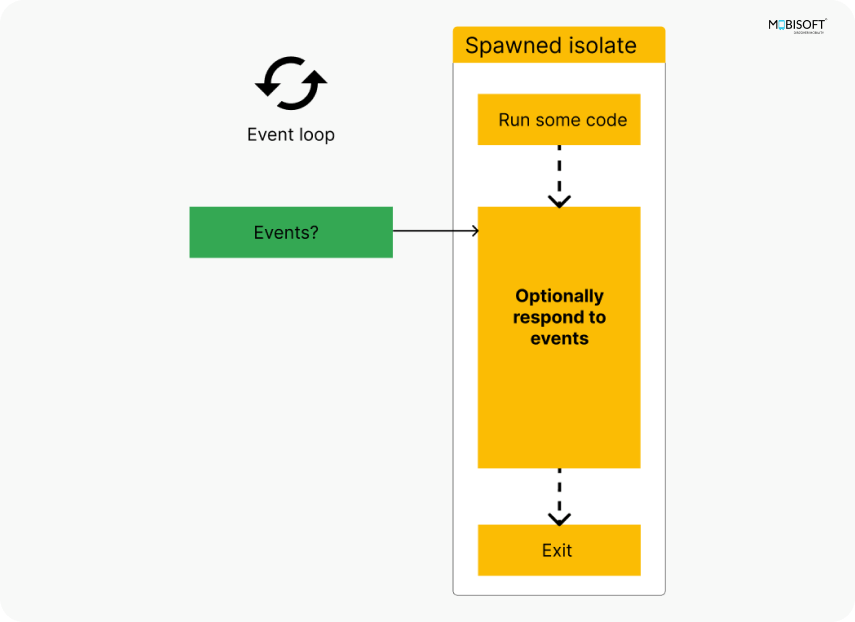
Let’s check the Flutter isolate life cycle.
As the following figure shows, every isolate starts by running some Dart code, such as the main() function. This Dart code might register some event listeners to respond to user input or file I/O. When the isolate’s initial function returns, the isolate stays around if it needs to handle events. After handling the events, the isolate exits. Following Flutter isolate best practices, you can manage this cycle efficiently to optimize system resources.

Key Concepts in Isolate Flutter Implementation
The following are the key concepts in isolate Flutter implementation:
- Main Isolate: This is where your Flutter app runs, managing UI rendering and user input.
- Worker Isolates: These are separate threads where heavy tasks can be offloaded.
- Ports: These are communication channels used to send and receive messages between Isolates.
Flutter Isolates Tutorial: Creating and Using Isolates
In our code, we’ve added a GIF in the UI to demonstrate that while the processing is going on, the UI does not freeze. This is a great way to showcase compute Flutter vs isolates in real-time and understand when to use one over the other.
The simplest way to use an isolate is to spawn one using the Isolate.spawn() method. This method takes two parameters:
1. A function that you want to run in the new Isolate.
2. A message that will get passed to the Isolate.
This example falls under one of the key Flutter isolate use cases and demonstrates why to use isolates in Flutter to handle performance-critical features.
Isolates are powerful for performance optimization, especially when managing compute-heavy operations in real-time applications. Need expert help to implement Flutter isolates? Hire our Flutter developers.
Example 1: Flutter Isolate Use Case: Heavy Calculation

import 'dart:isolate';
import 'package:flutter/material.dart';

class CalculationExample extends StatefulWidget {
 const CalculationExample({super.key});

 @override
 State<CalculationExample> createState() => _CalculationExampleState();
}

class _CalculationExampleState extends State<CalculationExample> {
 late String _result = '';

 void _startHeavyCalculation() async {
   final receivePort = ReceivePort();
   await Isolate.spawn(calculateSum, receivePort.sendPort);


   final result = await receivePort.first;
   setState(() {
     _result = 'Sum is $result';
   });
 }

 @override
 Widget build(BuildContext context) {
   return Scaffold(
     appBar: AppBar(title: Text('Heavy Calculation')),
     body: Center(
       child: Column(
         mainAxisAlignment: MainAxisAlignment.center,
         children: [
           Image.asset("assets/samples/sun.gif"),
           ElevatedButton(
             onPressed: _startHeavyCalculation,
             child: Text('Start Heavy Calculation'),
           ),
           SizedBox(height: 30),
           Text(_result),
         ],
       ),
     ),
   );
 }
}

void calculateSum(SendPort sendPort) {
 int sum = 0;
 for (int i = 1; i <= 1000000000; i++) {
   sum += i;
 }
 sendPort.send(sum);
}
Code Explanation:
In the above code, a variable _result is declared to store the result of heavy computation and to show on UI.
On tapping the button titled 'Start Heavy Calculation', the function _startHeavyCalculation is called.
void _startHeavyCalculation() async {
   final receivePort = ReceivePort();
   await Isolate.spawn(calculateSum, receivePort.sendPort);

   final result = await receivePort.first;
   setState(() {
     _result = 'Sum is $result';
   });
 }
Here first ReceivePort is created to receive messages from the Isolate.
- Then the
Isolate.spawnmethod spawns(starts) a new Isolate passing the functioncalculateSumandsendPortfrom theReceivePortas arguments. - The
calculateSumfunction performs the main computation and uses the provided port to send back the result to update the UI.
void calculateSum(SendPort sendPort) {
 int sum = 0;
 for (int i = 1; i <= 1000000000; i++) {
   sum += i;
 }
 sendPort.send(sum);
}
After the computation is complete, the result is sent back through the SendPort to the main isolate. The UI is updated with the result.
In the whole process, the UI does not get stuck, as the heavy lifting of computation is offloaded to the Flutter isolate.
Note that the function calculateSum is defined outside the widget class as a top-level function because only top-level or static functions can be spawned in isolates.
This was a simple example of how to use isolates in Flutter and how they work, where the calculation was done in a separate isolate and the result was sent back to the main thread.
Now let’s increase the level and check a real-world example that involves Flutter background processing.
Let’s perform an asynchronous task of reading and processing a file.
Example 2: Reading Text Files
import 'dart:isolate';
import 'package:flutter/material.dart';
import 'package:flutter/services.dart';

class ReadFileExample extends StatefulWidget {
 const ReadFileExample({super.key});
 @override
 ReadFileExampleState createState() => ReadFileExampleState();
}

class ReadFileExampleState extends State<ReadFileExample> {
 String _processedData = "File processing";

 Future<void> createIsolate() async {
   final receivePort = ReceivePort();

   await Isolate.spawn(
     _readFileIsolate,
     receivePort.sendPort,
   );

   final sendPort = await receivePort.first as SendPort;
   final answerPort = ReceivePort();
   String textData = await _loadAssetTextFile();
   sendPort.send([textData, answerPort.sendPort]);
   final result = await answerPort.first;
   setState(() {
     _processedData = result as String;
   });
 }

 Future<String> _loadAssetTextFile() async {
   String data =
       await rootBundle.loadString('assets/samples/sampleText.txt');
   return data;
 }

 static void _readFileIsolate(SendPort mainSendPort) async {
   final port = ReceivePort();
   mainSendPort.send(port.sendPort);
   await for (final message in port) {
     final String textData = message[0];
     final SendPort replyTo = message[1];
     String content = textData.toUpperCase();
     replyTo.send(content);
   }
 }

 @override
 Widget build(BuildContext context) {
   return Scaffold(
     appBar: AppBar(title: Text('Read File')),
     body: Center(
       child: Padding(
         padding: const EdgeInsets.all(20.0),
         child: Column(
           mainAxisAlignment: MainAxisAlignment.center,
           children: [
             Image.asset("assets/samples/sun.gif"),
             Expanded(
               child: SingleChildScrollView(
                 scrollDirection: Axis.vertical,
                 child: Text(
                   _processedData,
                   textAlign: TextAlign.center,
                   style: TextStyle(fontSize: 18),
                 ),
               ),
             ),
             SizedBox(height: 20),
             ElevatedButton(
               onPressed: createIsolate,
               child: Text('Start Text Processing'),
             ),
           ],
         ),
       ),
     ),
   );
 }
}
Code Explanation:
In this example, we are calling the createIsolate function on the tap of the “Start Text Processing” button.
Future<void> createIsolate() async {
   final receivePort = ReceivePort();

   await Isolate.spawn(
     _readFileIsolate,
     receivePort.sendPort,
   );

   final sendPort = await receivePort.first as SendPort;
   final answerPort = ReceivePort();
   String textData = await _loadAssetTextFile();
   sendPort.send([textData, answerPort.sendPort]);
   final result = await answerPort.first;
   setState(() {
     _processedData = result as String;
   });
 }
This function creates a ReceivePort for communication that is, to get messages from the isolate.
Then it spawns an isolate to process the file and waits for the isolate to send back its send port so that the main app can send its data.
Reading the asset file itself must be done in the main isolate. We can offload heavy parsing or processing to the isolate.
So, the data in the file is loaded into textData using _loadAssetTextFile.
Future<String> _loadAssetTextFile() async {
   String data =
       await rootBundle.loadString('assets/samples/sampleText.txt');
   return data;
 }
Then this textData is sent with a port to the isolate for processing and waits for the result, and when received, updates the UI.
Following is the isolate function that processes the data and sends back the result.
static void _readFileIsolate(SendPort mainSendPort) async {
   final port = ReceivePort();
   mainSendPort.send(port.sendPort);
   await for (final message in port) {
     final String textData = message[0];
     final SendPort replyTo = message[1];
     String content = textData.toUpperCase();
     replyTo.send(content);
   }
 }
This function creates its port to receive messages from the main app, sends its port back to the main app, and waits for the text data and a port to reply to.
On receiving the textData, it processes the text here, makes it uppercase, and sends the result back to the main app.
In this whole process, you can observe that the GIF does not get stuck or frozen, reinforcing the performance benefit of using isolates in Flutter for background processing.
Here, the isolate reads a file asynchronously and sends the content back to the main isolate. This ensures the main thread is not blocked by the I/O operation. This is an effective demonstration of flutter concurrency tutorial practices.
Isolates are especially helpful for asynchronous tasks like text parsing or scanning data in the background.
Learn how to build Flutter apps with BLE? We've got you covered! Check out our blog for practical tips and code examples.
Example 3: Isolate Performance in Flutter: Downloading and Displaying Images
import 'dart:isolate';
import 'dart:typed_data';
import 'package:flutter/material.dart';
import 'package:http/http.dart' as http;

class DownloadImageExample extends StatefulWidget {
 const DownloadImageExample({super.key});

 @override
 State<DownloadImageExample> createState() => DownloadImageExampleState();
}

class DownloadImageExampleState extends State<DownloadImageExample> {
 Uint8List? imageBytes;
 bool isProcessing = false;

 Future<void> downloadImageInIsolate(String url) async {
   setState(() => isProcessing = true);

   final receivePort = ReceivePort();

   await Isolate.spawn(_downloadImage, [url, receivePort.sendPort]);

   imageBytes = await receivePort.first as Uint8List?;

   setState(() => isProcessing = false);
 }

 static Future<void> _downloadImage(List<dynamic> args) async {
   final String url = args[0];
   final SendPort sendPort = args[1];

   final response = await http.get(Uri.parse(url));
   if (response.statusCode == 200) {
     sendPort.send(response.bodyBytes);
   } else {
     sendPort.send(null);
   }
 }

 @override
 void initState() {
   // TODO: implement initState
   super.initState();
   downloadImageInIsolate(
       'https://cdn.pixabay.com/photo/2023/11/16/05/02/mountains-8391433_640.jpg');
 }

 @override
 Widget build(BuildContext context) {
   return Scaffold(
     appBar: AppBar(
       title: Text('Image Downloading and Display'),
     ),
     body: Center(
       child: Column(
         mainAxisAlignment: MainAxisAlignment.center,
         children: [
           Image.asset("assets/samples/sun.gif"),
           isProcessing
               ? const CircularProgressIndicator()
               : imageBytes != null
                   ? Image.memory(imageBytes!)
                   : const Text('Failed to load image'),
         ],
       ),
     ),
   );
 }
}
Code Explanation:
In the above code, the state class DownloadImageExampleState manages the downloaded image data and the processing state. It stores the isProcessing flag to indicate if the download is in progress.
Also, it stores the downloaded image data as bytes in imageBytes. The downloadImageInIsolate function is called in the initState to initiate the downloading.
Let's check the downloadImageInIsolate function.
Future<void> downloadImageInIsolate(String url) async {
   setState(() => isProcessing = true);

   final receivePort = ReceivePort();

   await Isolate.spawn(_downloadImage, [url, receivePort.sendPort]);

   imageBytes = await receivePort.first as Uint8List?;

   setState(() => isProcessing = false);
 }
In this function, an isolate is spawned to start the image-downloading process. First, it sets isProcessing to true, which triggers a UI update to show a loading indicator. Then, a ReceivePort is created to receive messages from the spawned isolate.
Isolate.spawn spawns a new isolate running the _downloadImage function, passing it the image URL and the send port for communication.
After spawning the isolate, the main isolate waits for the first message on the receive port, which will be the downloaded image data or null if the downloading fails. Once the image data is received, isProcessing is set to false, updating the UI to show either the downloaded image or a failure message. This flow highlights isolated performance in Flutter and ensures smooth UI updates.
Now let's see the function that runs in isolate.
static Future<void> _downloadImage(List<dynamic> args) async {
   final String url = args[0];
   final SendPort sendPort = args[1];

   final response = await http.get(Uri.parse(url));
   if (response.statusCode == 200) {
     sendPort.send(response.bodyBytes);
   } else {
     sendPort.send(null);
   }
 }
It takes the image URL and the send port for sending the data back to the main isolate . This function makes an HTTP request to download the image from the URL. If the request is successful, it sends the image bytes back to the main isolate via the send port. If the download fails, it sends null. As this function runs in parallel with the main thread, you can observe that the UI does not get frozen anywhere. This use case is a strong example of why use isolates in Flutter when network operations are involved.
Now let's see how to handle errors that occur in the background, isolate by listening on separate error ports.
Example 4: Dart Isolate Communication & Error Handling in Flutter
import 'dart:isolate';
import 'package:flutter/material.dart';

class ErrorHandlingExample extends StatefulWidget {
 const ErrorHandlingExample({super.key});
 @override
 ErrorHandlingExampleState createState() => ErrorHandlingExampleState();
}
class ErrorHandlingExampleState extends State<ErrorHandlingExample> {
 String _result = '';
 Future<void> _runWithError() async {
   final receivePort = ReceivePort();
   final errorPort = ReceivePort();
   await Isolate.spawn(
     _errorProneIsolate,
     receivePort.sendPort,
     onError: errorPort.sendPort,
   );
   final sendPort = await receivePort.first as SendPort;
   final answerPort = ReceivePort();
   sendPort.send([answerPort.sendPort]);
   errorPort.listen((error) {
     setState(() {
       _result = 'Error: ${error.toString()}';
     });
   });
   try {
     final result = await answerPort.first;
     setState(() {
       _result = 'Result: $result';
     });
   } catch (e) {
     setState(() {
       _result = 'Caught error: $e';
     });
   }
 }

 static void _errorProneIsolate(SendPort mainSendPort) async {
   final port = ReceivePort();
   mainSendPort.send(port.sendPort);
   await for (final message in port) {
     final SendPort replyTo = message[0];
     throw Exception('Something went wrong in the isolate');
   }
 }

 @override
 Widget build(BuildContext context) {
   return Scaffold(
     appBar: AppBar(title: Text('Error Handling in Isolate')),
     body: Center(
       child: Column(
         mainAxisAlignment: MainAxisAlignment.center,
         children: [
           Image.asset("assets/samples/sun.gif"),
           ElevatedButton(
             onPressed: _runWithError,
             child: Text('Run with Error'),
           ),
           SizedBox(height: 20),
           Text(_result),
         ],
       ),
     ),
   );
 }
}
Code Explanation:
In the above code, when the button titled “Run with Error” is tapped _runWithError function is called, triggering the isolate operation. In the UI, the _result variable is used to display either the result of the operation or the error message.
Check the _runWithError function.
Future<void> _runWithError() async {
   final receivePort = ReceivePort();
   final errorPort = ReceivePort();
   await Isolate.spawn(
     _errorProneIsolate,
     receivePort.sendPort,
     onError: errorPort.sendPort,
   );
   final sendPort = await receivePort.first as SendPort;
   final answerPort = ReceivePort();
   sendPort.send([answerPort.sendPort]);
   errorPort.listen((error) {
     setState(() {
       _result = 'Error: ${error.toString()}';
     });
   });
   try {
     final result = await answerPort.first;
     setState(() {
       _result = 'Result: $result';
     });
   } catch (e) {
     setState(() {
       _result = 'Caught error: $e';
     });
   }
 }
In this function, two ReceivePort objects are created, namely, receivePort and errorPort. These ports are used for communication between the main isolate and the newly spawned isolate using the Isolate.spawn method, which runs in the background. The receivePort.sendPort is passed as an initial message and specifies errorPort.sendPort as the destination for any errors that occur.
After spawning the isolate, it waits for the first message from receivePort, which is expected to be a SendPort from the new isolate. This port enables bidirectional communication through dart isolate communication.
The code then creates another ReceivePort called answerPort and sends its SendPort to the new isolate so that the isolate can send messages back to the main isolate.
The errorPort is set to listen for errors. If an error occurs in the background isolate, the main isolate receives the error message and updates the UI to display the error by calling setState and setting _result to the error message.
The code then tries to await the first message from answerPort, which will be the result of the background isolate. If the operation completes successfully, it updates the UI with the result. If an error is caught or if the background isolate throws an exception, it updates the UI to show the error message. This robust handling is a good reference point for developers seeking flutter isolates tutorial material.
Now let's check the background isolate function _errorProneIsolate.
static void _errorProneIsolate(SendPort mainSendPort) async {
   final port = ReceivePort();
   mainSendPort.send(port.sendPort);
   await for (final message in port) {
     final SendPort replyTo = message[0];
     throw Exception('Something went wrong in the isolate');
   }
 }
This function receives a SendPort as an argument, which is the port from the main isolate. This is a setup for communication.
In this function, a new ReceivePort is created, and its SendPort is sent back to the main isolate to allow the main isolate to send a message to the background isolate. Then this function listens for messages using await for.
For each message received, it extracts the SendPort, where it is supposed to send the result, and then deliberately throws an exception, “Something went wrong in the isolate.” This simulates an error occurring in the background isolate, which is caught and sent back to the main isolate through the error port specified in the Isolate.spawn call.
You can see in this whole process that the GIF active on the screen does not get frozen, as the primary UI thread does not get blocked.
For apps with real-time data flow, isolates can help maintain UI responsiveness and stability. For real-time data like WebSockets, isolates can improve responsiveness.
Summary: Why Use Isolates in Flutter?
Keeping the UI responsive and entrusting work to the isolated areas, where all the rigorous processing is done, will help one have a fluent user experience, as shown in all the examples above.
Leveraging isolates in Flutter, whether for file operations, image downloads, or error handling, enables smooth processing.
To explore the complete code implementation of these examples, you can refer to the GitHub repository.


 July 9, 2025


