In Part 1, we introduced the integration of Flutter modules in your iOS app. Now, in part 2, we’re ready to take the next step in your Flutter app development journey. We will implement a simple demo Android application that will feature a few screens designed in Flutter. Our goal is to seamlessly embed the Flutter module into our Android app as an Android Archive (AAR).
If you haven't already created a Flutter module, it's crucial to follow the initial two steps outlined in our Part 1 series. This will provide the foundation for the integration we're about to discuss.
In this blog post, we will be focusing on the heart of the matter - Integrating a Flutter module into your Android project. So let’s get started.
Step 1: Generate Android Archive from the Flutter Module
The Flutter documentation explains that there are a couple of ways to add the Flutter module as a dependency of your existing app in Gradle. However, we'll be focusing on Option 1 mentioned there, which is called "Android Archive".
Before generating the Android Archive, we need to make sure that we have defined an entry point function to be invoked by the native app.
In our main.dart file located under mi_flutter_module/lib folder, add the following entry point function. This function will be called from the Android app.
@pragma("vm:entry-point")
void loadFromNative() async {
WidgetsFlutterBinding.ensureInitialized();
runApp(const MyApp());
}
To generate the Android Archive (AAR), run the following command in your mi_flutter_module directory. This command will generate 3 frameworks for Debug, Profile, and Release.
flutter build aarStep 2: Configuring and Integrating Android Archive (AAR) in Android Project
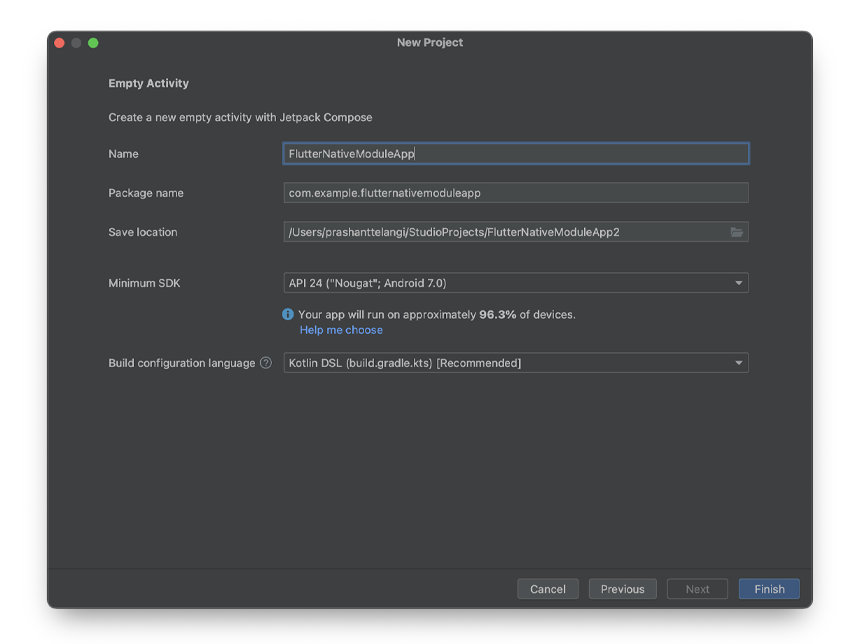
- Create an Android application and make sure the Build Configuration language is Kotlin DSL (build.gradle.kts)

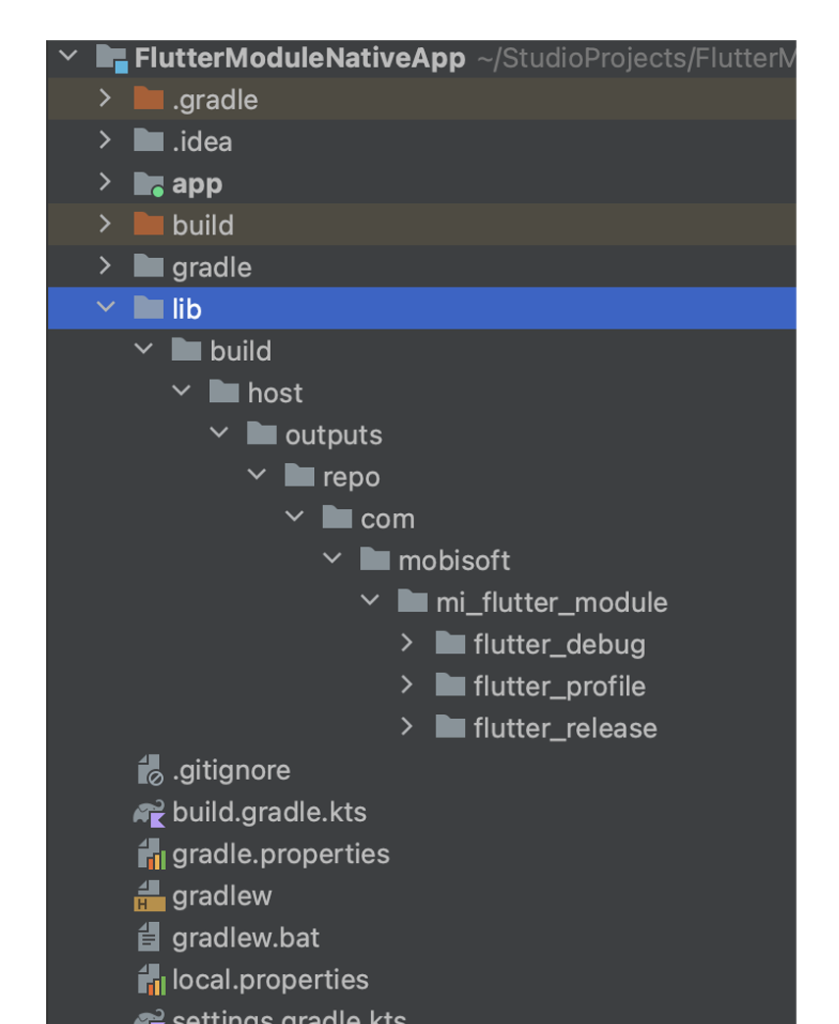
- Create a lib folder in your Android project directory. After that copy and paste your AAR directory inside it.

Note: Please make sure the folder structure of the AAR library should be lib/build/host/.. for the host app to find these files.
- Ensure you have the repositories configured for the host app to find the AAR files and add the following code to app level build.gradle (<host>/app/build.gradle)
repositories{
    val storageUrl = System.getenv("FLUTTER_STORAGE_BASE_URL") ?: "https://storage.googleapis.com"
    repositories {
        google()
        mavenCentral()
        maven {
            setUrl("../lib/build/host/outputs/repo")
        }
        maven {
            setUrl("$storageUrl/download.flutter.io")
        }
    }
}


dependencies {
  debugImplementation ("com.mobisoft.mi_flutter_module:flutter_debug:1.0")
  profileImplementation ("com.mobisoft.mi_flutter_module:flutter_profile:1.0")
  releaseImplementation ("com.mobisoft.mi_flutter_module:flutter_release:1.0")
}
- Update the settings.gradle.kts file dependencyResolutionManagement to fix the compile issue.
dependencyResolutionManagement {
    repositories {
        google()
        mavenCentral()
        maven { url = uri("jitpack.io") }
    }
}
If all the steps for generating the AAR and configuring the gradle and settings files are correct, you should be able to build the project successfully.
Step 3: Open the Flutter View
To initiate a Flutter screen from an existing Android interface, we'll use the FlutterEngine.
- Create an instance of the Flutter Engine in the MainActivity class.
package com.example.fluttermodulenativeapp
import io.flutter.embedding.android.FlutterActivity
import io.flutter.embedding.engine.FlutterEngine
import io.flutter.embedding.engine.FlutterEngineCache
import io.flutter.embedding.engine.dart.DartExecutor


const val FLUTTER_ENGINE_NAME = "mi_flutter_engine"


class MainActivity : ComponentActivity() {
    override fun onCreate(savedInstanceState: Bundle?) {
        super.onCreate(savedInstanceState)
        val flutterEngine = FlutterEngine(this)
        flutterEngine.dartExecutor.executeDartEntrypoint(
            DartExecutor.DartEntrypoint.createDefault()
        )
        FlutterEngineCache.getInstance().put(FLUTTER_ENGINE_NAME, flutterEngine)


       ...
    }
}


val flutterEngine = FlutterEngine(this)
This line creates a new instance of a Flutter Engine named flutterEngine. A Flutter Engine is responsible for running Flutter code within an Android application.
flutterEngine.dartExecutor.executeDartEntrypoint(DartExecutor.DartEntrypoint.createDefault())
This line of code sets up the Flutter Engine to execute the default Dart entry point. It starts running the Flutter code within the engine effectively.
FlutterEngineCache.getInstance().put(FLUTTER_ENGINE_NAME, flutterEngine)This line stores the flutterEngine instance in the FlutterEngineCache with the name defined by FLUTTER_ENGINE_NAME. It is used for caching and managing Flutter engines within the application.
- Add the below-mentioned activity tag in your AndroidManifest.xml file:
 <activity
  android:name="io.flutter.embedding.android.FlutterActivity"
  android:configChanges="orientation|keyboardHidden|keyboard|screenSize|locale|layoutDirection|fontScale|screenLayout|density|uiMode"
  android:hardwareAccelerated="true"
  android:windowSoftInputMode="adjustResize"
/>
The <activity> element we have provided is configuring an Android activity named FlutterActivity from the Flutter framework. It specifies how this activity should handle certain configuration changes, enables hardware acceleration for improved graphics performance, and sets the soft input mode to adjust the window size when the soft keyboard is displayed. These settings are commonly employed when integrating Flutter-based UI components into an Android app.
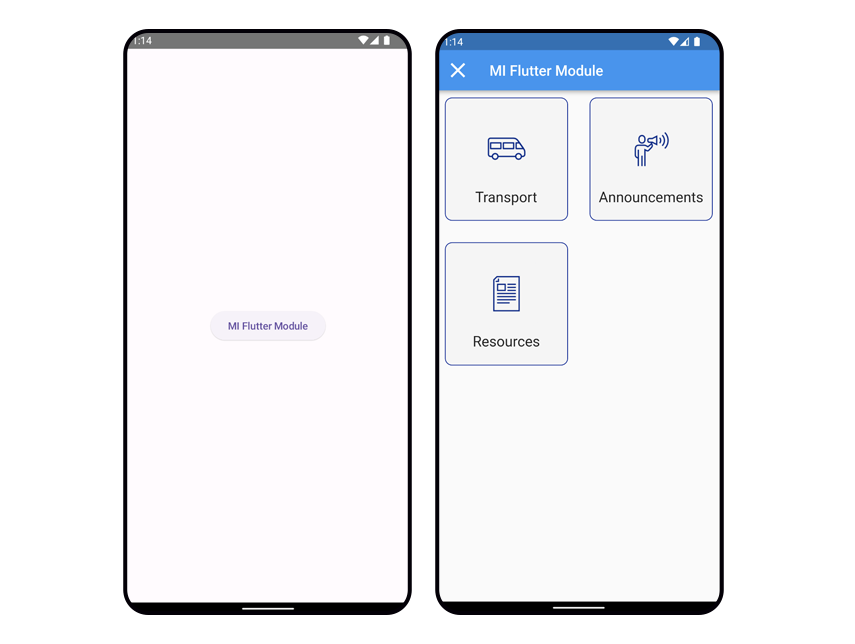
- Update your MainActivity class and add a button to open the Flutter module when it’s clicked.
const val FLUTTER_ENGINE_NAME = "mi_flutter_engine"


class MainActivity : ComponentActivity() {
    override fun onCreate(savedInstanceState: Bundle?) {
        super.onCreate(savedInstanceState)
        val flutterEngine = FlutterEngine(this)
        flutterEngine.dartExecutor.executeDartEntrypoint(
            DartExecutor.DartEntrypoint.createDefault()
        )
        FlutterEngineCache.getInstance().put(FLUTTER_ENGINE_NAME, flutterEngine)
        setContent {
                // A surface container using the 'background' color from the theme
                Surface(
                    modifier = Modifier.fillMaxSize(),
                    color = MaterialTheme.colorScheme.background
                ) {
                    LaunchFlutterModuleButton()
                }
        }
    }
}
@Composable
fun LaunchFlutterModuleButton() {
    val context = LocalContext.current
    Column(
        modifier = Modifier.fillMaxSize(),
        verticalArrangement = Arrangement.Center,
        horizontalAlignment = Alignment.CenterHorizontally
    ) {
        ElevatedButton(onClick = {
            context.startActivity(
                FlutterActivity.withCachedEngine(FLUTTER_ENGINE_NAME).build(context))
        }) {
            Text(text = "MI Flutter Module")
        }
    }
}
Note: Please ensure that you modify the compileSdk version to 34 in the app level build.gradle file.
When the ElevatedButton is clicked, it triggers the creation and launch of a FlutterActivity using a cached Flutter engine named FLUTTER_ENGINE_NAME created within our MainActivity class. This allows the app to run Flutter code within the context of this activity.
Quite straightforward, wouldn't you agree?
We’re all set! You can now run the application and Voila!

We have now successfully integrated the Flutter screens into your Native Android application.
But wait, how can you come back to your native application? To achieve this, we need to update your Flutter Module to close the FlutterActivity.
Step 4: Create a Helper Class called CloseFlutterModuleHelper in Your Flutter Module
class CloseFlutterModuleHelper {
  // Create a static constant MethodChannel instance with a specific channel name.
  static const methodChannel = MethodChannel('com.mobisoft.FlutterNativeModuleApp');
  // Private constructor to prevent direct instantiation of the class.
  CloseFlutterModuleHelper._privateConstructor();


  // A static method to close a Flutter screen using platform-specific code.
  static Future<void> closeFlutterScreen() async {


    try {
if (Platform.isAndroid) {
// Close the FlutterActivity started from Android application
  SystemNavigator.pop();
} else {
 // Invoke a method named 'dismissFlutterModule' on the MethodChannel of iOS.
      await methodChannel.invokeListMethod('dismissFlutterModule');
}


    } on PlatformException catch (e) {
      // If an exception occurs during method invocation, print the error.
      debugPrint(e.toString());
    }
  }
}
Here's what the above code does:
- We have created a CloseFlutterModuleHelper class. Its purpose is to close the Flutter screen.
- MethodChannel instance named methodChannel is created. This channel is used for communication between Dart code and platform-specific code. The channel name 'com.mobisoft.FlutterNativeModuleApp' identifies the channel and should match the channel set up on the platform side.
- The closeFlutterScreen method is defined as a static method. It is responsible for initiating the process to close a Flutter screen using platform-specific code. Inside the closeFlutterScreen method, there's a try block. Within this block, the methodChannel is used to invoke a method named 'dismissFlutterModule'. If the platform is Android, it uses SystemNavigator.pop() to close the current screen. This is an Android-specific way of closing the current screen or activity. If the platform is not Android (implying it's another platform like iOS), the code within the other block is executed.
Step 5: Generate the AAR file again following Step 1 and update it in your Android Project.
After implementing the modifications described in Step 4, please remember to regenerate the Android Archive file (AAR). Afterward, integrate this updated AAR into your Android project. Once this is done, you should be able to successfully close the Flutter module when the user clicks on the close button.
Summing It Up
I hope you enjoyed this tutorial on How to add screens designed in Flutter into Your Android App. To download the code for this app, please click here.
Parts 1 and 2 of this tutorial series aim to provide you with valuable insights and guidance for crafting exceptional apps. The combination of Flutter and Android enables you to build visually appealing and highly functional applications. Please feel free to contact me if you have any questions or feedback.
If you need expert assistance in your app development initiatives or want to bring your unique app idea to life, our Flutter app development services are at your disposal. Our team of skilled Flutter developers and designers are knowledgeable in the latest trends and technologies, including Flutter layered architecture, Dart language, and language-specific functionalities. We are ready to collaborate with you and guide you through this transformative journey.


 November 6, 2023


