
This blog post will guide you through deploying a Spring Boot application on a Kubernetes cluster. We'll cover everything from creating a kubernetes docker image spring boot deployment and exposing it to the outside world.
Prerequisites
Before we begin, ensure you have the following installed:
- Java Development Kit (JDK): Ensure you have a compatible JDK installed (e.g., JDK 17 or later).
- Maven or Gradle: For building your Spring Boot application.
- Docker: For containerizing your application.
- kubectl: For interacting with your Kubernetes cluster. You can check this doc to install kubectl https://kubernetes.io/docs/tasks/tools/
- Kind (Optional): If you don't have access to a Kubernetes cluster, Kind is a great way to run a single-node cluster locally for development and testing. You can follow this link for instructions https://kind.sigs.k8s.io/docs/user/quick-start/#installation
Alternatively, you can use a cloud-based Kubernetes service like Google Kubernetes Engine (GKE), Amazon Elastic Kubernetes Service (EKS), or Azure Kubernetes Service (AKS).1

1. Create a Simple Spring Boot Application (or use an existing one)
If you don’t have a Spring Boot application, create a simple one. You can use Spring Initializr (start.spring.io) to generate a basic project quickly.
Read More: This repository contains the code for the tutorial: "Deploying a Spring Boot Application on Kubernetes: A Comprehensive Guide for Beginners", published by the Mobile App Development Agency, Houston.
Feel free to download a sample example I’ve created from GitHub to get started.
Java
package com.mobisoftinfotech.k8demo.controllers;

import java.util.Date;

import org.springframework.web.bind.annotation.GetMapping;

import org.springframework.web.bind.annotation.RestController;

@RestController

public class GreetingController {

   @GetMapping("/")

   public String greet() {

       return "Greetings from Spring Boot! at " + new Date();

   }

}
2. Create a Dockerfile
Create a Dockerfile in the root directory of your Spring Boot project:
Dockerfile
# syntax=docker/dockerfile:1

FROM openjdk:21-jdk-slim

WORKDIR /app

COPY ./target/k8demo-0.0.1-SNAPSHOT.jar ./app/ROOT.war

EXPOSE 8080

CMD ["java", "-jar",  "./app/ROOT.war"]
This Dockerfile does the following:
- Uses a slim OpenJDK 21 base image.
- Sets the working directory to /app.
- Copies the built JAR file (replace k8demo-0.0.1-SNAPSHOT-*.jar with your actual JAR file name) into the container.
- Exposes port 8080 (the default Spring Boot port).
- Defines the command to run the application.
3. Build the Docker Image
Build the Docker image using the following command in your project's root directory:
Bash
mvn clean package
docker build -t k8demo . # you can use your name for the image

4. Create Kubernetes Deployment and Service YAML files
Create two YAML files: deployment.yaml and service.yaml.
YAML: deployment.yaml
apiVersion: apps/v1

kind: Deployment

metadata:

 name: k8demo-deployment

 namespace: demo  # Specify the namespace here

spec:

 replicas: 3

 selector:

   matchLabels:

     app: k8demo

 template:

   metadata:

     labels:

       app: k8demo

   spec:

    containers:

     - name: k8demo

       image: k8demo:latest

       imagePullPolicy: Never  # Changed to Never since we're loading the image directly

       ports:

       - containerPort: 8080
YAML: service.yaml
apiVersion: v1

kind: Service

metadata:

 name: k8demo-service

 namespace: demo

spec:

 type: NodePort  # Using NodePort for local development with Kind

 selector:

   app: k8demo  # This should match the labels in your deployment

 ports:

   - protocol: TCP

     port: 8080  # The port your service listens on

     targetPort: 8080  # The port your application listens on (containerPort in deployment)

nodePort: 30080 # Optional: specify a node port (30000-32767)- Deployment: Defines the desired state of your application (number of replicas, container image, etc.).
- Service: Exposes your application to network traffic. LoadBalancer is typically used in cloud environments. For Minikube, use NodePort.
5. Deploy to Kubernetes (locally I am using kind)
a. Create a Kind Cluster with Configuration:
Create a kind-config.yaml file. This file will define your Kubernetes cluster configuration, including the name and any other settings. For this example, we'll keep it simple:
YAML
kind: Cluster

apiVersion: kind.x-k8s.io/v1alpha4

nodes:

- role: control-plane

  extraPortMappings:

  - containerPort: 30080

    hostPort: 30080

    protocol: TCP
Bash
kind create cluster --config kind-config.yaml
b. Create a Kubernetes Namespace:
Bash
kubectl create namespace democ. Load the Docker Image into Kind:
Bash
kind load docker-image k8demo:latestd. Deploy
Bash
kubectl apply -f deployment.yamlkubectl apply -f service.yaml6. Access Your Application:
Bash
kubectl port-forward service/k8demo-service 8080:8080 -n demo7. Verify the Deployment:
1. Deployment
Bash
kubectl get deployments -n demo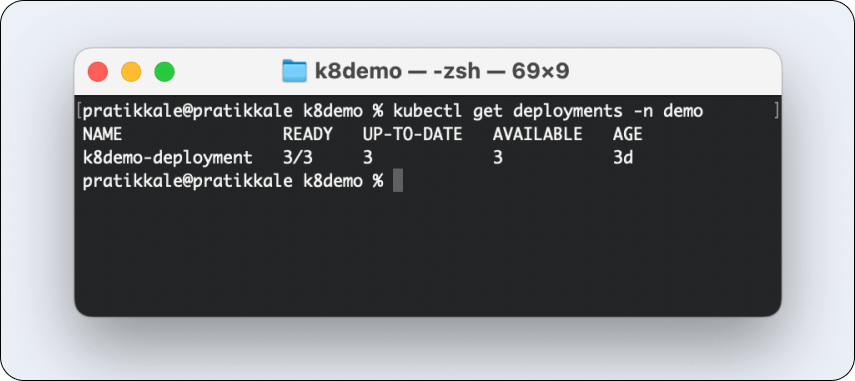
The command kubectl get deployments -n demo retrieves information about the Deployments within the Kubernetes cluster, specifically targeting the demo namespace.
2. Services
Bash
kubectl get services -n demo
The command kubectl get services -n demo retrieves information about the Services within the demo namespace of your Kubernetes cluster.
This command is vital for understanding how your application is exposed and accessible. It helps you find the IP address and port to use to connect to your application, and it shows you the type of Service you've created. It's essential for troubleshooting connectivity issues and verifying that your application is correctly exposed.
3. Pods
Bash
kubectl get pods -n demo
The command kubectl get pods -n demo retrieves information about the Pods running within the demo namespace of your Kubernetes cluster. This command is crucial for monitoring your application. You can see if your Pods are running correctly if they're experiencing issues (like crashing or failing to start), and how many replicas are currently active. It helps you diagnose problems and ensure your spring boot microservices kubernetes are healthy.
8. Delete the cluster (when you're finished):
Bash
kind delete cluster --name kindThis comprehensive guide should help you deploy your Spring Boot on Kubernetes cluster. Remember to adapt the instructions and YAML files to your specific needs and environment.
Conclusion
This blog post provided a step-by-step guide to deploying a Spring Boot application on a local Kubernetes cluster using Kind. We covered containerizing the application with Docker, creating Kubernetes deployment and service YAML files, and loading the image into Kind. We also demonstrated how to customize the deployment with a configuration file, namespace, and custom names. Using Kind and its load docker-image command simplifies local development. While this guide used Kind, the core concepts apply to cloud-based Kubernetes services. Kubernetes offers powerful container orchestration capabilities, enabling scalability and resilience. We encourage you to explore further and leverage Kubernetes' features to enhance your deployments.


Pratik Kale
Read more
Pratik Kale leads the Web and Cloud technology team at Mobisoft Infotech. With 14 years of experience, he specializes in building complex software systems, particularly focusing on backend development and cloud computing. He is an expert in programming languages like Java and Node.js, and frameworks like Spring Boot. Pratik creates technology solutions that not only solve current business problems but are also designed to handle future challenges.
 February 19, 2025


