The recent announcement from Parse.com to shut down it’s services has created lot of confusion among the app developers about how to handle this situation. We are helping lot of our existing clients to find the alternatives of Parse platform. In the process we found that there is a pressing need to create awareness about the far reaching implications of moving to a managed backend by in-house team of developers.
The first tutorial in these series of articles will provide you a detailed picture of your new environment in AWS/Google/Azure cloud. These three are infrastructure platforms and give us the complete control over the computing and networking aspects of deployment. The resultant power also puts a lot of responsibility on the shoulders of individual handling migration. One has to be careful at every step of migration. We hope that this guide will help you in considering the business continuity and security aspects of the migration along with the technical details.
1. Analysis
The first question that we need to ask before migration is which Parse services do we use? Some parse services have viable alternatives some don’t. Here is the list of all of the services/features provided by parse.
1. Parse push notifications:
Parse does not provide us dashboard. Which means the notifications needs to be sent from the some form of code. In case of Parse push notifications, we need to remember that Parse server does not support
- Delivery reports
- Scheduled pushes
- Client push
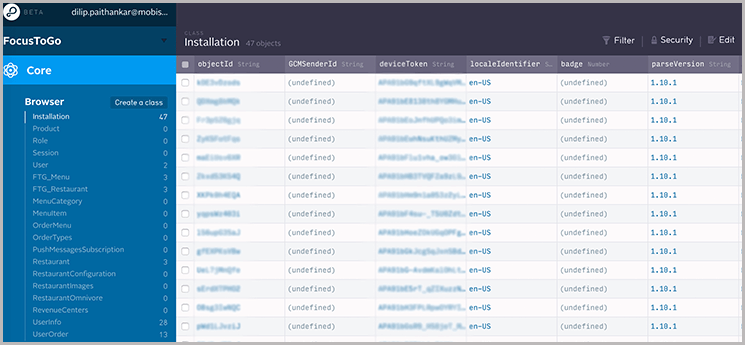
2. Check if Parse database is used. If you are not sure, check the core->browser section of the app. Download copy of DB to understand the size of DB.
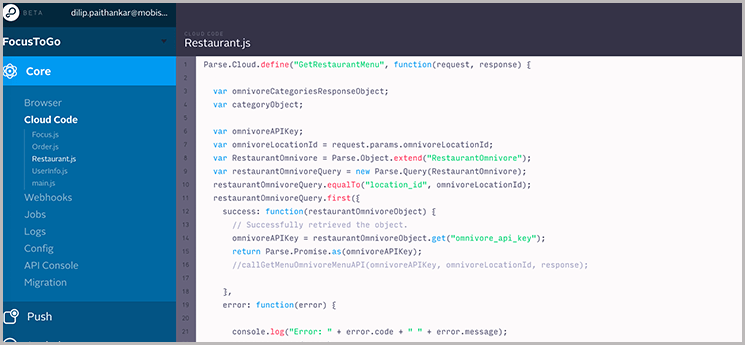
3. Check if we are using any cloud code. The cloud code can be seen at Core-> cloud.
4. Check if there are any webhooks configured. They can be found at Core->webhooks.
5. Check if the app uses scheduled jobs The scheduled jobs are present at Core->jobs.
6. For Push notifications, check the audiences. They are configured at Push->Audiences. We might need to note that these audiences may not be directly available for us.
7. Check if we are using analytics. The analytics are not part of the open source Parse server. Basic analytics can be easily migrated to Google or Flurry.
8. Check the slow queries analytics. It is not possible to migrate this as it is. However we can configure slow query logs in MongoDB.
9. Note down the user sessions settings. Again, some of these settings can not be migrated. We will note them down for future reference.
10. Check if the app uses custom domains. We would need to point the domains to the new servers.
11. Check if “Verify user emails” is set. It means we will have to setup email verification module.
12. Check email templates of verification and forgot password.
13. Check the default web pages setup for password, email verification and 404
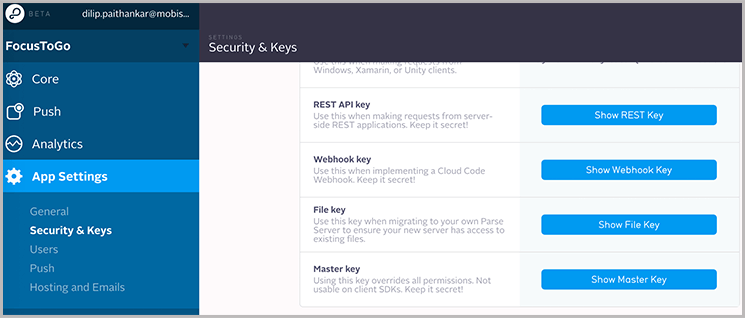
14. Take note of the security keys section, we are going to need these keys for configuration. Even after you migrate the app to your own servers, the same keys would be used by the new servers for access control.
You should also know that following features are not supported by the open source Parse server.
Major things which are not supported yet.
1. In User sessions
- a. Expire inactive sessions
- b. Revoke session on password change
2. User authentication
- a. Anonymous users can’t be disabled
- b. New methods can’t be disabled by default
3. The ability to restrict to one Facebook App is not available in Parse Server
4. Analytics: we need to use Google analytics as an alternative
5. Dashboard: We all are used to the Parse dashboard but it is not supported out of the box.
6. iOS in-app purchase verification is not supported.
7. There is no Job functionality in Parse Server, we need to setup cron jobs or use kue.
8. Schema API is not supported
9. Twitter login is not supported
10. Welcome email and verification emails are not supported out of the box.
2. Preparation
After analysing the services being used and choosing the alternatives it’s time to prepare for migration. We will gather elements, bits & pieces required for migration in this phase.
1. If you are using Android push notifications:
- Enable GCM for your Android project in the Google Developer Console. Take note of your project number. It should be a large integer like 123427208255. This project number is your GCM sender ID.
- To get your GCM API key, go to the Google developer credentials page, and either create a new API key or reuse an existing one.
- You wouldn’t have used any of these for Parse as it uses it’s own GCM sender ID.
2. If you are using iOS push notifications:
- Keep the P12 certificate ready (P12 certificate creation process is given at this link, but an existing certificate must be present while migrating. Make sure that you do not create new certificate if your app is already running in production. In that case existing app server (Parse.com) must use the new certificate to continue to support push notifications. The same certificate would be required for configuration of Parse server in EC2.
3. Download the cloud code. If you are using any of the following native modules, then replace them with alternatives:
- App Links: There is no exact alternative for app links, but we can create the tags ourselves.
- Buffer: It is part of native nodejs installation. We will have to remove the require(‘buffer’) calls.
- Mailgun: Use the official npm module: https://www.npmjs.com/package/mailgun-js
- Mandrill: Use the official npm module: https://www.npmjs.com/package/mandrill-api
- Moment: Use the official npm module: https://www.npmjs.com/package/moment
- Parse Image: This module is also not part of the new Parse server and Parse suggests the use of a solution like the imagemagick wrapper module. Any cloud based image manipulation library such as Cloudinary would also work.
- SendGrid: Use the official npm module: https://www.npmjs.com/package/sendgrid
- Stripe: Use the official npm module: https://www.npmjs.com/package/stripe
- Twilio: Use the official npm module: https://www.npmjs.com/package/twilio
- Underscore: Use the official npm module: https://www.npmjs.com/package/underscore
- Verification: If you have already set-up some tests to verify that your cloud code on Parse is running correctly, you will need to point them to the new Parse server.
4. We will need to create the cronjob scripts and kue scripts. One can create and try them out on test servers. However, we shall prepare a list of cron jobs to be created which can be used in production.
5. Prepare for emails with email service provider. Mandrill and sendgrid native modules are supported by Parse server. We can also use Amazon’s simple email service.
6. To replace Parse hosting, you can create the endpoints in the new Parse server to serve the webpages.
3. Execution
It takes five steps to implement the app migration.
- 1. Setup the AWS infrastructure
- 2. Migrate the database to MongoDB
- 3. Configure the parse server in AWS
- 4. Migrate the mobile apps
- 5. Restrict database access to VPC
3.1 Setup AWS infrastructure:
1. Signup for AWS and create your virtual private cloud (VPC). We can also use the default VPC provided by Amazon. The VPCs give 2 important advantages:
- a. The private IPs inside the VPC do not change across server reboots. This allows us to use private IP for internal communication in the same region.
- b. Private communication within region is free which means there would be no data transfer costs for communication between web server and database server.
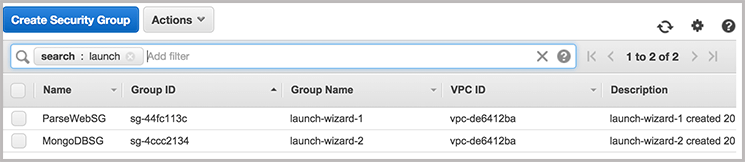
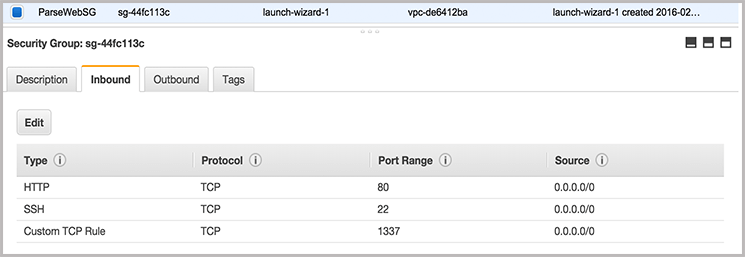
2. Create two security groups. One for database and other for Parse server. Keeping all servers publically accessible is not desired. We plan to keep database access within VPC using private IP. Our security group rules will evolve to this state from the state where anyone with the username and password can login to the database server from anywhere in the world.
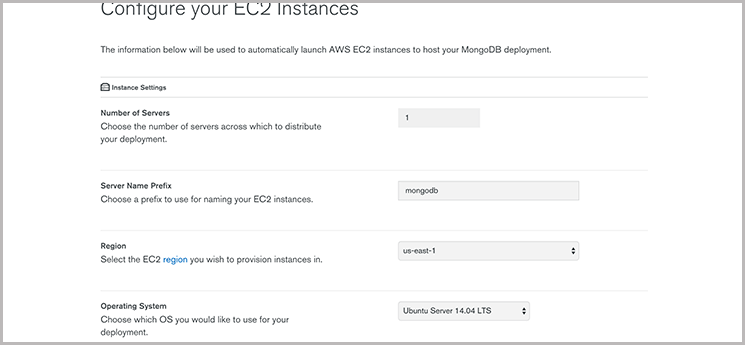
3. Launch a web server with Parse server installation.
- a. Launch a t2.small instance for your application. I prefer Ubuntu 14.04 server edition as the OS of the instance.
- b. Install nodejs on the server. Parse server is implemented as an express app in nodejs.
- c. The other requirement is of python, which comes in as preinstalled on Ubuntu machine.
- d. Goto the /var/www/ directory. Download Parse server. Go to Parse directory and install necessary modules using npm install.
- e. Install the relevant modules mentioned in the preparation sections as per the dependencies.
- f. Some of the modules might need compilation and hence you might need to install make utility with “apt-get install make”
4. Create a MongoDB cluster. Volume size should be 10 times of the DB size.
- a. Use MongoDB cloud manager to setup a replica set in your AWS Account very quickly!
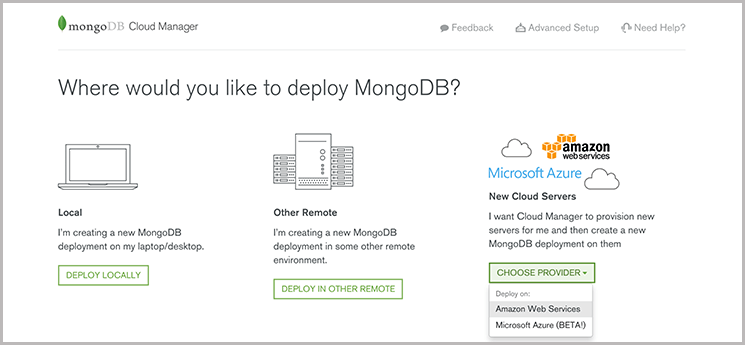
- b. We are not using MongoDB manager although you can continue to use it after the trial. Instead, we only use it to get the MongoDB configuration setup. They provide all the important options and do the hard-work of installation and configuration. Obviously, theirs is a very good management console service if you want to have visual tool for DB management.
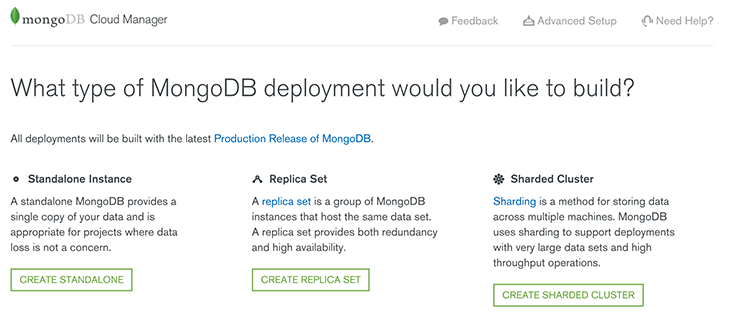
- c. Choose your database deployment type. It all boils down to how critical is your data and how much can you spend per month.
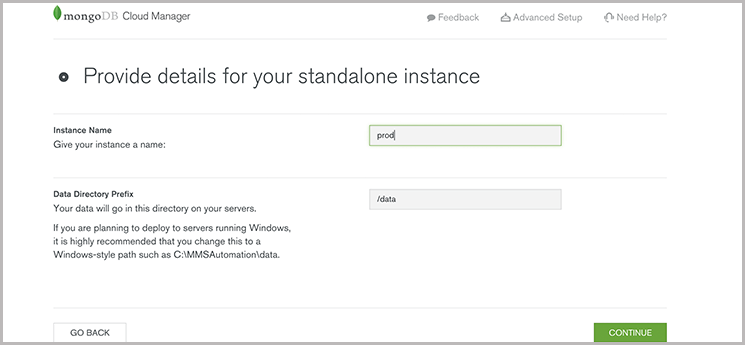
- d. Give a name to your db instance
- e. Make sure you choose OS images from HVM category.
- f. The default MongoDB installation allows anonymous access. Remove that by creating an admin user.
- g. Configure the database using MongoDB cloud manager tool. (A free tool for 30 days!) We only use it for installation purposes. You can continue to use it afterwords with minimal monthly charges as explained at https://www.mongodb.com/cloud
- h. Once the replica set is created, note down the URI of database.
- i. OR – Create server on MongoLab. If your data size is less than 500MB it is going to be free. For 15$ you can get shared Mongo access without any maintenance, failover or backup overhead.
5. When we migrate the database from Parse server, we will need access to DB from the Parse.com domain, as we don’t have data on their IP addresses. we have to keep the MongoDB port open for public network in database security group. So we keep the ssh and MongoDB port open for all.

6. Assign static IPs to MongoDB hosts until we migrate the Parse server in our environment.
7. We shall make the MongoDB access more secure when we start using our Parse server instead of Parse.com. Once we start using the hosted Parse server, we will keep the port open for the Parse security group removing the server access from the outside world.
8. We have to keep the ports 80 (http), and 1337(node) of Parse server security group open.
9. Assign a static ip to the Parse server.
10. Next step is optional for small scale applications. Good to have, but not mandatory.
11. We should create autoscaling groups for Parse servers to manage applications with heavy traffic. We need to create a load balancer to divide the traffic among the EC2 instances. Although autoscaling may not be required for most of the applications, having a failover setup is always helpful.
We have prepared enough arsenal now to start the migration. We have prepared the hardware setup. We have prepared the security groups. We have also discussed and established our scalability requirements. We briefly mentioned about the reliability add-ons which can be thought as optional who can’t spend extra money on Amazon just yet. Basically apps with lower user base or startups which are still in take-off stage.
The minimal configuration can have simple two server setup as shown below.

Each server would be assigned to the corresponding security group.
3.2 Migrate database to MongoDB
1. Transfer the data from Parse to MongoDB server.
- a. Go to app management section in App settings on Parse dashboard.
- b. Click on migrate database. You will be asked the URL of MongoDB server.
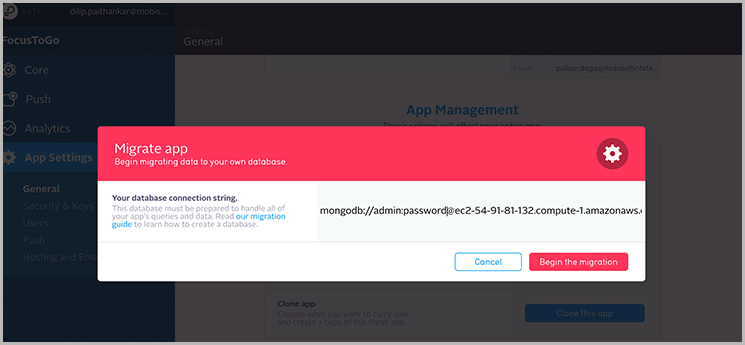
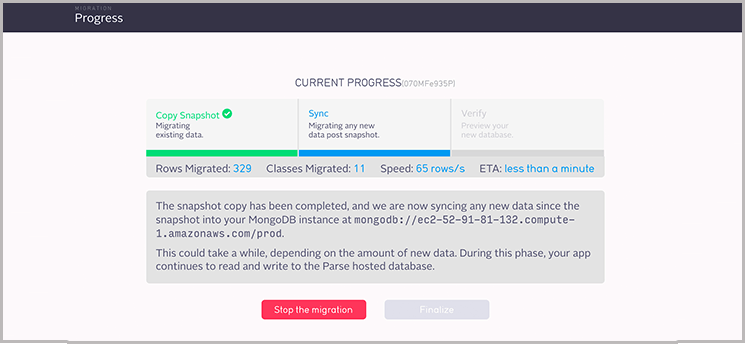
- c. Enter the URI and start the migration. Make sure you have blocked anonymous access to MongoDB and the connection string has admin privileges.
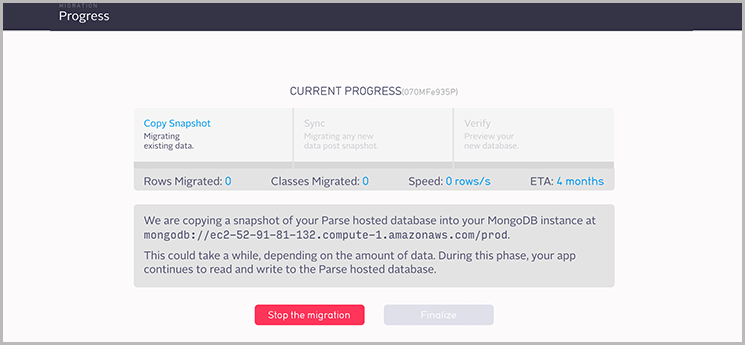
- d. The data transfer is followed by sync operation. After the sync operation finishes, we can mark the migration as complete to finish the migration and start using the MongoDB server from our Parse.com deployment.
- e. After the sync operation, verify the databases.
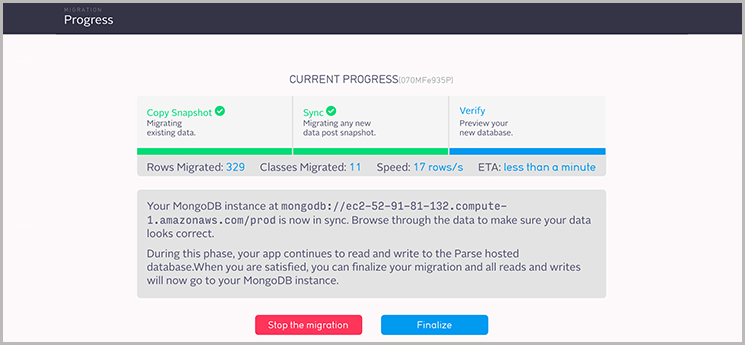
- f. If everything looks good, we can click on “Finalize”. The Parse.com servers will start using the hosted MongoDB servers. It’s our duty to ensure the uptime and security of DB from this point onwards.
- g. For creating a dev or demo setup before migration, choose the option of “Stop the migration”. It will keep the data in new database but apps will continue to connect to the parse.com platform.
2. Verify from the apps if they are working fine. Now the apps would be accessing data from the hosted MongoDB cluster.
3. Check the MongoDB database to ensure that the new data entered from apps is getting stored in our cluster.
3.3 Migrate the Parse server
- 1. Copy the cloud code to the Parse directory.
- 2. Test your installation by running “npm run start” you should get an error for database URI not set.
- 3. Edit the index.js file to update the configuration settings, importantly the keys, push notification settings and database URI.
- 4. Start the server with the command “npm run start” and check if it is working fine. You can use curl to test it.
- 5. Try accessing the DB from the APIs and verify that the configuration is correct.
- 6. Bring and install your P12 certificate
- 7. Take the GCM app id and Key and configure it in index.js
- 8. Check the scheduled jobs, create cron jobs for them on the server.
- 9. Setup default web pages for 404 etc. and update the configuration to serve them.
- 10. Assign a static ip to the server.
- (Optional for autoscaling groups)
- 11. Create an AMI from this server. This AMI will be used to launch servers in your autoscaling group.
- 12. Create your autoscaling group with this AMI as source for launching an instance.
- 13. Create a load balancer in front of autoscaling group.
If you don’t need scaling abilities immediately then your Parse server endpoint would be the static IP of Parse server, in other cases it would be the load balancer.
3.4 Migrate the mobile apps
- 1. Check your client side code (Android, iOS, javascript code)
- 2. Add Google analytics in your applications.
- 3. Update the Parse link in the app with the link of load balancer and test it.
- 4. Verify every workflow
- 5. Upload the builds to app store/play store/your website.
3.5 Restrict database access to VPC
- 1. Once you are convinced that the features are working fine, you can remove the database access from outside world. Keep that access limited to the hosts from VPC or better, only to the Parse server security group.

- 2. If you are using iOS apps as client to Parse app then make sure that you do not perform this step until the updated iOS app build is approved and updated by everybody.
- 3. So, while the app is under review stage and after it is approed, you would keep the access to database open from all Parse.com as well as hosted server until you are sure that all the old installations have been upgraded to the latest release.
Congratulations! You have now successfully migrated your app.
Note: “Parse migration can turn out to be a tricky task if you haven’t worked on AWS and DevOps. Read more on Mobisoft Parse Migration Service and discover how we provide you a detailed insight about migration without the loss of any data as you easily transition your app to Amazon (AWS).”
Author’s Bio

Hemant Shinde works as a Solutions Engineer at Mobisoft Infotech. He likes to add scalability and availability to mobile applications. He has 8+ years of experience in systems engineering, virtualization and cloud based systems. Apart from that, he has interest in history, e-commerce, Internet of Things and loves traveling.