Firebase, developed by Google, is a very powerful platform that provides many essential backend services, such as Firebase Authentication, Firestore, Realtime Database, Messaging System, Crash Reporting, Machine Learning, Analytics, File Storage, and many more.
In this blog, I will guide you through the step-by-step integration of Firebase Cloud Firestore and Firebase Authentication into your mobile app using flutter mobile app development. Firebase Authentication is used to authenticate end users and onboard them onto your application, while Firestore is used to store and retrieve user data.
About Firebase Authentication
Firebase Authentication is a backend service designed to verify and authenticate end users through various methods. It allows you to authenticate users through:
- Google Sign-In
- Sign-In with email and password
- Mobile number and OTP verification
- Social media accounts like Facebook, Twitter, etc.
- Anonymous and many more
About Firebase Firestore
Firebase Firestore is a cloud-based, NoSQL database service that stores data in a flexible, non-tabular format. This offers flexibility for handling unstructured and semi-structured data. Firestore allows you to store, access, and query data specific to individual users.
To demonstrate how to use Firebase Cloud Firestore, we'll integrate it into a Flutter app. Using a Task Management system as an example, we will add task details, fetch the task list, edit tasks, and delete tasks.
Want to learn how to test your flutter app, check out this detail guide on Flutter Testing: Unit, Widget & Integration Tests Guide for tips on testing your app’s functionality across different layers.
Steps to Setup the Firebase
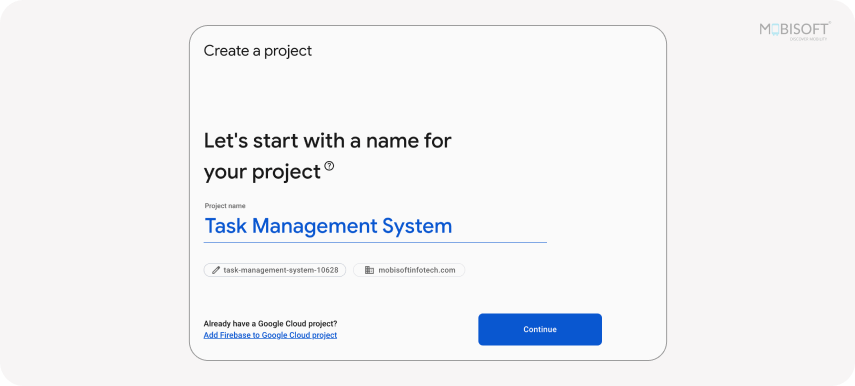
Step 1 : Create firebase project
Navigate to the Firebase Console and click on the ‘Create a Firebase project’ option. Then enter the project name and Parent Resource, then click on the Continue button.

Step 2 : Register Android app
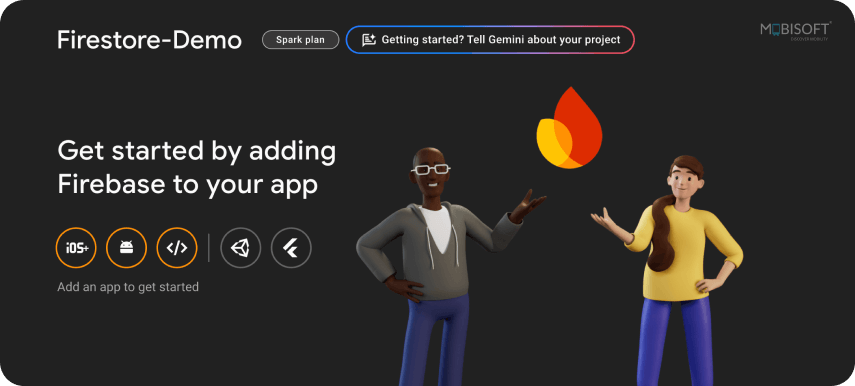
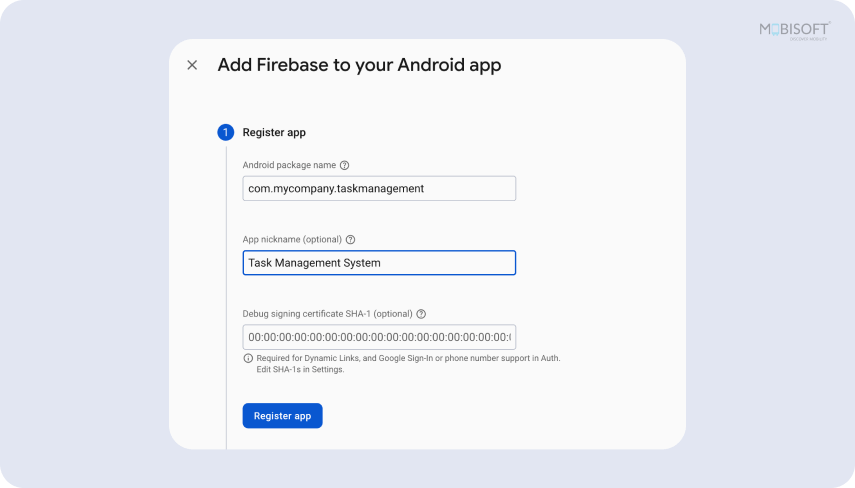
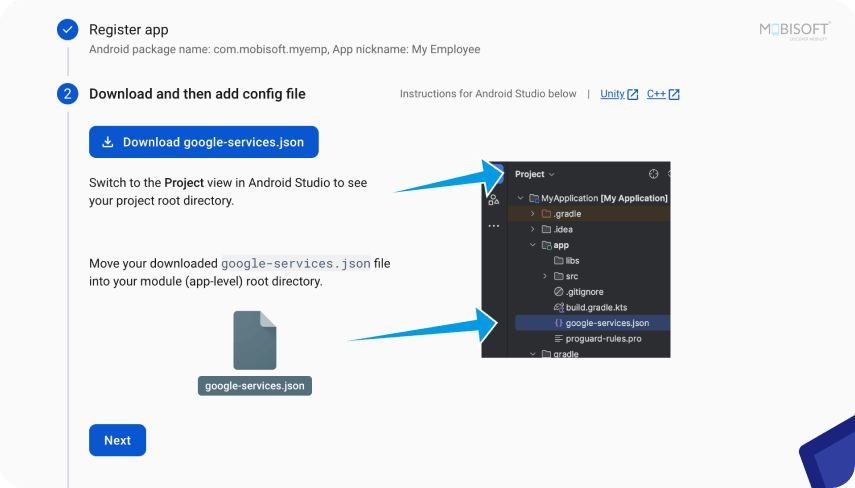
After successfully creating the project, You can see the Add app option on the dashboard screen. Click on Add app icon and then click on the Android icon from the options. Then, on the next screen, provide the package name of your Android app, nickname, and SHA-1 key (only required for Google sign-in). After entering the required information, click the 'Register App' button. After app registration, download the json file named as google-service.json by clicking on the Download google-service.json button. Then you need to copy the downloaded json file into your ./android/app/ location of your project folder. This setup step is essential when working with professional android app development services to ensure proper configuration and integration.
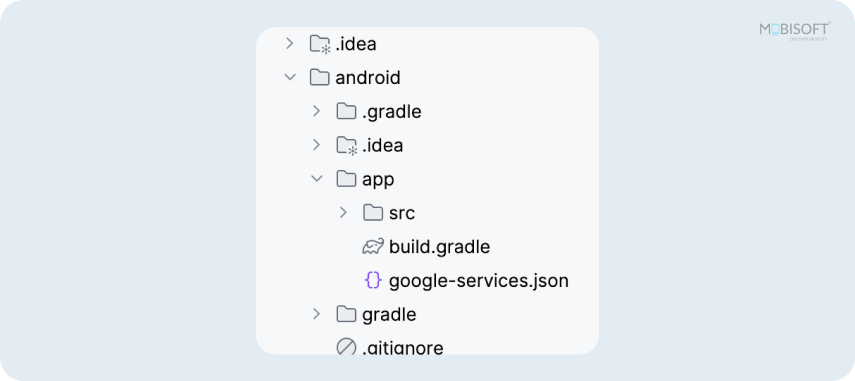
For an even deeper dive into mobile app development frameworks, you might be interested in reading Fundamental Guide for Developing Startup Mobile App with Flutter to understand the best practices for building scalable mobile apps.
Step 3 : Register the iOS app
To register the iOS app, click on the Add app option from the dashboard screen and then click on the iOS icon from the available options. Then, on the next screen, provide the App Bundle ID, App Nickname, and App Store ID (optional). After adding the information, click the Register app button, download the GoogleService-Info.plist file, and copy it to the ./ios/Runner folder. If you’re working with an iOS app development company, this will help streamline your process.
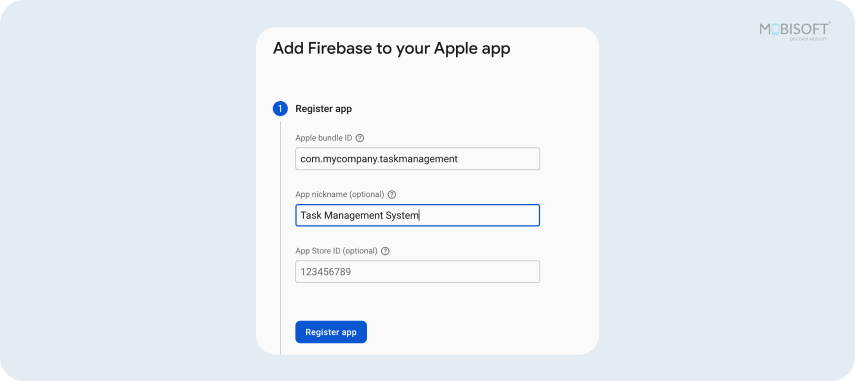
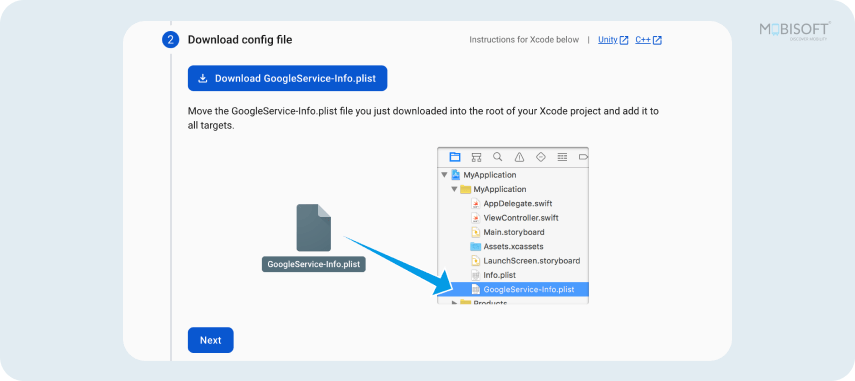
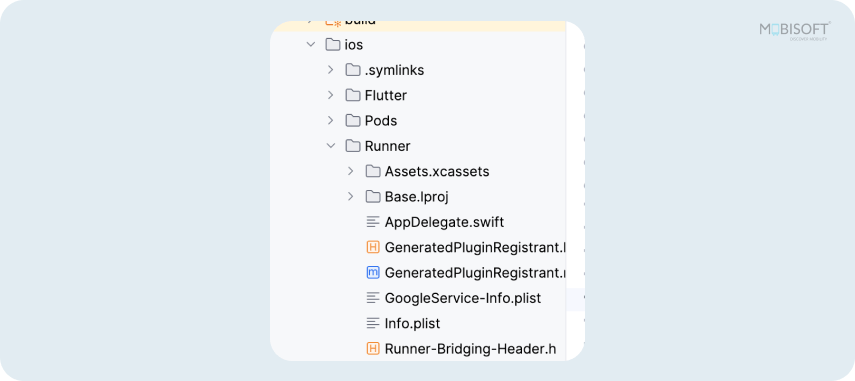
Step 4 : Incorporate Firebase dependencies.
Add the following necessary Firebase dependencies to the dev_dependencies section of the pubspec.yaml file. Next, run the flutter pub get command in the terminal to install the Firebase dependencies.
dependencies:
flutter:

   sdk: flutter

 cupertino_icons: ^1.0.8

 firebase_core: ^3.12.1

 firebase_auth: ^5.5.1

 google_sign_in: ^6.3.0

 cloud_firestore: ^5.6.5
Step 5 : Initialize the Firebase
Initialize the Firebase by adding the below line to your main.dart file.
void main() async {

 WidgetsFlutterBinding.ensureInitialized();

 await Firebase.initializeApp();

 runApp(const MyApp());

}
Here, we are done with the Firebase setup.
After completing these steps, you'll have a functional Firebase setup for your Flutter app. If you’re exploring cross-platform mobile development, check out this Flutter vs. React Native vs. Xamarin: Which One to Choose for Cross-platform App Development? to help you choose the right technology for your project.
Integrate Firebase Authentication and Firebase Firestore into your Flutter application.
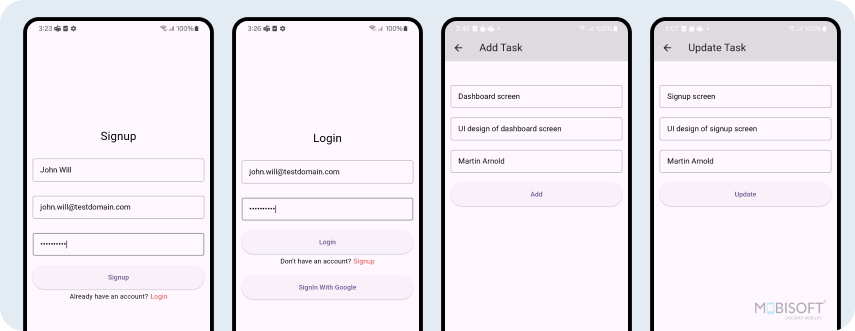
Here, we are taking a task management example for an employee. First, we authenticate the employee through a signup process using the Firebase Authentication service.
We provide a signup screen that allows employees to register by entering their name, email, and password. After signing up, an employee can log in to the app by entering their email and password on the login screen. We have also implemented Google Sign-In functionality to authenticate the employee.
Once authenticated, employees can create tasks, view all tasks, modify task details, and remove tasks as needed. To implement such a workflow efficiently, partnering with a custom mobile application development company that specializes in backend integration is essential.
We have designed a Home screen that displays a list of tasks added by the logged-in employee. At the bottom of the Home screen, we have added an “Add Task” button that navigates the employee to the Add Task screen. On this Add Task screen, we have created a form to collect the task title, task description, and task owner information from the employee.
The same screen is also used to update task details. We have also added two buttons and one profile icon on the app bar of the Home screen. One to refresh the task list and another to sign out the current employee, and the profile icon is to navigate users to the profile screen.
Let's move forward with the implementation by following the steps outlined below.
Steps to Set up the Firebase Authentication
We will provide two methods for authenticating end users: Sign-In with Google and custom user accounts created using an email and password.
Before writing any code in your project, you need to enable Firebase authentication methods from the Firebase console. Navigate to the Authentication section in your Firebase console, then click on the Sign-in Method tab. We can see multiple sign-in methods on this tab, as shown in the screenshot below.
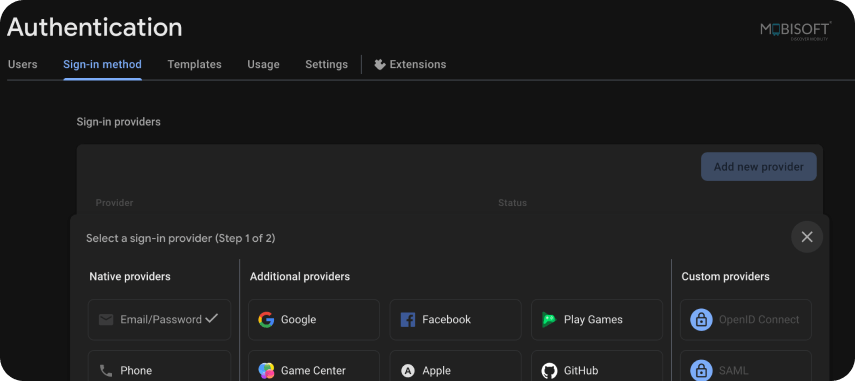
This blog covers the implementation of Email/Password login along with Google Sign-In. To activate the Email/Password method, select the Email/Password option under the Native providers section. Following the screenshot below, activate the option and click Save to proceed.
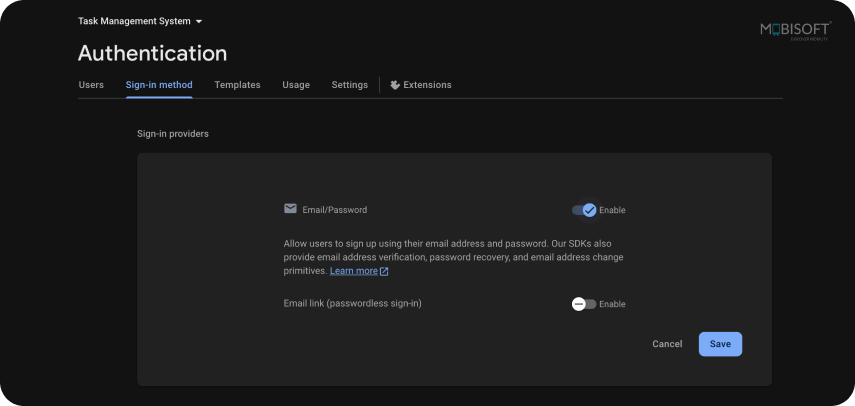
In this way, you can enable the Email/Password method. After this, to enable Google Sign-In, click on the Google option in the Additional providers section. As shown in the screenshot below, enable the switch and provide the support email address. You also need to provide the SHA1 key for Android when creating the Android application.
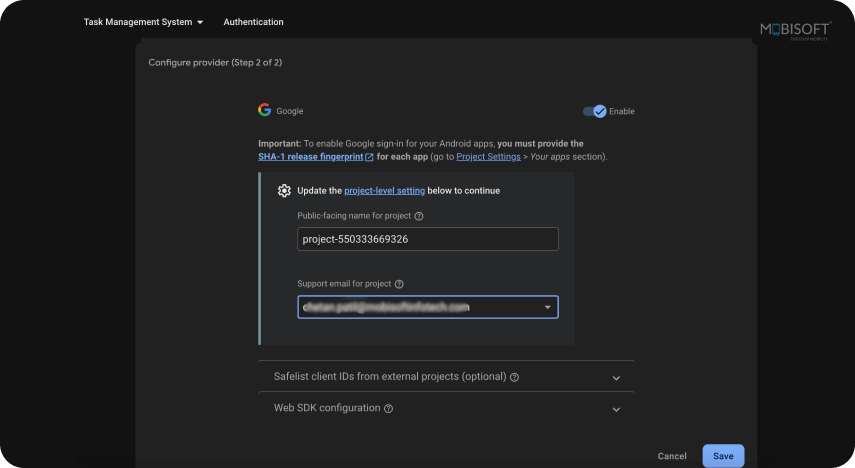
After entering all the required information, click on the save button. In this way you can enable both Email/Password and Google Sign-In authentication methods on the Firebase console.
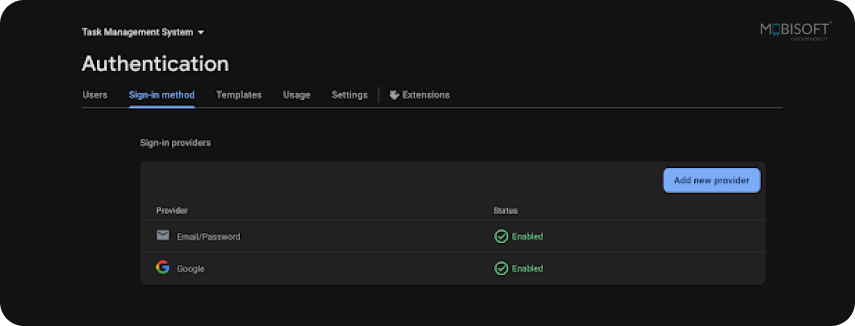
You can reconfirm if both methods are enabled or not, as shown in the above screenshot. Now we are ready to call the firebase authentication methods from our project.
Google Sign-In Functionality
First we will see Sign-In with Google functionality. To sign in with Google, we have provided a SignInwithGoogle button on the login screen. By clicking on this button, we call the signInWithGoogleButtonClicked() method in which we call the signInWithGoogle() method from the auth_service.dart file, as shown below. Create a separate file named auth_service.dart and write all the functions related to authentication in it.
void signInWithGoogleButtonClicked(BuildContext context) async {

 final userCred = await AuthService().signInWithGoogle();

 if (userCred != null) {

   Navigator.push(

     context,

     MaterialPageRoute(builder: (context) => const HomeScreen()),

   );

 }

}
As shown in the above method, we invoke the signInWithGoogle() function from the auth_service.dart file, as illustrated below, to obtain the UserCredential data. If the UserCredential data is not empty, the user has been successfully authenticated with Google, and we navigate the user to the home screen.
Future<UserCredential?> signInWithGoogle() async {

 try {

   final googleUser = await GoogleSignIn().signIn();

   final googleAuth = await googleUser?.authentication;

   final cred = GoogleAuthProvider.credential(

       idToken: googleAuth?.idToken, accessToken: googleAuth?.accessToken);

   return await FirebaseAuth.instance.signInWithCredential(cred);

 } catch (e) {

   log(e.toString());

 }

 return null;

}
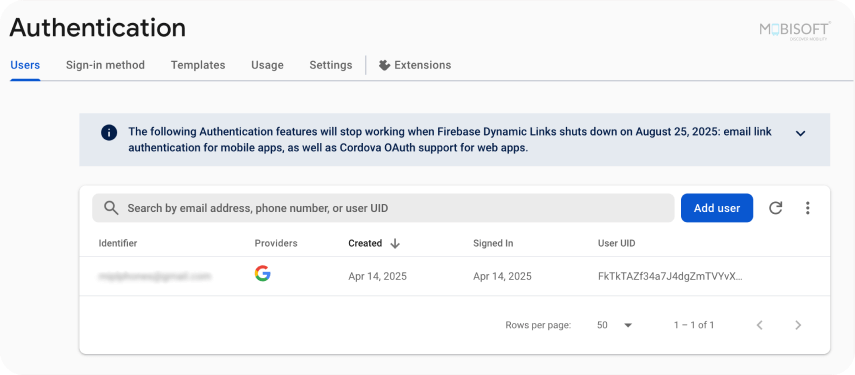
We need to use the function 'FirebaseAuth.instance.signInWithCredential(cred)' to sign in with Google Sign-In. You have to provide the GoogleAuthProvider.credential object, which can be generated by providing the Access Token and Google authentication token. These authentication token and access token can be obtained by using GoogleSignIn().signIn() and GoogleSignIn().signIn().authentication, respectively.
Sign Up Using Email and Password
To create a custom user by using email and password, we have developed a sign-up form to collect the user's name, email, and password. After filling out the signup form, the user needs to click on the Sign up button. On the Sign up button click, we have called the onSignupClicked() method, in which we check the simple validations. If the validations are unsuccessful, we are showing a specific text message to the employee; otherwise, we invoke the AuthService().createUserWithEmailAndPassword() method from the auth_service.dart file. This function will return the User model if the user is created successfully on Firebase.
void signupButtonClicked(BuildContext context) async {

 String email = emailController.text.toString().trim();

 String password = passwordController.text.toString().trim();

 if (performValidation(context, email, password)) {

   final user = await AuthService()

       .createUserWithEmailAndPassword(context, email, password);

   if (user != null) {

     Navigator.pop(context);

     CommonUtils.showToast(context, "User created successfully.");

   }

 }

}

bool performValidation(BuildContext context, String email, String password) {

 if (email.isEmpty) {

   CommonUtils.showToast(context, "Please enter email address.");

   return false;

 } else if (password.isEmpty) {

   CommonUtils.showToast(context, "Please enter password.");

   return false;

 }

 return true;

}
Implement a function named createUserWithEmailAndPassword() to facilitate the registration of new users.
Future<User?> createUserWithEmailAndPassword(

   BuildContext context, String emailAddress, String password) async {

 try {

   final credential =

       await FirebaseAuth.instance.createUserWithEmailAndPassword(

     email: emailAddress,

     password: password,

   );

   return credential.user;

 } on FirebaseAuthException catch (e) {

   if (e.code == 'weak-password') {

     CommonUtils.showToast(context, 'The password provided is too weak.');

   } else if (e.code == 'email-already-in-use') {

     CommonUtils.showToast(

         context, 'The account already exists for this email.');

   }

 } catch (e) {

   print(e);

 }

 return null;

}
The FirebaseAuth.instance.createUserWithEmailAndPassword() method is utilized to register a new user using the given email and password. This will create a new user with the provided email and password. Firebase may throw exceptions like 'weak-password', 'email-already-in-use' or any other exceptions.

Sign In with Email and Password
We have developed a login screen to verify the users registered with Firebase Authentication. We have provided 2 input fields to get the email and password from the user. Once the user has entered their email and password, they must click the 'Sign In' button. On the Sign in button click, we have called the onLoginClicked() method, in which we check the empty string validation for both email and password. After validating the email and password, we called the loginWithEmailAndPassword() from the auth_service.dart file.
void loginButtonClicked(BuildContext context) async {

 setState(() {

   isLoading = true;

 });

 String email = emailController.text.toString().trim();

 String password = passwordController.text.toString().trim();

 if (performValidation(context, email, password)) {

   final user = await AuthService()

       .loginWithEmailAndPassword(context, email, password);

   setState(() {

     isLoading = false;

   });

   if (user != null) {

     Navigator.pushAndRemoveUntil(

         context,

         MaterialPageRoute(builder: (context) => const HomeScreen()),

         (Route<dynamic> route) => false);

   }

 } else {

   setState(() {

     isLoading = false;

   });

 }

}

bool performValidation(BuildContext context, String email, String password) {

 if (email.isEmpty) {

   CommonUtils.showToast(context, "Please enter email address.");

   return false;

 } else if (password.isEmpty) {

   CommonUtils.showToast(context, "Please enter password.");

   return false;

 }

 return true;

}
Write a function loginWithEmailAndPassword() to sign in the user by using email and password as below in auth_service.dart file.
Future<User?> loginWithEmailAndPassword(

   BuildContext context, String emailAddress, String password) async {

 try {

   final credential = await FirebaseAuth.instance

       .signInWithEmailAndPassword(email: emailAddress, password: password);

   return credential.user;

 } on FirebaseAuthException catch (e) {

   if (e.code == 'invalid-credential') {

     CommonUtils.showToast(context, "Invalid credential. Please try again.");

     return null;

   } else {

     CommonUtils.showToast(context, "Something went wrong.");

     return null;

   }

 }

}
Using the method FirebaseAuth.instance.signInWithEmailAndPassword(), the user will get authenticated and after validating the email and password, this method returns the ‘User’ data model. If the validation fails, an exception will be triggered, such as 'invalid-credential' or a different error.
Sign Out
We need to ensure that the user is provided with the option to sign out. To sign out the currently logged-in user, we have provided the logout button on the home screen’s App bar. When the user clicks on this logout button, the _signOutButtonClicked() method is invoked as shown below.
_signOurButtonClicked() async {

 try {

   await AuthService().signOut();

   DatabaseService().clearUID();

   Navigator.pushAndRemoveUntil(

       context,

       MaterialPageRoute(builder: (context) => LoginScreen()),

       (Route<dynamic> route) => false);

 } catch (e) {

   log(e.toString());

 }

}
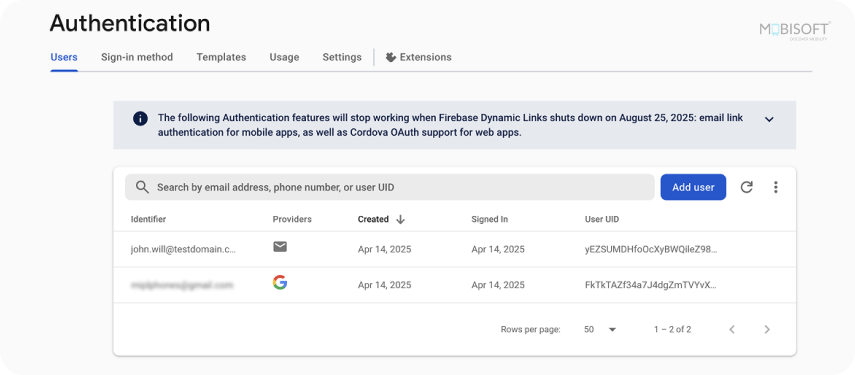
We invoked the signOut() method from the auth_service.dart file within this method. Next, we reset the uid variable to empty, which is declared in the DatabaseService.dart file, which stores the ID of the currently logged-in user. Following this, the user is redirected to the login screen. Define a function signOut() in the auth_service.dart file as follows:
Future<void> signOut() async {

 try {

   await AuthService().signOut();

 } catch (e) {

   log("Something went wrong");

 }

}
Steps to Implement the Firebase Firestore
Before starting any operations related to Firebase Firestore, we need to create the database in Firebase Firestore. To do this, navigate to the Firestore Database screen by clicking on the Firestore Database option under the Build section in the left menu, as shown in the screenshot below.
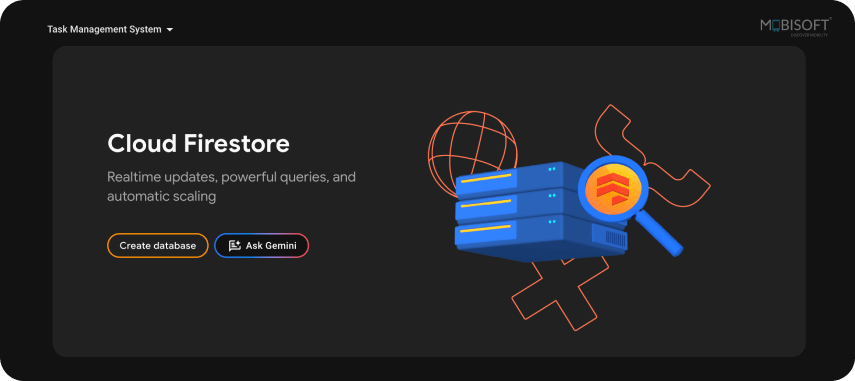
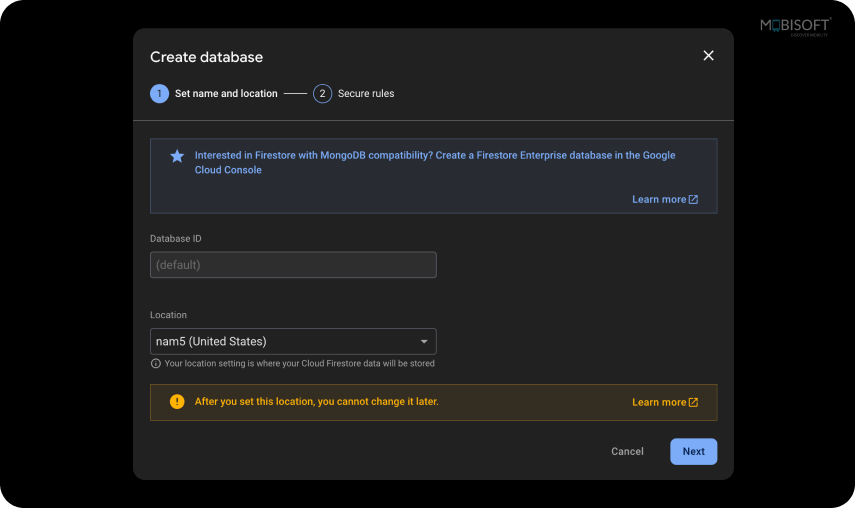
Click Create database to initiate the first step in setting up your database. In step 1, the Database ID field will be disabled, as its default value is set to "(default)". Next, you need to select the location of the Cloud Firestore database. Choose the location carefully, as it cannot be changed once selected. After selecting the location, click the Next button, as shown in the image below.
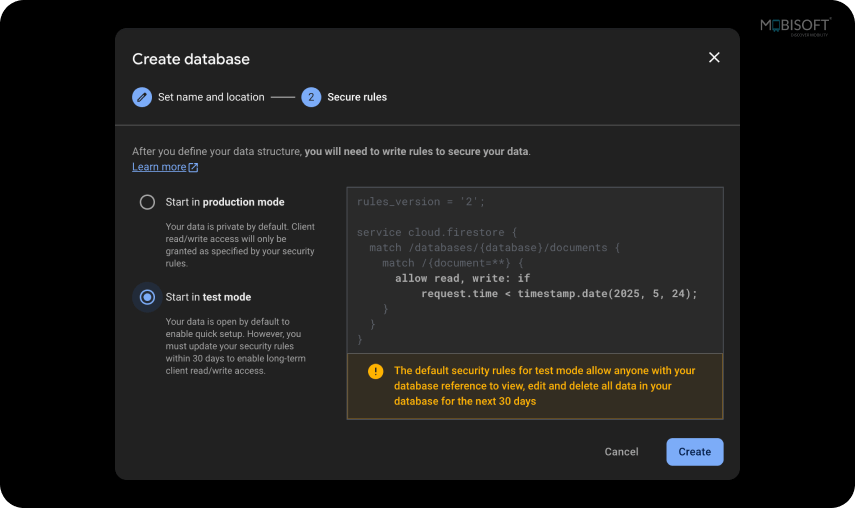
In Step 2, we need to define secure rules for read and write operations. Two modes are provided: production mode and test mode. If we select production mode, all read and write operations will be restricted for third-party users. If we select test mode, we need to define our own rules to secure the data during read and write operations. We will discuss Firestore rules in more detail later in this blog. For the demonstration, we will select test mode and complete the database creation process by tapping the Next button.
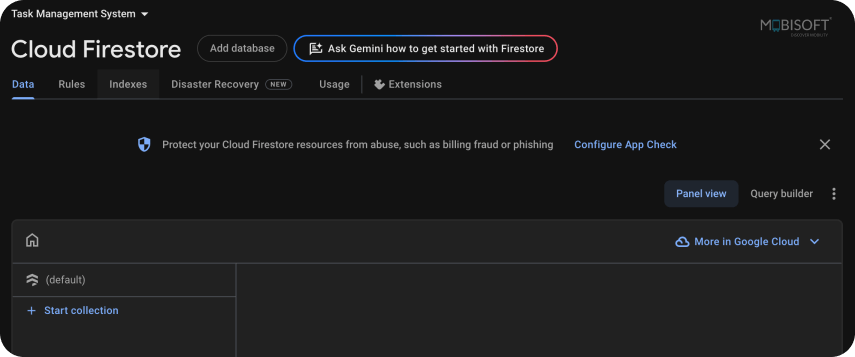
After creating the database on firebase firestore we are ready to call the read and write operations from mobile. Let’s get started.
Insert records into the Firestore database
To collect the data from the user, we create an Add Task screen and on this screen, we design the form, in which we get some user inputs like task title, task description, and the owner of the task. Once the necessary information has been entered, the user will click on the Add button. Upon clicking the Add button, the insertRecord() function is triggered, beginning with a validation of the form to ensure there are no empty fields by invoking _checkValidations(context). Feel free to implement your own validation rules according to your needs. After validating the form, we collect the input values and link them to the collection. Next, we need to invoke the insertTask() method from the database_service.dart file. Create a separate file named database_service.dart and write all the functions related to Firebase Firestore in it. The insertRecord() method is also used to update records by checking the task.id. We will explore the record update functionality later in this blog.
insertRecord(BuildContext context) async {

 String message = '';

 if (_checkValidations(context)) {

   if (widget.task.id == null) {

     message = await DatabaseService().insertTask(_getTask());

   } else {

     message =

         await DatabaseService().updateTask(widget.task.id!, _getTask());

   }

   CommonUtils.showToast(context, message);

   if (widget.task.id == null) {

     _clearInputFields();

   }

   Navigator.pop(context);

 }

}

_checkValidations(BuildContext context) {

 if (nameController.text.toString().isEmpty) {

   CommonUtils.showToast(context, "Please enter task name");

   return false;

 } else if (emailController.text.toString().isEmpty) {

   CommonUtils.showToast(context, "Please enter task description");

   return false;

 } else if (phoneController.text.toString().isEmpty) {

   CommonUtils.showToast(context, "Please enter task owner");

   return false;

 }

 return true;

}

_getTask() {

 return Task(

     taskName: nameController.text.toString().trim(),

     description: emailController.text.toString().trim(),

     owner: phoneController.text.toString().trim());

}
As shown in the above method, we invoke the .insertTask() function from the database_service.dart file which is used to store the data on the firestore database.
Future<String> insertTask(Task task) async

 try {

   await FirebaseFirestore.instance

       .collection("user")

       .doc(uid)

       .collection("task")

       .add(task.toMap());

   return "Record added successfully";

 } catch (e) {

   log(e.toString());

   if (e is FirebaseException) {

     return e.message ?? "";

   } else {

     return e.toString();

   }

 }

}
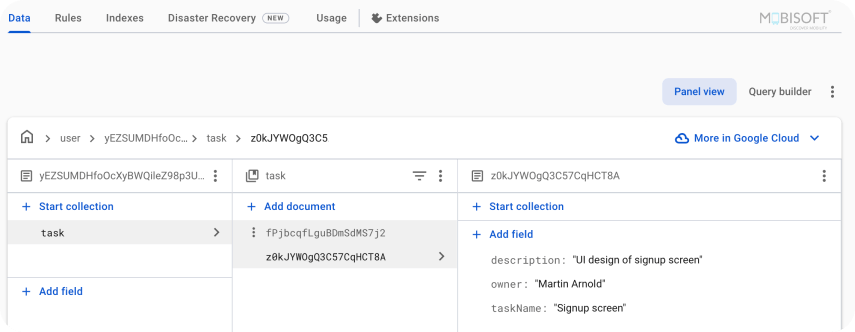
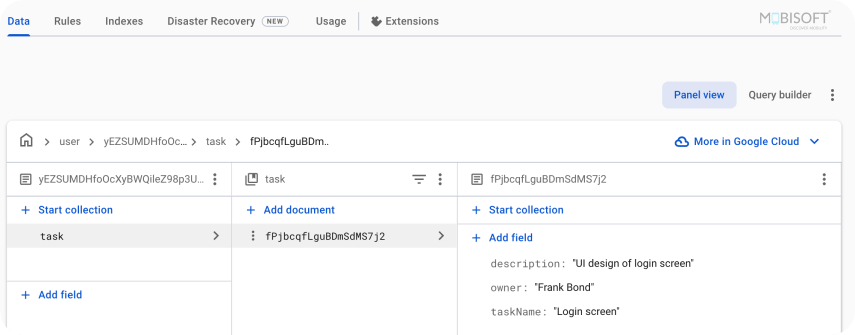
To insert records, use the .add() method and pass the data to this method. The data should be provided in a Map format. Before invoking .add() method, provide the collection name to the .collection() method. Then, use the logged-in user ID as the document ID to store the records against the current user.
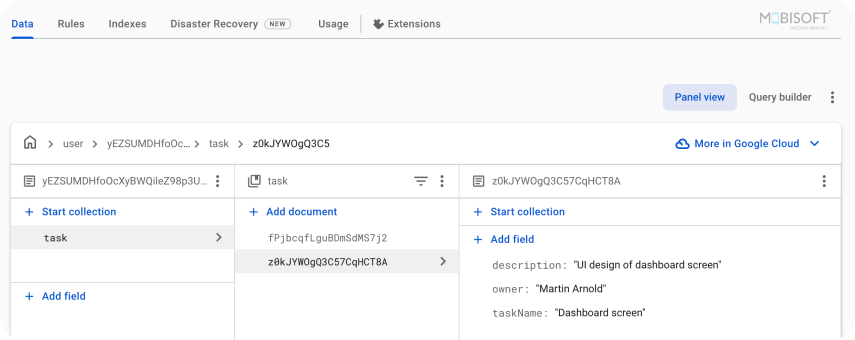
Fetch records from the Firestore database
To show all the records inserted in the firestore database, we have designed a screen with ListView widget. To fetch the records from the firestore database, we invoked the _fetchTaskList() method when the screen is initialized for the first time and also when the Refresh button is pressed. In this method we invoke the fetchTasks() method from the database_service.dart file.
Future<void> _fetchTaskList() async {

 final tasks = await DatabaseService().fetchTasks();

 setState(() {

   _taskList = tasks;

 });

}
To fetch the records from the database, create a function fetchTasks() like below
Future<List<Task>> fetchTasks() async {

 try {

   final QuerySnapshot snapshot = await FirebaseFirestore.instance

       .collection("user")

       .doc(uid)

       .collection("task")

       .get();

   return snapshot.docs.map((doc) {

     final id = doc.id;

     final data = doc.data();

     if (data != null) {

       Task task = Task.fromMap(data as Map<String, dynamic>);

       task.id = id;

       return task;

     } else {

       return Task(id: '', taskName: '', description: '', owner: '');

     }

   }).toList();

 } catch (e) {

   log(e.toString());

 }

 return [];

}
You can use the get() method from FirebaseFirestore.instance.collection() to retrieve the data. You need to provide the logged-in user ID as document ID to the collection function to fetch the logged-in user's data.

Update records on the Firestore database
To update the specific record, we have added the Edit button on each list item. When the Edit button is clicked, we redirect the user to the Add Task screen, providing the details of the selected task. We have used the same screen to add and update the records. After updating the required data, the user can click on the Update button. On the Update button click, we have called the same insertRecord() method, which we called for the Add records functionality in Step 1.
To update the specific record on the firestore database, we created the below function in database_service.dart file as below.
Future<String> updateTask(String documentId, Task task) async {

 try {

   await FirebaseFirestore.instance

       .collection("user")

       .doc(uid)

       .collection("task")

       .doc(documentId)

       .update(task.toMap());

   return "Record updated successfully";

 } catch (e) {

   log(e.toString());

   if (e is FirebaseException) {

     return e.message ?? "";

   } else {

     return e.toString();

   }

 }

}
You can update a specific record by providing the document ID. You can use the .update() method to update the record. Furthermore, it is essential to specify the accurate collection names where this record has been stored.
Delete records from Firestore database
We have provided a Delete button for each item on the list to remove the specified record from the Firestore database. When a user clicks on the Delete button, we call the _onDeleteButtonClicked(int index) method by passing the index of the list item. In this method, we call the .deleteTask(String documentId) method from the database_service.dart file. We also pass the document ID to this method.
_onDeleteButtonClicked(int index) {

 DatabaseService().deleteTask(_taskList![index].id ?? "");

 CommonUtils.showToast(context, "Record deleted successfully");

 _fetchTaskList();

}
Create a deleteTask() method in database_service.dart as shown below
Future<void> deleteTask(String documentId) async {

 try {

   FirebaseFirestore.instance

       .collection("user")

       .doc(uid)

       .collection("task")

       .doc(documentId)

       .delete();

 } catch (e) {

   log(e.toString());

 }

}
You can delete specific records by providing the document ID. To delete the record, you can use the .delete() method of FirebaseFirestore.instance. Furthermore, it is essential to specify the accurate collection names where this record has been stored.
Log in user details
We are able to retrieve details of the currently logged-in user, including their display name, email, phone number, photo URL, and other information. In this blog, we created a straightforward profile screen showing only the email address of the logged-in user. Feel free to customize the profile screen to suit your specific needs. To fetch the email address, we have written a function in database_service.dart file as below.
String loginUserName() {

 return FirebaseAuth.instance.currentUser?.email

 ?? "";

}
How to set the Firestore Rules
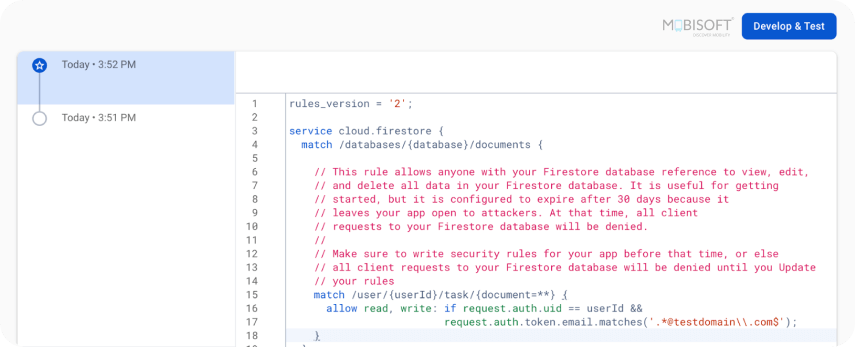
Firebase rules safeguard against unauthorized access by enforcing security measures. By using the Firestore rules, only authorized users can access the data. You can provide the read and write access to the users by defining the rules.
Steps to Add Firebase Rules
Step 1: Go to the Firebase Console and click on your project.
Step 2: From the menu on the left side, inside the Build section, select the Firestore Database option.
Step 3: Click on the second tab of ‘Rules’.
Step 4: Define your own rules according to your specific requirements.
Step 5: After writing rules, you can click on the ‘Publish’ button to apply these rules.
We have added the following rules: Only logged-in users can add or update records, and the email ID of a logged-in user must match the allowed domain. Here for the demonstration purpose, we only allow the domain 'testdomain.com'. You can change this domain as per your need.
Test your application
- To test the authentication feature, attempt to register and log in using various email addresses.
- Also test the Google Sign-In functionality.
- Try to add multiple records to test the Firestore database. Also check if data is getting stored or not against the logged-in user.
- Do the CRUD operations to test the other functionalities too.
- Evaluate the Firestore rules by trying to access them with unapproved users.
Conclusion
This blog will guide you through the process of setting up Firebase Authentication and Firebase Firestore in Flutter, as well as how to securely store and manage your data. To download the source code, please visit the GitHub repository here. You can explore the code and follow along with the steps mentioned in this guide.
Note: Before running the application, make sure to add the google-services.json file to the Android project and the GoogleServices-Info.plist file to the iOS project.




 May 14, 2025


