In today’s fast-paced mobile app development landscape, automation is crucial for boosting efficiency and reducing manual errors. Flutter, Google's popular framework for building cross-platform applications, makes it easy to create apps for both iOS and Android. However, when it comes to generating production-ready builds for multiple platforms, manually managing the build process can quickly become cumbersome and prone to mistakes.
This is where custom build scripts come into play. Automating the Flutter iOS build process for both iOS and Android not only saves time but also ensures consistency, reduces human error, and improves the overall development workflow. In this guide, I will walk through how to create and configure custom build scripts for your Flutter apps, enabling you to seamlessly automate the creation of iOS and Android builds. Whether you're getting ready for app deployment, configuring CI/CD Flutter iOS, or simply aiming to optimize your workflow, these build scripts are an essential tool for any Flutter developer.
Let’s get started and learn how to set up these scripts to automate the process of building your Flutter apps for both iOS and Android.

Creating Build Script for iOS
To build an iOS app and generate an IPA file, you must first enroll in the Apple Developer Program, register the bundle ID, and create the required distribution certificate and provisioning profile. Ensure that these are properly installed on your Mac before proceeding with the Flutter iOS build configuration process.
Step 1: Create ExportOptions.plist file
- Why is ExportOptions.plist needed?
Automated Build Configuration
During automated builds (like in CI/CD Flutter iOS pipelines), Xcode needs to know how to sign and export the IPA without manual intervention. The ExportOptions.plist file provides these instructions in a machine-readable format.
Signing Information
Specifies which signing certificates and provisioning profiles to use Determines the signing method (development, ad-hoc, enterprise, or app store) Maps bundle identifiers to provisioning profiles for apps with extensions
Distribution Settings
Defines how the app should be distributed (App Store, Ad Hoc, Enterprise, etc.)
Sample ExportOptions.plist file
<?xml version="1.0" encoding="UTF-8"?>
<!DOCTYPE plist PUBLIC "-//Apple//DTD PLIST 1.0//EN" "http://www.apple.com/DTDs/PropertyList-1.0.dtd">
<plist version="1.0">
<dict>
<key>destination</key>
<string>export</string>
<key>method</key>
<string>enterprise</string>
<key>provisioningProfiles</key>
<dict>
    <key>BUNDLE_ID</key>
    <string>PROVISIONING_PROFILE_NAME</string>
</dict>
<key>signingCertificate</key>
<string>Apple Distribution</string>
<key>signingStyle</key>
<string>manual</string>
<key>stripSwiftSymbols</key>
<true/>
<key>teamID</key>
<string>TEAM_ID</string>
<key>thinning</key>
<string><none></string>
</dict>
</plist>Let's break down each key-value pair:
1 destination
<key>destination</key>
<string>export</string>- Specifies where the exported files will be saved. "export" is the standard value.
2 method
<key>method</key>
<string>enterprise</string>- Defines the distribution method. Here it's set to "enterprise" for in-house distribution
- Other possible values include: "app-store", "ad-hoc", "development"
3 provisioningProfiles
<key>provisioningProfiles</key>
<dict>
<key>BUNDLE_ID</key>
<string>PROVISIONING_PROFILE_NAME</string>
</dict>- Maps your app's bundle identifier to the provisioning profile name
- BUNDLE_ID should be replaced with your actual app bundle ID
- PROVISIONING_PROFILE_NAME should be replaced with your actual provisioning profile name
4 signingCertificate
<key>signingCertificate</key>
<string>Apple Distribution</string>- - Specifies which certificate to use for signing the app
- "Apple Distribution" is used for enterprise and App Store distribution
5 signingStyle
<key>signingStyle</key>
<string>manual</string>- Indicates whether the signing is manual or automatic
- "manual" means you're explicitly specifying the certificates and provisioning profiles
Note: Make sure you're logged into Xcode with your Apple account (Xcode > Preferences > Accounts), and that "Automatically Manage Signing" is enabled under the "Signing & Capabilities" section in your Xcode project when specifying 'automatic'.
6 stripSwiftSymbols
<key>stripSwiftSymbols</key>
<true/>- When set to true, removes Swift symbols to reduce app size
7 teamID
<key>teamID</key>
<string>TEAM_ID</string>- Your Apple Developer Team ID
- Should be replaced with your actual team ID from Apple Developer account
8 thinning
<key>thinning</key>
<string><none></string>- Controls app thinning settings
- <none> means no app thinning will be applied
Step 2: Once you've updated all the necessary values, copy the ExportOptions.plist file to the ios directory of your Flutter project.
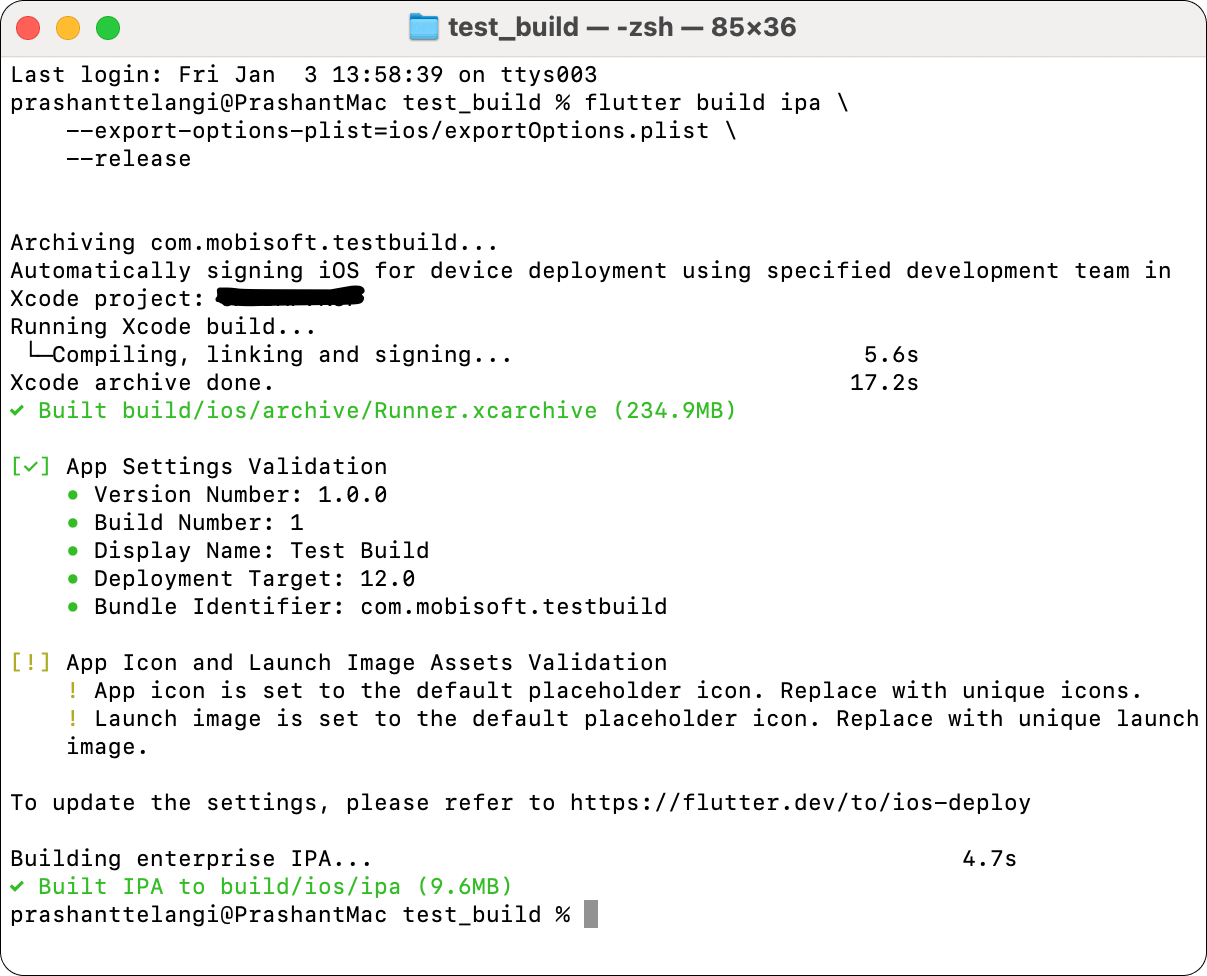
Step 3: Now, let's attempt to build the iOS project manually using the Flutter command.
Open Terminal, navigate to your Flutter project directory, and execute the following command:
flutter build ipa \
    --export-options-plist=ios/exportOptions.plist \
    --release
If you’ve correctly configured your exportOptions.plist file and ensured that Xcode has the proper provisioning profile and certificate, you should be able to generate the IPA successfully.

Note: The build will be generated in the build/ios/ipa directory within your project folder.
Step 4: Let’s create a bash script to encapsulate the entire build creation process.
#!/bin/bash

# Default values
BUILD_NAME="1.0.0"
BUILD_NUMBER="1"
EXPORT_OPTIONS_PLIST="ios/exportOptions.plist"
...

cd ..
# Build iOS IPA
echo "Building iOS IPA"
...

flutter build ipa \
    --build-name="$BUILD_NAME" \
    --build-number="$BUILD_NUMBER" \
    --export-options-plist="$EXPORT_OPTIONS_PLIST" \
    --release \
    -v
# Immediately after build, check the exit code and directory
BUILD_RESULT=$?
echo "Build exit code: $BUILD_RESULT"
echo "Contents of build directory:"
ls -R build/ios/
# Check if build was successful
if [ $BUILD_RESULT -eq 0 ]; then
    echo "Build completed successfully!"
    echo "IPA file location: ./build/ios/ipa/"
else
    echo "Build failed!"
    echo "Please ensure:"
    echo "1. Valid provisioning profile is configured in Xcode"
    echo "2. exportOptions.plist contains correct provisioning profile information"
    echo "3. Signing certificates are properly installed"
    exit 1
fi
The above shell script automates the process of building a Flutter iOS app. It generates an IPA file (iOS App Store Package) that can be used for App Store deployment or distributed for testing.
Version Control:
- Accepts two optional parameters:
-vfor version name (e.g., "1.0.0")-bfor build number (e.g., "1")
Build Process:
- Cleans previous builds using
flutter clean - Updates project dependencies with
flutter pub get - Installs iOS-specific dependencies using
pod install - Builds the IPA file with the provided version and build number
Error Handling:
- Checks for the existence of required files (such as
exportOptions.plist) - Validates each step of the build process
- Provides detailed error messages if any step fails
Output:
- The final IPA file is created in the
./build/ios/ipa/directory - Detailed logs are displayed throughout the build process
Usage Example:
sh build_ios_flutter.sh -v BUILD_NAME -b BUILD_NUMBER
sh build_ios_flutter.sh -v 1.0.0 -b 1
This command will build your iOS app with version 1.0.0 and build number 1. If you don't provide these parameters, the script will use the default values (version="1.0.0", build="1").
Note: Copy the above bash script to your Flutter project directory and ensure it has the correct permissions. Grant the script read and write access by executing the following command in your terminal:
chmod +x build_ios_flutter.sh
Step 5: Building a Custom Flavor for iOS
If your app supports multiple flavors, let's update the script to generate builds for each specific flavor.
flutter build ipa \
    --flavor "$FLAVOR" \
    --dart-define=FLAVOR="$FLAVOR" \
    --build-name="$BUILD_NAME" \
    --build-number="$BUILD_NUMBER" \
    --export-options-plist="$EXPORT_OPTIONS_PLIST" \
    --release \
    -t "lib/main_$FLAVOR.dart" \
    -v
Flavors Specific Arguments:
--flavor "$FLAVOR":
- Specifies which flavor (variant) of the app to build
- Common flavors might be 'dev', 'staging', 'prod'
- This corresponds to different build configurations in Xcode
--dart-define=FLAVOR="$FLAVOR":
- Passes the flavor value as a compile-time constant to your Dart code
-t "lib/main_$FLAVOR.dart":
- Specifies the entry point file for the app
- Uses different main files for different flavors
- Example: main_dev.dart, main_prod.dart
Looking to add flavors to your Flutter app? Check out our blog post for a step-by-step guide here!
Summing It Up
I hope you found this tutorial on Creating iOS Builds for Flutter Apps with a Custom Build Script helpful. You can download the complete script from here.
In Part 2, we’ll dive into Creating Android Builds for Flutter Apps with a Custom Build Script.


 January 20, 2025


