What is SSL Pinning?
SSL pinning, an acronym for Secure Socket Layer, also known as certificate pinning, is a security technique used in mobile and web applications to enhance the security of SSL/TLS connections. Instead of solely relying on the trust hierarchy of Certificate Authorities (CAs), SSL pinning involves hardcoding or “pinning” a specific SSL certificate or its public key within the application.
This means that the application will only accept connections with servers that present the pinned certificate or key, thereby preventing potential attacks such as man-in-the-middle (MITM) attacks where an attacker tries to intercept or modify the communication between the client and the server. SSL pinning adds an extra layer of security by ensuring that the connection is made only to trusted servers, even if the device’s trust store has been compromised or manipulated.
Two approaches utilized for implementing SSL pinning
Certificate Pinning:
Certificate pinning involves associating a specific SSL certificate with a particular domain or service. The application is configured to accept connections only to servers presenting this exact certificate. This mitigates the risk of man-in-the-middle (MITM) attacks, as even if an attacker presents a valid certificate signed by a trusted CA, the connection will fail if it does not match the pinned certificate.
Public Key Pinning:
Public key pinning involves associating a specific public key extracted from the SSL certificate with a particular domain or service. The application is configured to accept connections only to servers presenting this exact public key. This method provides similar security benefits as certificate pinning but focuses specifically on the public key, which can be more resilient to changes in certificates, such as certificate renewals.
Implementing SSL Pinning in your Flutter Application
To integrate SSL Pinning into a Flutter application, we’ll adopt the Certificate-based pinning method. Let’s explore this approach in detail.

To bring this to life, we’ll integrate the RESTful API provided by restcountries.com into our sample application.
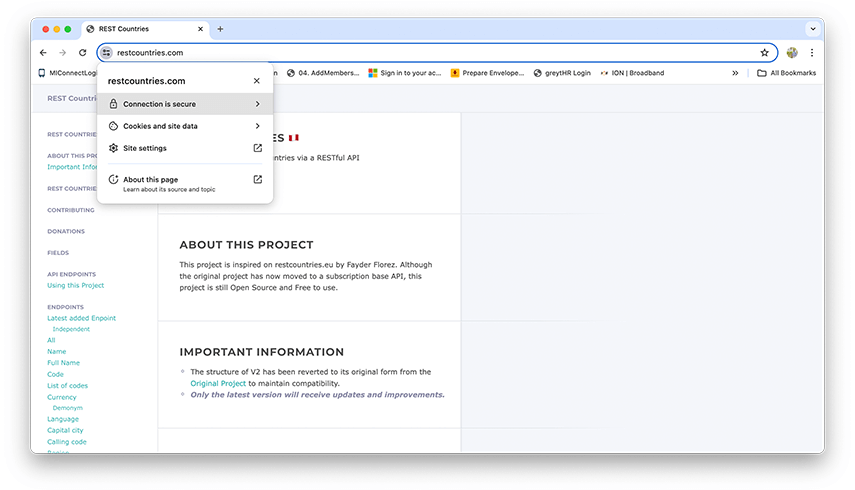
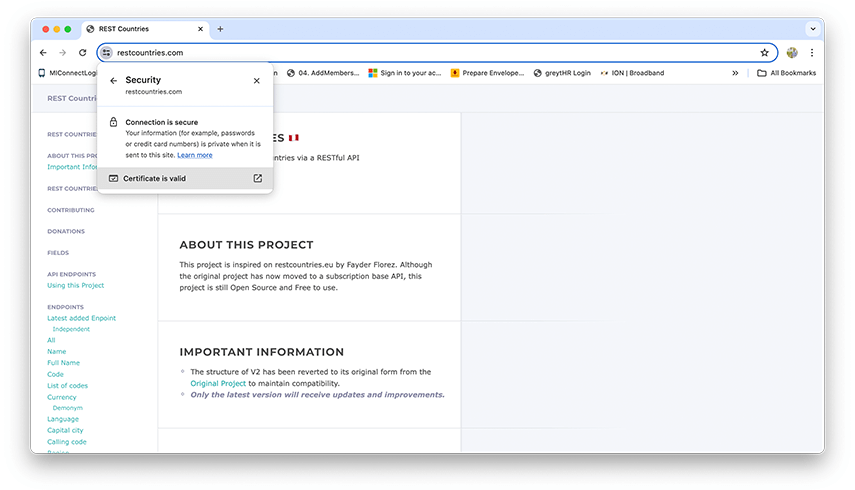
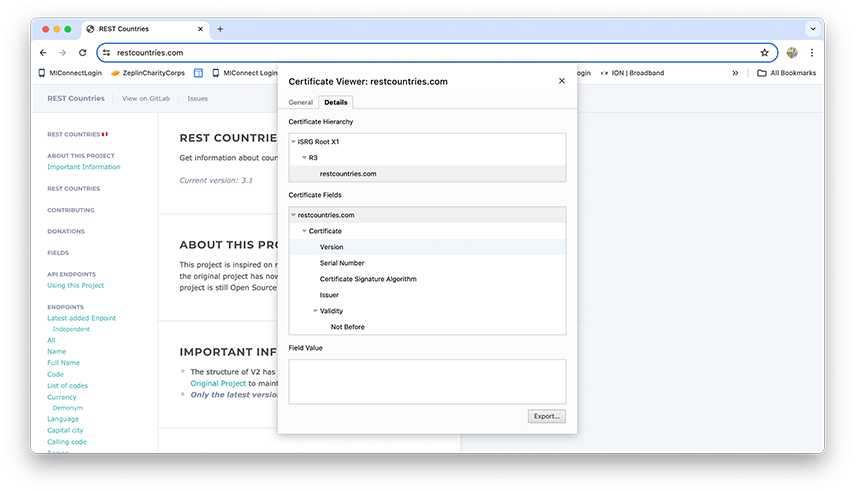
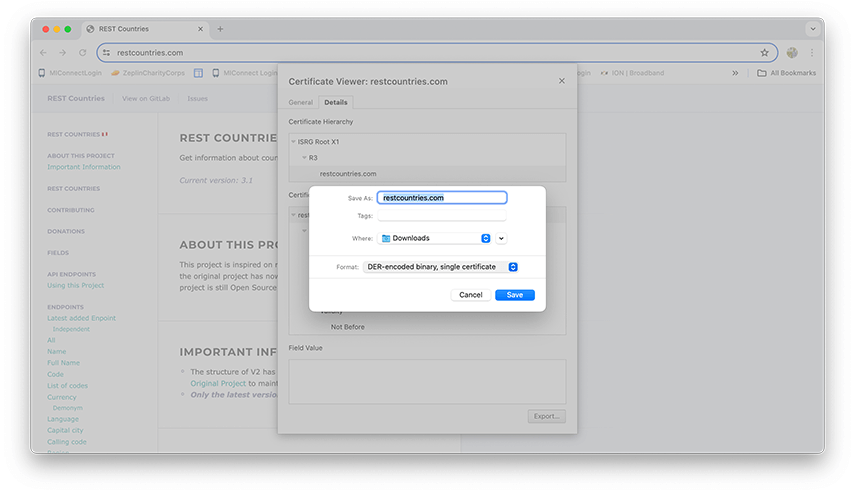
Step 1: Download the SSL certificate from restcountries.com.
- Open restcountries.com on your chrome browser.
- Click on View site information icon -> Connection is secure -> Certificate is Valid -> Open Details Tab
- Click on Export option at the bottom right and select DER-encoded binary, Single Certificate and save the certificate on your macOS and give it a suitable name.
Step 2: Convert the file extension of the downloaded certificate from .cer to .pem.
Navigate to the directory in your command line interface where you saved the .cer file from Step 1, and execute the below mentioned command.
openssl x509 -inform der -in [INPUT_FILENAME].cer -outform pem -out  [OUT_FILENAME].pem

openssl x509 -inform der -in restcountries.cer -outform pem -out ssl_certificate.pem

Note: We are generating a ssl_certificate.pem file from restcountries.cer file downloaded from the browser following Step 1.
Code language: CSS (css)
Step 3: Create a SSL enabled HTTP client.
- Create security context from the SSL certificate
Future<SecurityContext?> get _securityContext async {
    final data =
        await rootBundle.load("assets/certificate/ssl_certificate.pem");
    SecurityContext context = SecurityContext(withTrustedRoots: false);
    context.setTrustedCertificatesBytes(data.buffer.asUint8List());
    return context;
  }
Code language: JavaScript (javascript)
The _securityContext is an asynchronous method which retrieves the SSL certificate from the application’s assets. It loads the certificate file ssl_certificate.pem using rootBundle.load() from the Flutter framework. Then, it initializes a SecurityContext object with the loaded certificate.
- Create a SSL enabled HTTP Client
 Future<IOClient> _getSSLClient() async {
    HttpClient client = HttpClient(context: await _securityContext);
    client.badCertificateCallback =
        (X509Certificate cert, String host, int port) => false;
    IOClient ioClient = IOClient(client);
    return ioClient;
  }
}
Code language: JavaScript (javascript)
This method _getSSLClient() creates an SSL-enabled HTTP client (HttpClient) using the HttpClient(context: await _securityContext) constructor, where _securityContext provides the SSL certificate. It sets badCertificateCallback to always return false. Finally, it wraps the HttpClient in an IOClient and returns it.
- Create a class called SSLPinningManager and add the above methods to it.
class SSLPinningManger {

  Future<SecurityContext?> get _securityContext async {
    final data =
        await rootBundle.load("assets/certificate/ssl_certificate.pem");
    SecurityContext context = SecurityContext(withTrustedRoots: false);
    context.setTrustedCertificatesBytes(data.buffer.asUint8List());
    return context;
  }
  Future<IOClient> _getSSLClient() async {
    HttpClient client = HttpClient(context: await _securityContext);
    client.badCertificateCallback =
        (X509Certificate cert, String host, int port) => false;
    IOClient ioClient = IOClient(client);
    return ioClient;
  }
}
Code language: JavaScript (javascript)
Step 4: Write a Baseclient which will be responsible for handling and processing all our network requests.
class BaseClient {
 static const int timeOutDuration = 60;
 final Map<String, String> _header = {
   "Content-Type": "application/json; charset=utf-8",
   "Accept-Language": "en-US",
 };

 BaseClient._internal();

 static final BaseClient _instance = BaseClient._internal();

 static BaseClient get instance => _instance;

 late final http.Client client;

 factory BaseClient(http.Client client) {
   _instance.client = client;
   return _instance;
 }
...

Future<dynamic> get(String api) async {
  var uri = Uri.parse(UrlConstants.baseUrl + api);
  debugPrint(uri.toString());
  try {
    var response = await client
        .get(uri, headers: _header)
        .timeout(const Duration(seconds: timeOutDuration));
    return _processResponse(response);
  } on GeneralApiResponseErrorException catch (error) {
    ...
  } on Exception {
    ...
  }
...

}
...
}
Code language: JavaScript (javascript)
BaseClient provides a convenient way to manage HTTP requests with predefined headers and a configurable timeout duration, following the Singleton pattern to ensure a single instance is used across the application.
BaseClient has a factory constructor which needs to be initialized with an SSL Enabled client created using Step 3.
Step 5: Add initialize method to SSLPinningManager class which will initialize the BaseClient with SSL enabled HTTP Client.
class SSLPinningManger {
  Future<void> initialize() async {
    var client = await _getSSLClient();
    BaseClient(client);
  }
...

}
Code language: JavaScript (javascript)
Step 6: Call the SSLPinningManger’s initialize method in your main function
void main() async {
  WidgetsFlutterBinding.ensureInitialized();
  await SSLPinningManger().initialize();
...
  runApp(const MyApp());
}
Code language: JavaScript (javascript)
WidgetsFlutterBinding.ensureInitialized();: This line ensures that the Flutter framework’s bindings are initialized before any Flutter-specific code is executed. It’s necessary for widgets and other Flutter components to function properly.
SSLPinningManger().initialize();: This line initializes an instance of the SSLPinningManger class and waits for its initialize method to complete.
Note: To verify the effectiveness of SSL pinning, you can attempt to establish connections to various sites by pinning different certificates. If SSL pinning is functioning correctly, these attempts should result in the failure of the API calls.
Summing It Up
I hope you enjoyed this tutorial on Implementing SSL Pinning in your flutter apps. To download the source code for the sample app, please click here.

Author's Bio

Prashant Telangi brings over 15 years of experience in Mobile Technology, He is currently serving as Head of Technology, Mobile at Mobisoft Infotech. With a proven history in IT and services, he is a skilled, passionate developer specializing in Mobile Applications. His strong engineering background underscores his commitment to crafting innovative solutions in the ever-evolving tech landscape.