In this tutorial we will see how to use Amazon’s s3cmd for project backups. Amazon’s s3 is highly available storage cloud. It gives you virtually unlimited storage at very affordable rate, so this makes it ideal for project backups.
Typically you would want to store your daily database terms to a amazon s3 bucket, naturally, you would want to automate this process. To automate this process the s3cmd package is very useful.
Here, we will see how to use s3cmd to copy files to an s3 bucket.
First you need to create an account in console.aws.amazon.com. After creating an account follow the steps given below:
Step 1: Creating s3 Bucket
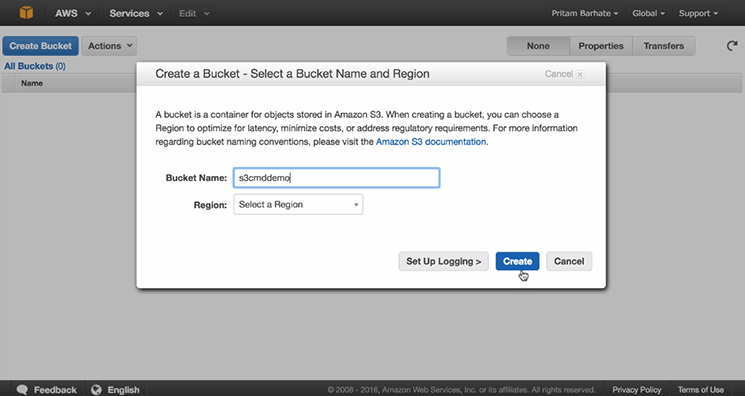
First, create an ‘s3 bucket’
- Click on ‘Create Bucket’
- Select a Bucket Name (e.g ‘s3cmddemo’)
- Click on ‘create’
Step 2: Create A User
-
- Click on ‘Services’
- Go to > Amazon’s IAM Service
- Go to ‘Users’ and click on ‘Create New User’
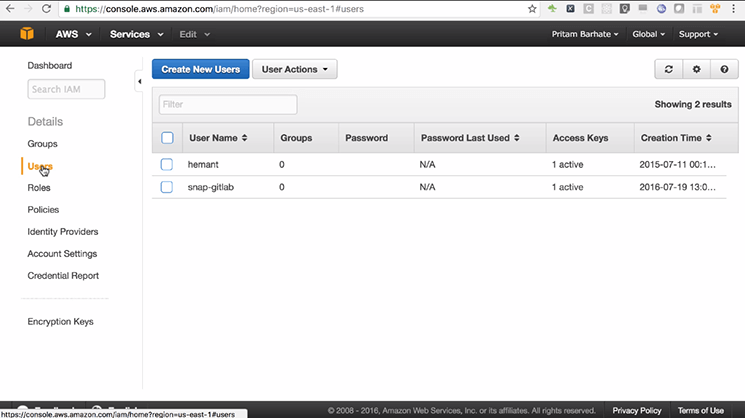
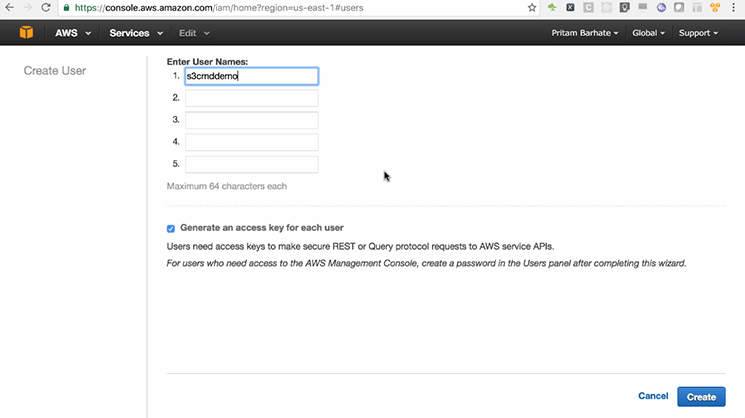
- Enter ‘User Name’
- Click on ‘Create’
Generally, it is advised to use the same name (Bucket name) to indicate that this user is created for the sole purpose of accessing the s3 bucket.
Note: It’s important not to use the same credentials for multiple buckets, because that way the credentials of that one user gets leaked, all your buckets become vulnerable to hacking, so it’s a good practice to create a user to specifically access data from one bucket.
Even in a project if you are creating various buckets for dev demo and production environment, you should create a different user for each of those buckets.
Step 3: Downloading Credentials
- Click on ‘Download Credentials’.
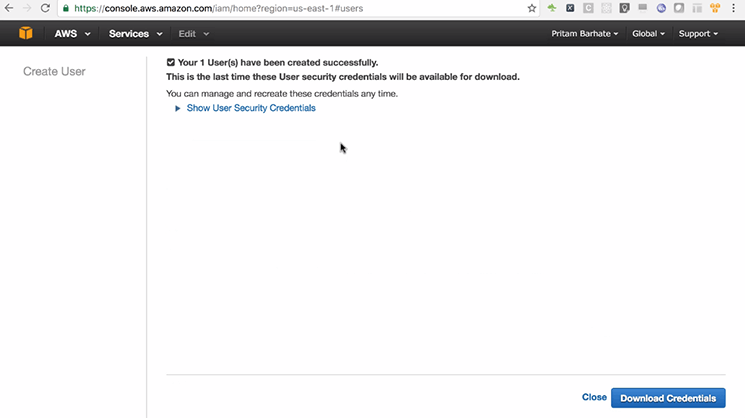
Note: You get to download credentials only once if you lose them you need to reset credentials using ‘IAM Management Console’. But it will mean that you will need to update all the projects where this user’s credentials are being used.
Once downloaded, you will receive > User Name, Access key Id, and Secret Access Key.
Creating ‘IAM Policy’ To Give User Access To The Bucket That We Created
Below is an example of an already created bucket policy:
Step 1: Create A New File
- Create a new file. For this purpose copy the below given statement in a new file.
(TEXT TO COPY TO A FILE)
{
"Version": "2012-10-17",
"Statement": [
{
"Effect": "Allow",
"Action": [
"s3:ListBucket",
"s3:GetBucketLocation",
"s3:ListBucketMultipartUploads"
],
"Resource": "arn:aws:s3:::",
"Condition": {}
},
{
"Effect": "Allow",
"Action": [
"s3:AbortMultipartUpload",
"s3:DeleteObject",
"s3:DeleteObjectVersion",
"s3:GetObject",
"s3:GetObjectAcl",
"s3:GetObjectVersion",
"s3:GetObjectVersionAcl",
"s3:PutObject",
"s3:PutObjectAcl",
"s3:PutObjectAclVersion"
],
"Resource": "arn:aws:s3:::/*",
"Condition": {}
},
{
"Effect": "Allow",
"Action": "s3:ListAllMyBuckets",
"Resource": "*",
"Condition": {}
}
] } - Change the line containing
“Resource”: "arn:aws:s3:::"
with the as s3cmddemo (Add your bucket-name)
After adding the change, it would be:
"Resource": "arn:aws:s3:::s3cmddemo"
We are creating below given statement for “Resource”: “arn:aws:s3:::s3cmddemo”, which gives following actions:
- “s3:ListBucket”
- “s3:GetBucketLocation”
- “s3:ListBucketMultipartUploads”
Step 2: Provide Access To A Resource
Similarly give access to
“Resource”: “arn:aws:s3:::/*”,
Use – s3cmddemo as the /*”,
Hence, it will be:
“Resource”: “arn:aws:s3:::s3cmddemo/*”,
Note: We have given “ListAllMyBuckets” action on all buckets to this user, so this allows this user to list all the buckets but he can modify only the buckets listed in the two below given roots, and that is the only bucket ‘s3cmddemo’
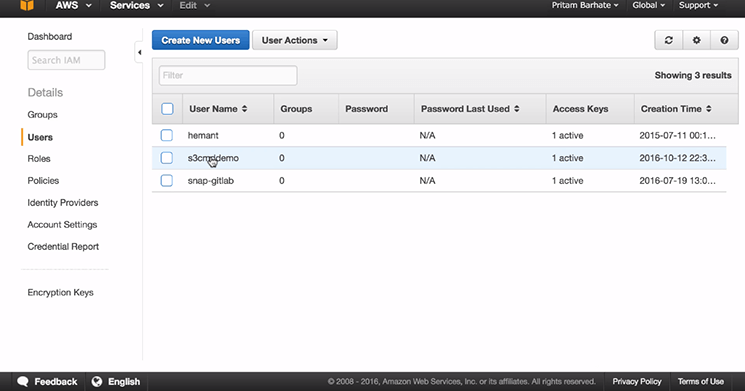
Step 3: Completion Of User Creation Process In ‘IAM’
- Select and copy the below given Statement
- Go to IAM
- Click on ‘Close’.
Once you click on ‘Close’, you will find the user in ‘IAM’ with the name of ‘s3cmddemo’ as shown below
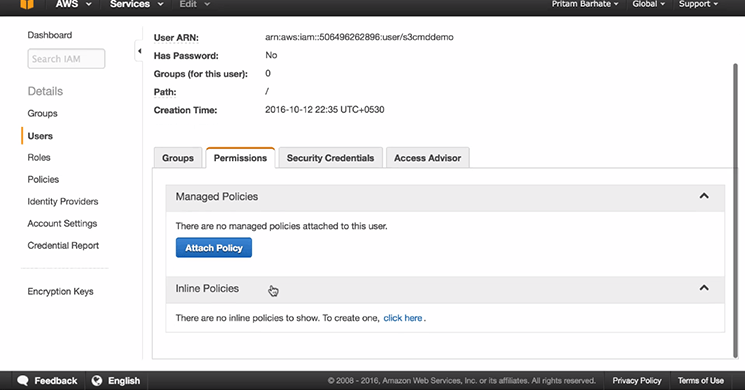
Step 4: Updating Policies In Policy Document
1. Click on the user name ‘s3cmddemo’
2. Click on ‘Inline Policies’
3. Select ‘click here’ option
4. Select ‘Custom Policy’ under Set Permissions
5. Click on ‘Select’
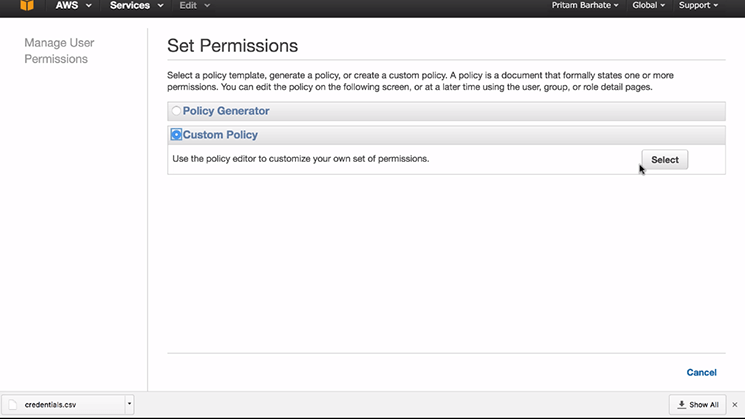
After clicking on ‘Select’ the Review Policy tab will open, paste the following in ‘Policy Document’ as shown below:
[TEXT TO COPY] (Here the bucket name has been given as s3cmddemo)"Version": "2012-10-17",
"Statement": [
{
"Effect": "Allow",
"Action": [
"s3:ListBucket",
"s3:GetBucketLocation",
"s3:ListBucketMultipartUploads"
],
"Resource": "arn:aws:s3:::s3cmddemo",
"Condition": {}
},
{
"Effect": "Allow",
"Action": [
"s3:AbortMultipartUpload",
"s3:DeleteObject",
"s3:DeleteObjectVersion",
"s3:GetObject",
"s3:GetObjectAcl",
"s3:GetObjectVersion",
"s3:GetObjectVersionAcl",
"s3:PutObject",
"s3:PutObjectAcl",
"s3:PutObjectAclVersion"
],
"Resource": "arn:aws:s3:::s3cmddemo/*",
"Condition": {}
},
{
"Effect": "Allow",
"Action": "s3:ListAllMyBuckets",
"Resource": "*",
"Condition": {}
}
]
}
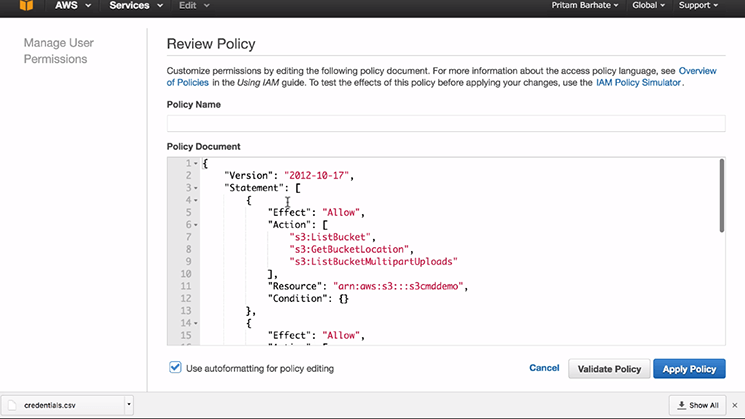
- Give the Policy Name, for example, I have given policy name as: s3cmddemo-policy
- Click on ‘Validate Policy’
- Once the policy is validated then click on ‘Apply policy’
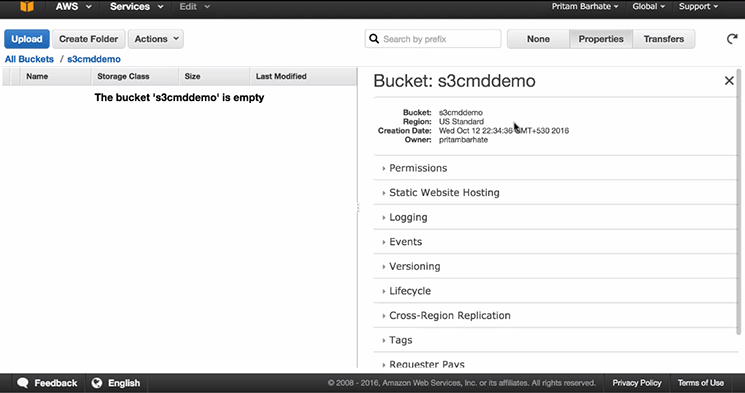
Step 5: Check If Everything Is Done
Once the policy is applied:
- Go to s3cmddemo
- Click on ‘Properties’
Actually, nothing is going to change in properties, here, first we need to configure s3cmd and then upload files, which is our next step.
How To Configure s3cmd On The Server Installed
You first need to create Ubuntu 16.04 server. Here, I have freshly created Ubuntu 16.04 server, where I am going to install s3cmd
Step 1: Update Ubuntu With Latest Software From Repositories
- Open terminal in Ubuntu Server and type following command on command prompt:
$ sudo apt-get update
Step 2: Install s3cmd
Type following command in the terminal:
$ sudo apt-get install s3cmd
Step 3: Configuring s3cmd
Type following command in the terminal:
$ s3cmd --configure
- It will ask you for the Access Key and Secret Key. Provide the access key and the secret key which you created earlier using IAM.
- You should choose yes for https access.
This completes the process of configuring s3cmd.
Using s3cmd To Upload Files
Here we will see two things:
First is how to upload the single file
Next we will see how to sync the entire directory to s3
Step 1: Create A Test File
Go to the command prompt and open testfile
$ vi testfile.txt
I have created a ‘New file’ and I have put text as ‘This is test file’ in the file.
Step 2: Upload The Test File On AWS
- Use s3cmd’s ‘put’ command
s3cmd put testfile.txt s3://s3cmddemo/backups/
to upload the file to a folder called as ‘backups’ in your directory.
Note: The format for s3 paths is: ‘s3:///backups/’
One more thing to note here is that the s3 bucket names are unique across entire s3
- Copy the command and paste it in your Ubuntu server
$ s3cmd put testfile.txt s3://s3cmddemo/backups/
Hence, the file is successfully uploaded
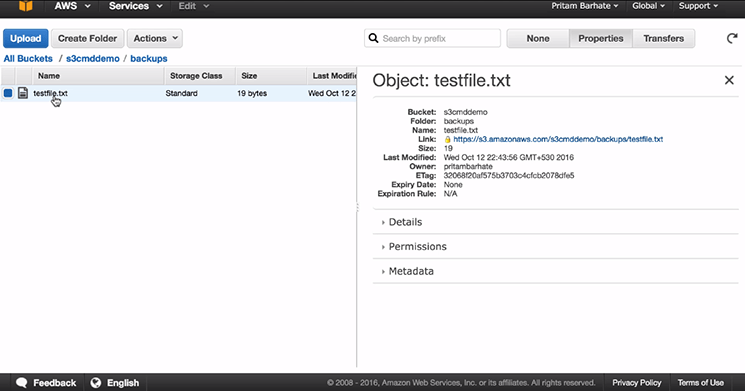
Step 3: Verify Success Of Upload Procedure
- Go to the s3 console and refresh it, you can see the ‘backup’ folder
- Click on it and there you can see ‘textfile’ is available
Step 4: Download The File
Now, to download the file:
- Click on ‘Action’
- Click on Download option, and download the file
(once the download is complete, you can see the content of the file)
Another way is to use s3cmd’s ‘Get subcommand’ to check the file
-
- Open terminal and create a new directory:
$ mkdir temp

$ cd temp/
-
- Use the s3cmd Get command to download the file:
$ s3cmd get s3://s3cmddemo/backups/testfile.txt

$ ls

$ cat testfile.txt
Now we will get content of the file
How To Sync A Directory To The s3 Bucket
Step 1: Create A Folder Structure
Here we will create a new directory called testdir and create subdirectories within the testdir.:
-
- To create directories use the mkdir command:
$ mkdir testdir
-
- To create a new file use the touch command:
$ touch 1.txt

$ touch 2.txt

$ mkdir subdir

$ cd subdir
-
- Again use the touch command:
$ touch s1.txt

$ touch s2.txt

$ ls
-
- After this use the command:
$ cd . .

$ ls
You will get 1.txt 2.txt subdir
-
- Finally, put the command:
$ cd . .

$ ls
Hence, the testdir is created.
Note:We are just going to quickly create the folder structure. We are not going to put any data in these files. Below, you can see the test dir we have created.
Step 2: Sync Using s3cmd Sync Command
If you want to sync the entire directory to s3cmd
- For this use the command
s3cmd sync ./testdir s3://s3cmddemo/ - To this command, you pass the directory (without ending slash (/)) e.g. ./testdir
- For destination part, you do provide ending slash (/) e.g. s3://s3cmddemo/
At root level directory, the test directory will be copied. You can also copy it inside any sub-directory of s3cmddemo (only if you want to).
At last, check all the files in the directory and subdirectory. This is how you can configure s3cmd to upload files to Amazon s3.
Limiting The Storage That Is Being Used
Now in backups typically you would want to limit the storage being used. For database backups typically you would want to keep backups for last 30 days or so.
Let’s say we are storing all the backups inside the backup folder and we want any files that are older than 30 days to be deleted automatically.
For this, we need to set something called as ‘Lifecycle Rule’ for our bucket, for this
- Go to ‘All bucket’ under that Select ‘bucket’
- Go to ‘Properties’ and click on ‘Lifecycle’
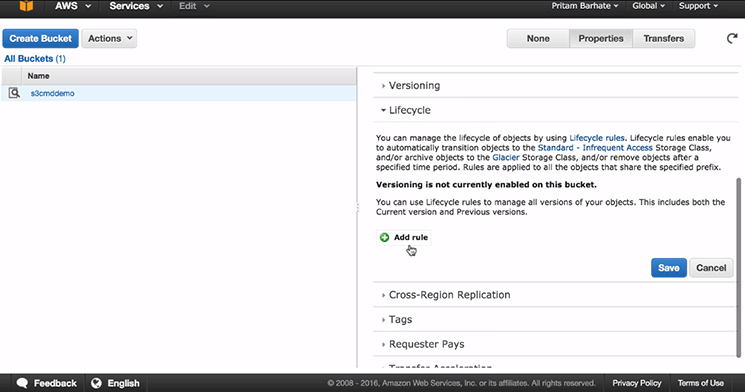
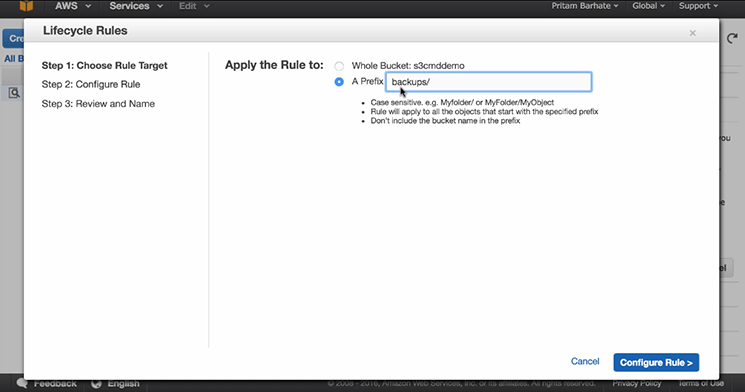
- In ‘Lifecycle’ Go to ‘Add rule’
- In ‘Add rule’ select ‘A Prefix’ and in that type ‘backpus/’
- Click on ‘Configure rule’
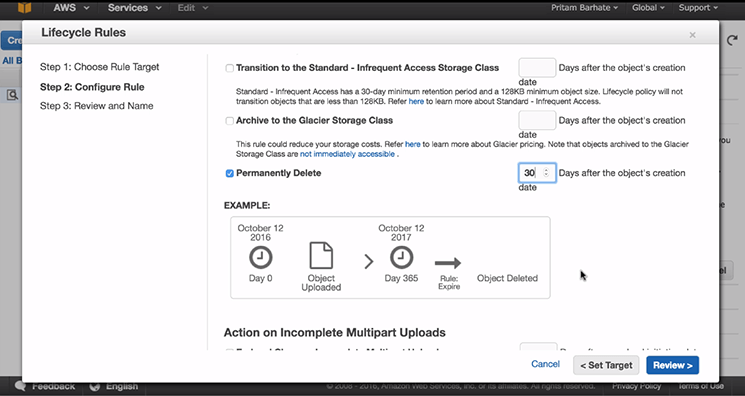
- Select ‘Permanently delete’ (there are other options, so you can use or select other options too, according to your need)
- Type the number of days you want to permanently delete backups, for example, here we will type ‘30’
- Click on the ‘Review’
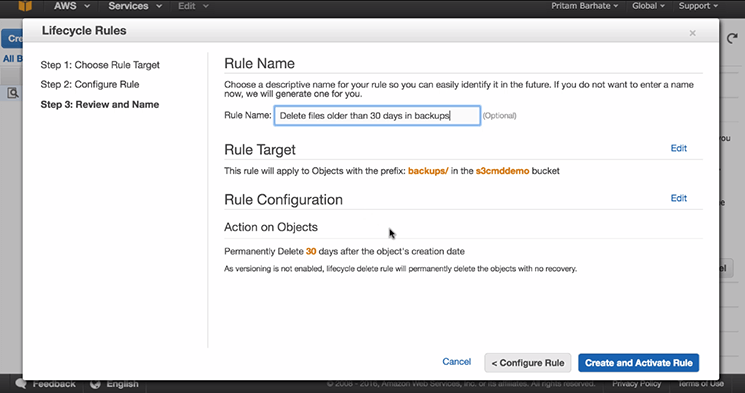
- In ‘Rule Name’ type ‘Delete files older than 30 days in backups’
- Click on ‘Create and Active Rule’ you will see your rule and you can also edit if you wish to do so
That’s it, this is how you do it!
Do refer to it later, when you want to configure your own backups using s3cmd.
This is how you use Amazon S3 and s3cmd for project backups.
Author’s Bio

Pritam Barhate, with an experience of 10+ years in technology, heads Technology Innovation at Mobisoft Infotech. He has a rich experience in design and has been a consultant for a variety of industries and startups. At Mobisoft Infotech, he primarily focuses on technology resources and develops the most advanced solutions. Follow him @pritambarhate