WebSockets are an essential technology for real-time applications, enabling seamless two-way communication between clients and servers. Whether you're building a chat app, live notification system, or multiplayer game, WebSockets allow data to flow instantly between users.
In this tutorial, we'll walk you through setting up a WebSocket server with Socket.io in a Node.js environment using TypeScript. Socket.io is one of the most popular libraries for real-time web applications and provides an easy way to handle WebSockets.
In this tutorial, we'll cover two main examples :
- Basic Example: Broadcasting messages to all clients.
- Advanced Example: Implementing chat rooms (groups) for specific communication.
This repository contains the code for the tutorial: Angular Signals Guide: Architectural Patterns and Best Practices for Using Signals in Angular Applications by Mobisoft, Web Application Development Company, Houston
The code for this tutorial is available in this Github repository.
1. Introduction to WebSockets and Socket.io

What are WebSockets?
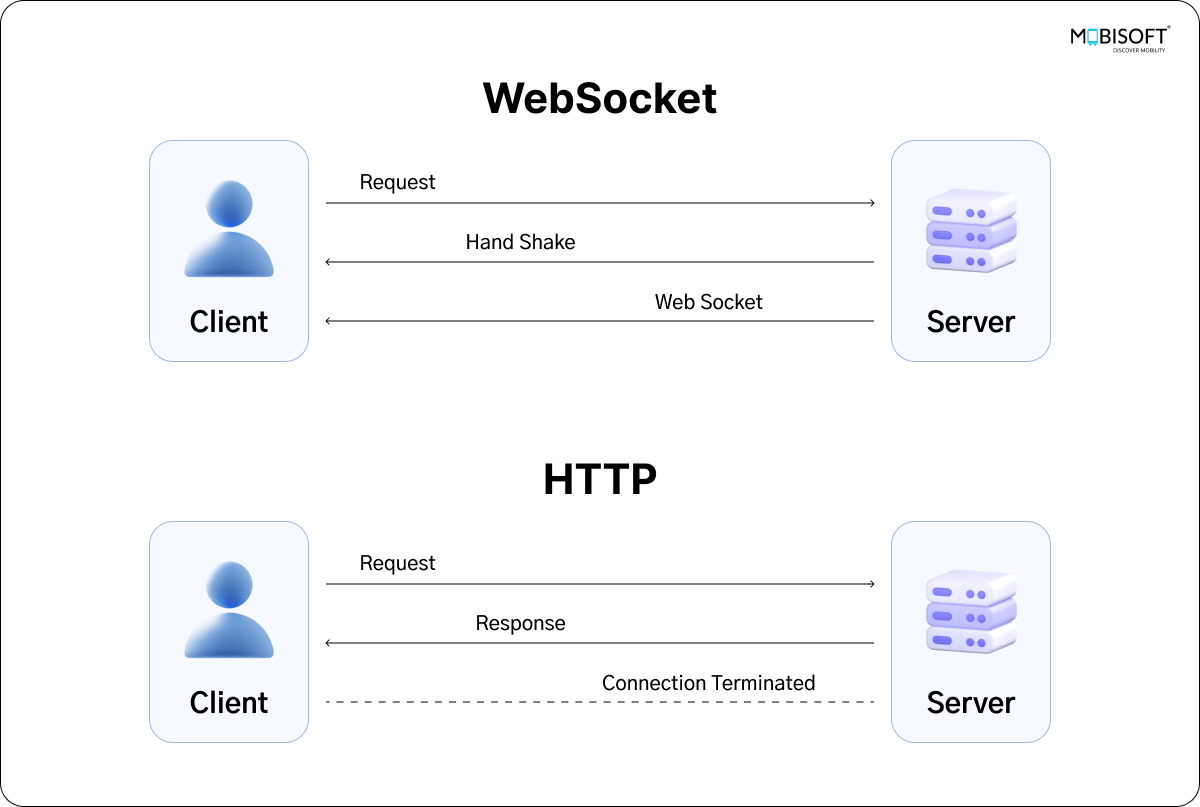
WebSockets enable two-way communication between the client and server over a single, long-lived connection. Unlike traditional HTTP requests, which are request-response-based, WebSockets allow data to be sent between the client and server at any time. This makes WebSockets perfect for real-time applications like chat apps, live notifications, gaming platforms, and more.
Why Socket.io?
Socket.io is a powerful library that makes working with real-time communication in Node.js applications much easier. It simplifies the process of connecting users and allowing them to communicate instantly, using WebSockets or other protocols as needed.
Key benefits include:
- WebSocket Abstraction: Easily manage WebSocket connections without the complexity.
- Fallback Support: Automatically switches to long polling if WebSockets aren’t available.
- Room Management: Create rooms for users to join, enabling group-specific communication.
- Automatic Reconnection: Socket.io automatically reconnects if the connection is lost.
In this tutorial, we’ll use Socket.io to implement both basic and advanced functionalities.
2. Setting up the Project
Let’s start by setting up the project environment using Node.js, Express, and Socket.io.
Prerequisites:
- Node.js installed (if you don’t have it, download it from here).
- Basic knowledge of Node.js, TypeScript, and npm.
Step 1: Initialize the Project
Create a new directory for your project:
mkdir node-socketio-projectMove into the project directory:
cd node-socketio-projectInitialize the node project:
npm init -yStep 2: Install Dependencies
Install the core dependencies for the Express framework and Socket.IO:
npm install express socket.ioInstall TypeScript and necessary type definitions:
npm install --save-dev typescript ts-node @types/expressTypeScript Configuration
Generate a TypeScript configuration file by running:
npx tsc --init3. Basic Example: Emit Messages to All Clients
Step 1: Set Up Basic Express Server with Socket.io
Create the src/index.ts file and set up a basic WebSocket server using Express and Socket.io. This server will broadcast messages to all connected clients using Socket.io.
import express from "express"

import http from "http"

import { Server } from "socket.io"

import { handleMessage } from "./controllers/socket-controller"

const app = express()

const server = http.createServer(app)

const io = new Server(server) // Initialize Socket.io on the server

app.use(express.static("public"))

app.get("/", (req, res) => {

  res.sendFile(__dirname + "/public/index.html")

})

//Handle new connections from clients

io.on("connection", (socket) => {

  console.log("A new client connected")

  //Handle messages from the client

  socket.on("message", (msg) => {

    handleMessage(socket, msg)

  })

  socket.on("disconnect", () => {

    console.log("Client disconnected")

  })

})

const PORT = process.env.PORT || 3000

server.listen(PORT, () => {

  console.log(`Server is running on port ${PORT}`)

})
Explanation:
- This code sets up an Express server and integrates it with Socket.io.
- It listens for incoming WebSocket connections and provides an endpoint (/) to serve the
index.htmlfile. - When a client connects, the server listens for messages from that client and invokes the
handleMessagefunction.
Step 2: Create the Socket Controller
In src/controllers/socket-controller.ts, define the logic for handling messages:
import { Socket } from 'socket.io'

export const handleMessage = (socket: Socket, message: string) => {

  console.log('Message from client:', message)

  socket.broadcast.emit('message', message)

}
Explanation:
- This controller handles the messages that clients send to the server.
- It logs the received message and broadcasts it to all other connected clients using
socket.broadcast.emit().
4. Advanced Example: Chat Rooms (Groups)
Step 1: Update Socket Controller to Handle Rooms
In src/controllers/socket-controller.ts, modify the code to add room functionality:
import { Socket } from 'socket.io'

export const handleMessage = (socket: Socket, message: string) => {

  console.log('Message from client:', message)

  socket.broadcast.emit('message', message)

}

export const joinRoom = (socket: Socket, room: string) => {

  socket.join(room)

  socket.emit('joinMessageToRoom', `You have joined the room: ${room}`)

}

export const sendMessageToRoom = (socket: Socket, room: string, message: string) => {

  socket.to(room).emit('sendMessageToRoom',room, message)

}
Explanation:
- In addition to broadcasting messages globally, this controller introduces functions for joining specific rooms and sending messages to clients within a room.
joinRoomallows a client to join a room.sendMessageToRoombroadcasts a message only to clients in that room.
Step 2: Update Server Logic to Handle Room Messages
In src/index.ts, add the logic to handle room-related events:
import express from "express"

import http from "http"

import { Server } from "socket.io"

import {

  handleMessage,

  joinRoom,

  sendMessageToRoom,

} from "./controllers/socket-controller"

const app = express()

const server = http.createServer(app)

const io = new Server(server) // Initialize Socket.io on the server

app.use(express.static("public"))

app.get("/", (req, res) => {

  res.sendFile(__dirname + "/public/index.html")

})

io.on("connection", (socket) => {

  console.log("A new client connected")

  socket.on("message", (msg) => {

    handleMessage(socket, msg)

  })

  socket.on("joinRoom", (roomName: string) => {

    joinRoom(socket, roomName)

  })

  socket.on("sendMessageToRoom", (roomName: string, message: string) => {

    sendMessageToRoom(socket, roomName, message)

  })

  socket.on("disconnect", () => {

    console.log("Client disconnected")

  })

})

const PORT = process.env.PORT || 3000

server.listen(PORT, () => {

  console.log(`Server is running on port ${PORT}`)

})
5. Client-Side Code and Interaction
In src/public/index.html, allow users to interact with both broadcast messages and chat rooms functionalities. Socket.io listens for incoming messages on the client-side and displays them appropriately.
<!DOCTYPE html>

<html lang="en">

  <head>

    <meta charset="UTF-8" />

    <title>Socket.io Chat Example</title>

    <script src="/socket.io/socket.io.js"></script>

    <script>

      const socket = io();

      let currentRoom = '';

      //Receive messages from all clients

      socket.on("message", msg => displayMessage("Received: " + msg, "broadcastMessages"));

      //Receive messages for a specific room

      socket.on("sendMessageToRoom", (room, msg) => displayMessage(`Received(${room}): ` + msg, "roomMessages"));

      //Notify when the user joins a room

      socket.on("joinMessageToRoom", msg => displayMessage("You: " + msg, "roomMessages"));

      //Function to send message to all clients

      function sendMessage() {

        const message = document.getElementById("message").value;

        socket.emit("message", message);

        displayMessage(`You: ${message}`, "broadcastMessages");

        document.getElementById("message").value = ''; //Clear the input

      }

      //Join the room and update the current room

      function joinRoom() {

        const room = document.getElementById("room").value;

        if (room === currentRoom) {

          alert("You already joined the same room!");

        } else {

          socket.emit("joinRoom", room);

          currentRoom = room;

        }

      }

      //Send message to a specific room

      function sendMessageToRoom() {

        const room = document.getElementById("room").value;

        const message = document.getElementById("messageRoom").value;

        socket.emit("sendMessageToRoom", room, message);

        displayMessage(`You (${room}): ${message}`, "roomMessages");

        document.getElementById("messageRoom").value = '';

      }

      //Function to display messages in the specified section

      function displayMessage(message, sectionId) {

        const div = document.createElement("div");

        div.innerHTML = message;

        document.getElementById(sectionId).appendChild(div);

      }

    </script>

    <style>

      .section {

        margin-bottom: 20px;

        padding: 10px;

        border: 1px solid #ccc;

      }

      .section h3 {

        margin-top: 0;

      }

      .messages {

        margin-top: 10px;

        border: 1px solid #ddd;

        padding: 10px;

        max-height: 200px;

        overflow-y: auto;

      }

    </style>

  </head>

  <body>

    <div class="section">

      <h3>Broadcast Message to All Clients</h3>

      <input id="message" type="text" placeholder="Enter message" />

      <button onclick="sendMessage()">Send Message</button>

      <div id="broadcastMessages" class="messages"></div>

    </div>

    <div class="section">

      <h3>Chat Room</h3>

      <input id="room" type="text" placeholder="Enter room name" />

      <button onclick="joinRoom()">Join Room</button><br /><br />

      <input id="messageRoom" type="text" placeholder="Enter message" />

      <button onclick="sendMessageToRoom()">Send Message to Room</button>

      <div id="roomMessages" class="messages"></div>

    </div>

  </body>

</html>Explanation:
Above code mainly consists of two main features:
- Broadcast Messaging: Users can send messages to all connected clients, and their messages are displayed with a "You" label.
- Room Messaging: Users can join specific rooms and send messages to those rooms. Messages are displayed with the room's name.
JavaScript handles message sending and receiving, dynamically updating the page with messages from the user and the server. The socket.emit() function is used for sending messages, while socket.on() listens for incoming messages
6. Auto Reconnection with Socket.io
Socket.io automatically reconnects the client if the connection to the server is lost. This feature helps keep the app running smoothly without interruptions, even if there are network issues or the server restarts.
How It Works:
When the connection is lost, Socket.io will try to reconnect automatically. You can customize the reconnection attempts and delays.
Customizing Auto Reconnection
You can change how Socket.io reconnects, like how many times it should try or how long it should wait between tries. Here's a simple way to set it up: (Add this code in src/public/index.html file)
const socket = io({

   reconnection: true, //Enable reconnection

   reconnectionAttempts: 5, //Try 5 times to reconnect

   reconnectionDelay: 1000, //Wait 1 second between attempts

   reconnectionDelayMax: 5000, //Maximum wait time is 5 seconds

   timeout: 20000, //Timeout for the initial connection

 });

   socket.on("connect", () => {

     console.log("Connected to server");

   });

   socket.on("disconnect", (reason) => {

     console.log(`Disconnected from server: ${reason}`);

   });
7. Expected Output and Testing

Step 1: Run the Server
To run the server, use the following command:
npx ts-node src/index.tsStep 2: Open the Client in Your Browser
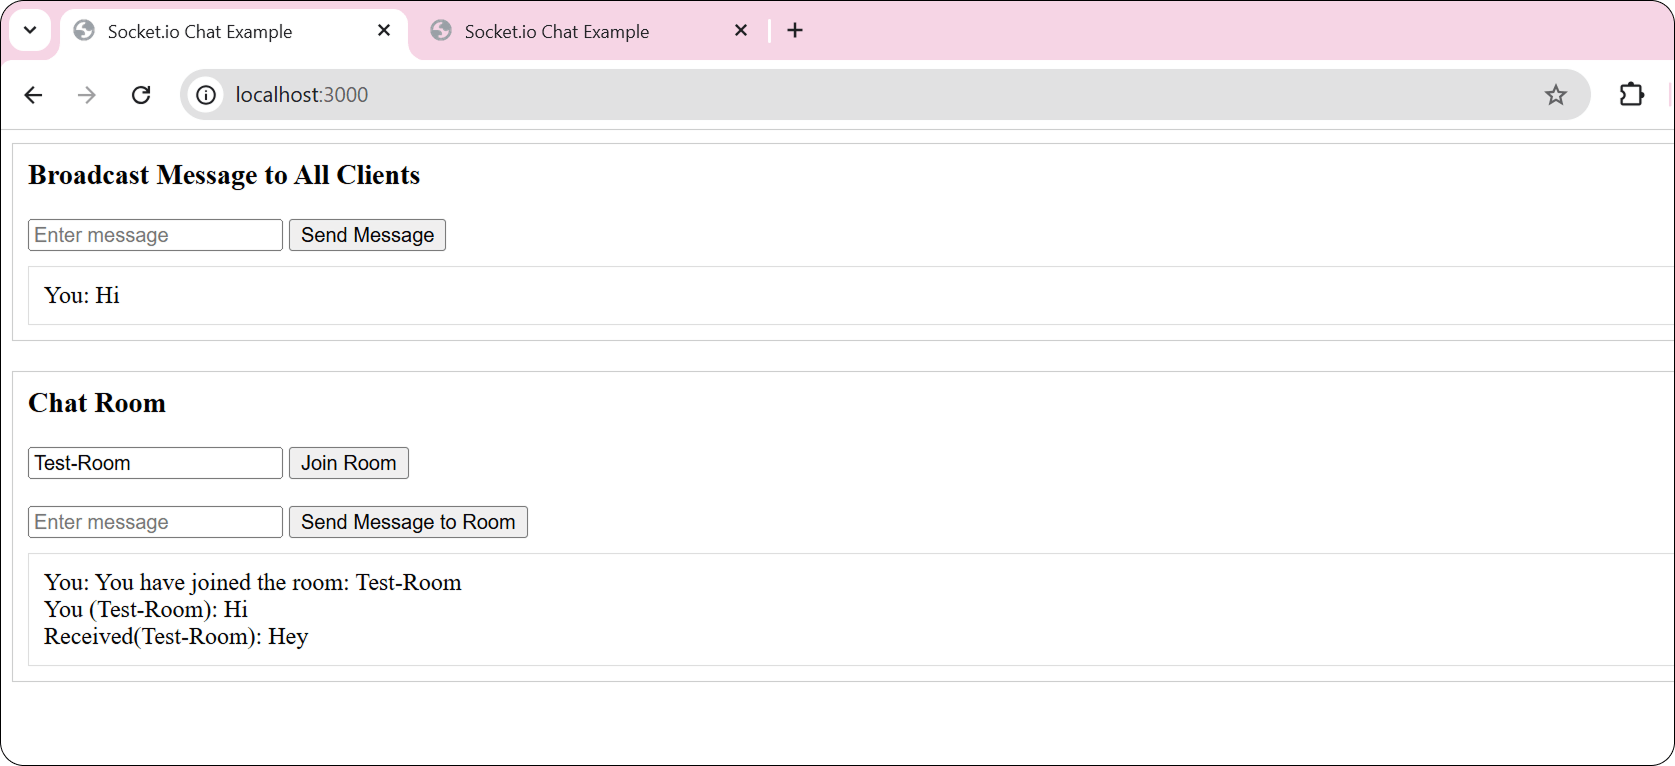
Once the server is running, open your browser and go to http://localhost:3000/. You should see two sections:
- Broadcast Message: Type a message and click the button. It will be broadcast to all connected clients using WebSocket.
- Chat Room: Type a room name, click "Join Room", and send a message. Only users in the same room will see the message.
You can also use multiple tabs to test the functionality. Open different tabs in your browser to simulate multiple users and see how messages are broadcast or sent within rooms.
Conclusion
In this tutorial, we’ve learned how to set up a WebSocket server in Node.js using Socket.IO. We covered two examples: broadcasting messages to all clients and implementing chat rooms for specific communication. This setup is perfect for real-time applications where data needs to be updated instantly, such as chat applications, games, or stock tracking. With Socket.IO's versatility and the power of WebSockets, you can create highly interactive and responsive applications.


 February 17, 2025


