If you're exploring modern backend tools that feel like magic, Supabase should be on your radar. It’s open source, fast to set up, and offers a full suite of features: a database, authentication, storage, and real-time subscriptions all powered by Postgres.
In this tutorial, we’ll walk through building a simple web app using Supabase, React, and TypeScript. The focus here is not on mastering React or TypeScript, but on understanding what Supabase offers and how to use it.
For more advanced frontend integration, you might like to explore ReactJS development services that can help you scale production-ready solutions efficiently.
By the end, you’ll have a working app with user authentication, database integration, file storage, and real-time updates.
What Is Supabase?
At its core, Supabase is an open source alternative to Firebase built on top of PostgreSQL. It includes:
- Database: Managed Postgres with built in REST and real time APIs.
- Authentication: Email/password, OAuth, magic links.
- Storage: Upload and serve files with access control.
- Edge Functions: Serverless functions for custom backend logic.
- Dashboard: UI for managing everything.
Let’s get our hands started.
Step 1: Set Up Your Supabase Project
- Go to https://supabase.com and sign in.
- Click "New Project".
- Give it a name, choose a password, and pick a region.
- Wait a moment while your project is created.
Once it's ready, you'll see the dashboard. You’ll mostly use the Table Editor, Authentication, and Storage tab as the essential tools for any serverless database with the Supabase project.

Step 2: Create Tables (Database)
1. Let’s make a first posts table for saving the user’s post:
- Go to Table Editor > New Table
- Name it: posts
- For now, disable RLS
- Add these columns:
- id – UUID, Primary Key (default)
- title – Text
- content – Text
- user_id – UUID (foreign key to auth.users)
- created_at – Timestamp (default: now())
- image_url – Text
- Click Save.
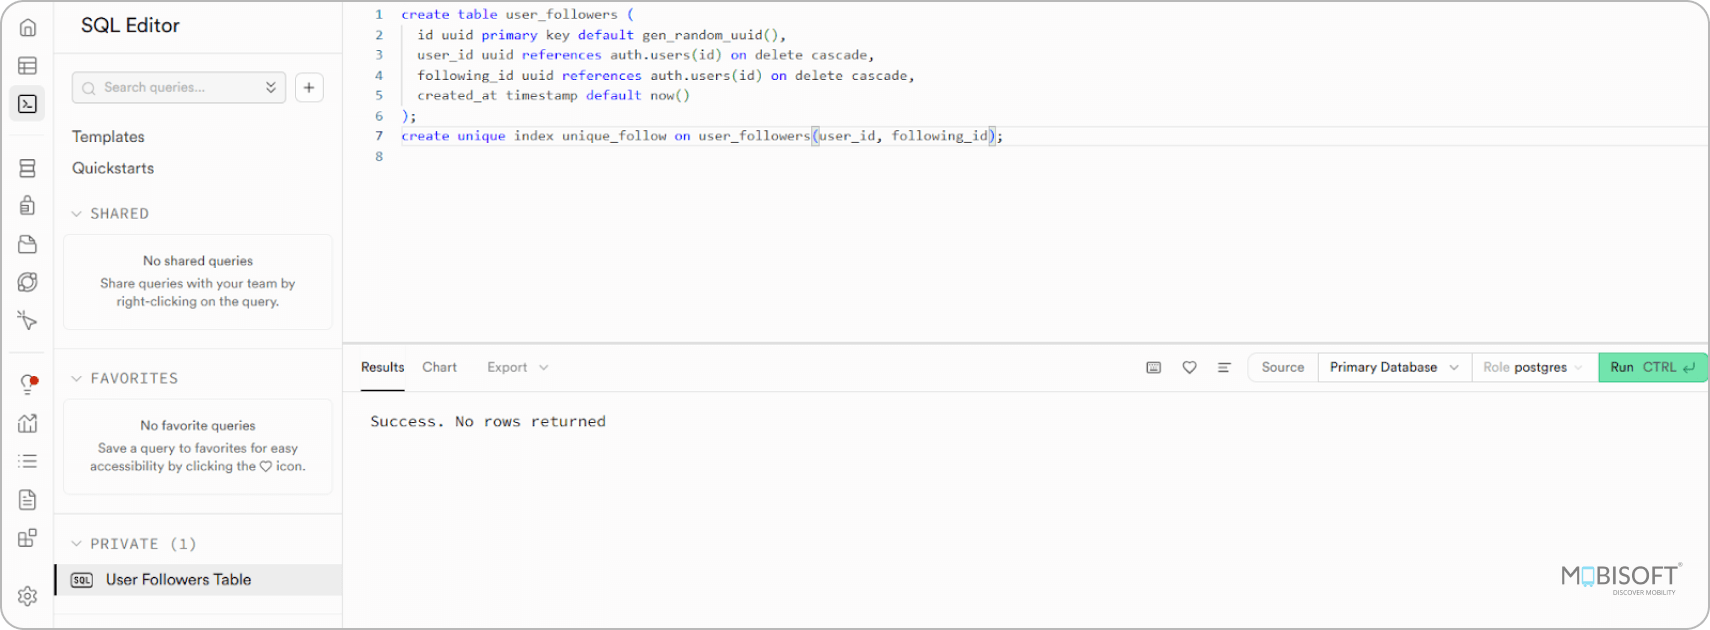
2. Now let’s make a second user_followers table for saving the user’s followers, but this time using SQL Editor:
- Go to SQL Editor
- Paste the following code for creating a user_followers table with unique constraints to prevent duplication.
create table user_followers (

  id uuid primary key default gen_random_uuid(),

  user_id uuid references auth.users(id) on delete cascade,

  following_id uuid references auth.users(id) on delete cascade,

  created_at timestamp default now()

);

create unique index unique_follow on user_followers(user_id, following_id);- Click on “Run”, It should look like the image below.

3. Now, create a profiles table. Whenever any user signs up, we will save user_id and email in this profile table. Later, you can add other fields like full name, profile_pic, bio, etc.
- Go to SQL Editor
- Paste the following code for creating a profiles table, and automatically insert a new profile when a user signs up
create table public.profiles (
 id uuid primary key references auth.users(id) on delete cascade,
 email text,
 created_at timestamp default now()
);

create function public.handle_new_user()
returns trigger as $$
begin
  insert into public.profiles (id, email)
  values (new.id, new.email);
  return new;
end;
$$ language plpgsql security definer;
create trigger on_auth_user_created
after insert on auth.users
for each row execute procedure public.handle_new_user();
Now, whenever a new user signs up, a matching row is inserted into profiles.
Supabase automatically creates APIs and permissions for these tables. Let’s use that next.
Step 3: Set Up Your Frontend with Vite
We’ll create our frontend using Vite + React + TypeScript:
npm create vite@latest supabase-vite-demo -- --template react-ts
cd supabase-vite-demo
npm install
Install Supabase and react router:
npm install @supabase/supabase-js
npm install react-router
Then, initialize the client in src/supabaseClient.ts:
import { createClient } from '@supabase/supabase-js'

const supabaseUrl = 'https://your-project.supabase.co'
const supabaseAnonKey = 'your-anon-key'

export const supabase = createClient(supabaseUrl, supabaseAnonKey)
Grab the key and URL from your Supabase dashboard under Settings > Data API.
Step 4: Add User Authentication
Let’s build a simple login/signup form.
Create src/Auth.tsx, The Auth page handles user authentication using Supabase. It provides:
- Email & Password Login: Users can securely sign in.
- User Registration: New users can sign up with an email and password.
- Error Feedback: Displays clear messages when authentication fails.
- Loading States: Disables inputs and buttons during processing for better UX.
This page is the entry point for accessing authenticated features in the app.
import { useState } from 'react'
import { supabase } from './supabaseClient'

export default function Auth() {
  const [email, setEmail] = useState('')
  const [password, setPassword] = useState('')
  const [error, setError] = useState<string | null>(null)
  const [signInLoading, setSignInLoading] = useState(false)
  const [signUpLoading, setSignUpLoading] = useState(false)

  const handleSignUp = async () => {
    try {
      setError(null)
      setSignUpLoading(true)
      const { error } = await supabase.auth.signUp({ email, password })
      if (error) throw error
    } catch (err) {
      setError(err instanceof Error ? err.message : 'An error occurred during sign up')
    } finally {
      setSignUpLoading(false)
    }
  }

  const handleSignIn = async () => {
    try {
      setError(null)
      setSignInLoading(true)
      const { error } = await supabase.auth.signInWithPassword({ email, password })
      if (error) throw error
    } catch (err) {
      setError(err instanceof Error ? err.message : 'An error occurred during sign in')
    } finally {
      setSignInLoading(false)
    }
  }

  return (
    <div className="auth-container">
      <h2>Sign In / Sign Up</h2>
      {error && <div className="error-message">{error}</div>}
      <input
        value={email}
        onChange={e => setEmail(e.target.value)}
        placeholder="Email"
        disabled={signInLoading || signUpLoading}
      />
      <input
        value={password}
        onChange={e => setPassword(e.target.value)}
        placeholder="Password"
        type="password"
        disabled={signInLoading || signUpLoading}
      />
      <button onClick={handleSignIn} disabled={signInLoading || signUpLoading}>
        {signInLoading ? 'Loading...' : 'Sign In'}
      </button>
      <button onClick={handleSignUp} disabled={signInLoading || signUpLoading}>
        {signUpLoading ? 'Loading...' : 'Sign Up'}
      </button>
    </div>
  )
}
Update App.tsx with the below code. The App component manages routing and authentication state:
- Session Handling: Listens for Supabase auth state changes to manage user sessions.
- Conditional Rendering:
- If not authenticated, → shows the Auth page.
- If authenticated, → routes to Posts and Followers.
- Routing: Uses React Router to navigate between pages, with /posts as the default landing route after login.
This is the central logic hub that controls what the user sees based on their login status.
import { useEffect, useState } from 'react'
import { supabase } from './supabaseClient'
import Auth from './Auth'
import Posts from './Posts'
import Followers from './Followers'
import { BrowserRouter as Router, Routes, Route, Navigate } from 'react-router'
import type { Session } from '@supabase/supabase-js'
import './App.css'

function App() {
  const [session, setSession] = useState<Session | null>(null)

  useEffect(() => {
    supabase.auth.onAuthStateChange((_event, session: Session | null) => {
      if (session) {
        setSession(session)
      } else {
        setSession(null)
      }
    })
  }, [])

  return (
    <Router>
      <div>
        {!session ? (
          <Auth />
        ) : (
          <Routes>
            <Route path="/posts" element={<Posts />} />
            <Route path="/followers" element={<Followers />} />
            <Route path="/" element={<Navigate to="/posts" replace />} />
          </Routes>
        )}
      </div>
    </Router>
  )
}

export default App
Step 5: Create and Fetch Posts
Create src/Posts.tsx, The Posts page allows authenticated users to create and view posts in real time. Key features include:
- Post Creation: Users can add new posts with a title, content, and image URL.
- Post Listing: Displays all posts from logged in user in reverse chronological order.
- Authentication Integration: Users must be logged in to post; includes sign out functionality.
- Error Handling & Validation: Ensures all fields are filled before submission and displays helpful error messages.
- Navigation: Links to the Followers page and handles user sign out.
This page demonstrates basic CRUD and authentication features using the Supabase SDK with React. If you're planning to scale or build a more sophisticated app, investing in expert web application development services might be the right next step.
import { useEffect, useState } from 'react'
import { supabase } from './supabaseClient'
import { Link } from 'react-router'
import { useNavigate } from 'react-router'

type Post = {
  id: string
  title: string
  content: string
  created_at: string
  image_url: string
}

export default function Posts() {
  const [posts, setPosts] = useState<Post[]>([])
  const [title, setTitle] = useState('')
  const [content, setContent] = useState('')
  const [imageUrl, setImageUrl] = useState('')
  const [error, setError] = useState<string | null>(null)
  const [loading, setLoading] = useState(false)
  const navigate = useNavigate()

  const fetchPosts = async () => {
    try {
      setError(null)
      const { data, error } = await supabase
        .from('posts')
        .select('*')
        .order('created_at', { ascending: false })
      if (error) throw error
      setPosts(data || [])
    } catch (err) {
      setError(err instanceof Error ? err.message : 'Failed to fetch posts')
    }
  }

  const createPost = async () => {
    try {
      setError(null)
      setLoading(true)
      const user = (await supabase.auth.getUser()).data.user
      if (!user) throw new Error('You must be logged in to create a post')
      if (!title || !content || !imageUrl) throw new Error('All fields are required')
      const { error } = await supabase.from('posts').insert({
        title,
        content,
        user_id: user.id,
        image_url: imageUrl,
      })
      if (error) throw error

      setTitle('')
      setContent('')
      fetchPosts()
    } catch (err) {
      setError(err instanceof Error ? err.message : 'Failed to create post')
    } finally {
      setLoading(false)
    }
  }
  const handleSignOut = async () => {
    try {
      const { error } = await supabase.auth.signOut()
      if (error) throw error
      navigate('/')
    } catch (err) {
      setError(err instanceof Error ? err.message : 'Failed to sign out')
    }
  }

  useEffect(() => {
    fetchPosts()
  }, [])

  return (
    <div className="posts-container">
	<div className="nav-links">
        <Link to="/followers" className="followers-link">View Followers</Link>
        <button onClick={handleSignOut} className="sign-out-btn">Sign Out</button>
      </div>
      <div className="create-post">
        <h2>Create Post</h2>
        {error && <div className="error-message">{error}</div>}
        <input
          value={title}
          onChange={e => setTitle(e.target.value)}
          placeholder="Title"
          disabled={loading}
        />
        <textarea
          value={content}
          onChange={e => setContent(e.target.value)}
          placeholder="Content"
          disabled={loading}
        />
        <button onClick={createPost} disabled={loading}>
          {loading ? 'Creating...' : 'Submit'}
        </button>
      </div>
      <h3>Posts</h3>
      <div className="post-list">
        {posts.map(post => (
          <div key={post.id} className="post-item">
            {post.image_url ? (
              <img
                src={post.image_url}
                alt={post.title}
                style={{ height: '60px' }}
                onError={(e) => {
                  console.error('Image failed to load:', post.image_url);
                  e.currentTarget.style.display = 'none';
                }}
              />
            ) : (
              <div>No image available</div>
            )}
            <h4>{post.title}</h4>
            <p>{post.content}</p>
            <small>{new Date(post.created_at).toLocaleString()}</small>
          </div>
        ))}
      </div>
    </div>
  )
}
Step 6: Add Real-Time Updates and Upload Images with Supabase Storage
Now we will add the below code for posts to update live without a refresh with the help of Supabase’s real time features.
Add this to the Posts.tsx file after the fetchPosts():
useEffect(() => {
    const channel = supabase
      .channel('public:posts')
      .on('postgres_changes', { event: '*', schema: 'public', table: 'posts' }, () => {
        fetchPosts()
      })
      .subscribe()

    return () => {
      supabase.removeChannel(channel)
    }
  }, [])
Now, every insert/update/delete will trigger a refresh of your posts.
Let’s allow users to upload a file.
Add to Posts.tsx:
const uploadFile = async (e: React.ChangeEvent<HTMLInputElement>) => {
    try {
      setError(null)
      const file = e.target.files?.[0]
      if (!file) return

      const { error, data } = await supabase.storage
        .from('uploads')
        .upload(`public/${file.name}`, file, { upsert: true })

      if (error) throw error
       const { data: signedUrlData } = await supabase.storage
        .from('uploads')
        .createSignedUrl(data.path, 60 * 60 * 24 * 30)
      if (!signedUrlData) throw new Error('Failed to get signed URL')
      setImageUrl(signedUrlData.signedUrl)
      alert('File uploaded successfully!')
    } catch (err) {
      setError(err instanceof Error ? err.message : 'Failed to upload file')
    }
  }
And in JSX, after the textarea tag and above the submit button:
<div className="file-upload">
   <input
    type="file"
    onChange={uploadFile}
    disabled={loading}
    accept="image/jpeg,image/png,image/gif,image/webp"
    />
    {imageUrl && (
       <div className="image-preview">
          <img src={imageUrl} alt="Preview" style={{ maxWidth: '200px', marginTop: '10px' }} />
       </div>
     )}
 </div>
Make sure you first create a Storage Bucket named uploads in your Supabase dashboard.
Step 7: Create Followers Page
Create src/Followers.tsx, The Followers page provides a seamless interface for users to engage with the social aspect of the app. It includes:
- Followers & Following Counts: Display real time stats showing how many users are following you and how many you are following.
- User Directory: Browse a list of all registered users (excluding yourself), pulled from the profiles table.
Follow / Unfollow Actions: Instantly follow or unfollow users with one click backed by real time database operations using Supabase React hooks. - Real time Updates: Changes in the user_followers table (like new follows or unfollows) are reflected live without requiring a page refresh, thanks to Supabase’s real time subscription feature.
- Integrated Supabase SDK: This page integrates Supabase’s auth, from(...).select, insert, delete, and realtime features to provide a complete user interaction system.
This page not only enables rich social interaction but also demonstrates how to build reactive, data driven interfaces with minimal backend code using Supabase React TypeScript integration.
import { useEffect, useState } from 'react'
import { supabase } from './supabaseClient'
import { Link } from 'react-router'

interface User {
  id: string
  email: string
  username: string
}

interface Follower {
  follower_id: string
  following_id: string
}

function Followers() {
  const [users, setUsers] = useState<User[]>([])
  const [followers, setFollowers] = useState<Follower[]>([])
  const [following, setFollowing] = useState<Follower[]>([])
  const [currentUser, setCurrentUser] = useState<User | null>(null)

  useEffect(() => {
    fetchUsers()
    fetchCurrentUser()
  }, [])

  const fetchCurrentUser = async () => {
    const { data: { user } } = await supabase.auth.getUser()
    if (user) {
      const { data } = await supabase
        .from('profiles')
        .select('*')
        .eq('id', user.id)
        .single()
      setCurrentUser(data)
    }
  }

  const fetchUsers = async () =>
    const { data: { user } } = await supabase.auth.getUser()
    if (user) {
      const { data: usersData } = await supabase
        .from('profiles')
        .select('*')
      const { data: followingData } = await supabase
        .from('user_followers')
        .select('*')
        .eq('user_id', user.id)
      const { data: followersData } = await supabase
        .from('user_followers')
        .select('*')
        .eq('following_id', user.id)

      setUsers(usersData || [])
      setFollowers(followersData || [])
      setFollowing(followingData || [])
    }
  }

  const handleFollow = async (userId: string) => {
    const { data: { user } } = await supabase.auth.getUser()
    if (user) {
      const { error } = await supabase
        .from('user_followers')
        .insert([
          { user_id: user.id, following_id: userId }
        ])

      if (!error) {
        fetchUsers()
      }
    }
  }

  const handleUnfollow = async (userId: string) => {
    const { data: { user } } = await supabase.auth.getUser()
    if (user) {
      const { error } = await supabase
        .from('user_followers')
        .delete()
        .eq('user_id', user.id)
        .eq('following_id', userId)

      if (!error) {
        fetchUsers()
      }
    }
  }

  const isFollowing = (userId: string) => {
    return following.some(f => f.following_id === userId)
  }

  useEffect(() => {
    const channel = supabase
      .channel('public:user_followers')
      .on('postgres_changes', { event: '*', schema: 'public', table: 'user_followers' }, () => {
        fetchUsers()
      })
      .subscribe()

    return () => {
      supabase.removeChannel(channel)
    }
  }, [])

  return (
    <div className="followers-container">
      <div className="followers-header">
        <h1>Users</h1>
        <Link to="/posts" className="back-link">Back to Posts</Link>
      </div>

      <div className="followers-stats">
        <div className="stat-box">
          <h3>Followers</h3>
          <p>{followers.length}</p>
        </div>
        <div className="stat-box">
          <h3>Following</h3>
          <p>{following.length}</p>
        </div>
      </div>

      <div className="users-list">
        {users.map((user) => (
          user.id !== currentUser?.id && (
            <div key={user.id} className="user-card">
              <div className="user-info">
                <h3>{user.username || user.email}</h3>
              </div>
              {isFollowing(user.id) ? (
                <button
                  className="unfollow-btn"
                  onClick={() => handleUnfollow(user.id)}
                >
                  Unfollow
                </button>
              ) : (
                <button
                  className="follow-btn"
                  onClick={() => handleFollow(user.id)}
                >
                  Follow
                </button>
              )}
            </div>
          )
        ))}
      </div>
    </div>
  )
}

export default Followers
Step 8: Add styling for all the pages
Update App.css with the following code:
#root {
  max-width: 1280px;
  margin: 0 auto;
  padding: 2rem;
  text-align: center;
}
.logo {
  height: 6em;
  padding: 1.5em;
  will-change: filter;
  transition: filter 300ms;
}
.logo:hover {
  filter: drop-shadow(0 0 2em #646cffaa);
}
.logo.react:hover {
  filter: drop-shadow(0 0 2em #61dafbaa);
}
@keyframes logo-spin {
  from {
    transform: rotate(0deg);
  }
  to {
    transform: rotate(360deg);
  }
}
@media (prefers-reduced-motion: no-preference) {
  a:nth-of-type(2) .logo {
    animation: logo-spin infinite 20s linear;
  }
}
.card {
  padding: 2em;
}
.read-the-docs {
  color: #888;
}
.auth-container {
  max-width: 400px;
  margin: 0 auto;
  padding: 2rem;
  background: #f8f9fa;
  border-radius: 8px;
  box-shadow: 0 2px 4px rgba(0, 0, 0, 0.1);
}
.auth-container h2 {
  margin-bottom: 1.5rem;
  color: #333;
}
.auth-container input {
  width: 100%;
  padding: 0.8rem;
  margin-bottom: 1rem;
  border: 1px solid #ddd;
  border-radius: 4px;
  font-size: 1rem;
}
.auth-container button {
  width: 100%;
  padding: 0.8rem;
  margin-bottom: 0.5rem;
  background: #646cff;
  color: white;
  border: none;
  border-radius: 4px;
  cursor: pointer;
  font-size: 1rem;
  transition: background 0.3s;
}
.auth-container button:hover {
  background: #535bf2;
}
.posts-container {
  max-width: 800px;
  margin: 0 auto;
}
.create-post {
  background: #f8f9fa;
  padding: 1.5rem;
  border-radius: 8px;
  margin-bottom: 2rem;
  box-shadow: 0 2px 4px rgba(0, 0, 0, 0.1);
}
.create-post h2 {
  margin-bottom: 1rem;
  color: #333;
}
.create-post input,
.create-post textarea {
  width: 100%;
  padding: 0.8rem;
  margin-bottom: 1rem;
  border: 1px solid #ddd;
  border-radius: 4px;
  font-size: 1rem;
}
.create-post textarea {
  min-height: 100px;
  resize: vertical;
}
.create-post button {
  padding: 0.8rem 1.5rem;
  background: #646cff;
  color: white;
  border: none;
  border-radius: 4px;
  cursor: pointer;
  font-size: 1rem;
  transition: background 0.3s;
}
.create-post button:hover {
  background: #535bf2;
}
.post-list {
  display: flex;
  flex-direction: row;
  gap: 1.5rem;
  flex-wrap: wrap;
}
.post-item {
  background: white;
  padding: 1.5rem;
  border-radius: 8px;
  box-shadow: 0 2px 4px rgba(0, 0, 0, 0.1);
}
.post-item h4 {
  margin: 0 0 0.5rem 0;
  color: #333;
}
.post-item p {
  margin: 0 0 1rem 0;
  color: #666;
}
.post-item small {
  color: #888;
}
.error-message {
  background: #fee2e2;
  color: #dc2626;
  padding: 0.8rem;
  border-radius: 4px;
  margin-bottom: 1rem;
  font-size: 0.9rem;
}
.file-upload {
  margin: 1rem 0;
}
.file-upload input[type="file"] {
  width: 100%;
  padding: 0.5rem;
  border: 1px dashed #ddd;
  border-radius: 4px;
  background: #f8f9fa;
}
input,
textarea {
  box-sizing: border-box;
}
.followers-container {
  max-width: 800px;
  margin: 0 auto;
  padding: 20px;
}
.followers-header {
  display: flex;
  justify-content: space-between;
  align-items: center;
  margin-bottom: 20px;
}
.back-link {
  color: #646cff;
  text-decoration: none;
  font-weight: 500;
}
.back-link:hover {
  text-decoration: underline;
}
.followers-stats {
  display: flex;
  gap: 20px;
  margin-bottom: 30px;
}
.stat-box {
  background: #1a1a1a;
  padding: 15px 25px;
  border-radius: 8px;
  text-align: center;
  min-width: 120px;
}
.stat-box h3 {
  margin: 0;
  font-size: 0.9em;
  color: #888;
}
.stat-box p {
  margin: 5px 0 0;
  font-size: 1.5em;
  font-weight: bold;
}
.users-list {
  display: grid;
  gap: 15px;
}
.user-card {
  background: #a4a0a0;
  padding: 15px;
  border-radius: 8px;
  display: flex;
  justify-content: space-between;
  align-items: center;
}
.user-info h3 {
  margin: 10px;
  font-size: 1.1em;
}
.follow-btn, .unfollow-btn {
  padding: 8px 16px;
  border-radius: 4px;
  border: none;
  cursor: pointer;
  font-weight: 500;
  transition: background-color 0.2s;
}
.follow-btn {
  background: #646cff;
  color: white;
}
.follow-btn:hover {
  background: #535bf2;
}
.unfollow-btn {
  background: #333;
  color: #888;
}
.unfollow-btn:hover {
  background: #444;
}
.nav-links {
  margin-bottom: 20px;
  display: flex;
  gap: 15px;
  align-items: center;
}
.followers-link {
  color: #646cff;
  text-decoration: none;
  font-weight: 500;
  padding: 8px 16px;
  border-radius: 4px;
  background: #1a1a1a;
  display: inline-block;
}
.followers-link:hover {
  background: #242424;
}
.sign-out-btn {
  padding: 8px 16px;
  border-radius: 4px;
  border: none;
  cursor: pointer;
  font-weight: 500;
  background: #dc2626;
  color: white;
  transition: background-color 0.2s;
}
.sign-out-btn:hover {
  background: #b91c1c;
}
Step 9: Secure the Table by RLS
- Set Row Level Security (RLS) rules in Supabase to protect data by enabling RLS for posts and user_followers tables and setting policies.
- To protect user data in Supabase, you need to enable Row Level Security and define specific policies. For example, in the user_followers table, we’ll allow each user to read and write only their data, and in the posts table, allow users to read posts created by themselves or users they follow. Here’s how to do it:
Step 1: Enable RLS for the posts Table
- Go to the Table Editor in your Supabase project.
- Select the posts table
- Click the “RLS Disabled” button to enable Row-Level Security. This will activate RLS on the table.

Step 2: Add Your First Policy – Allow Users to Insert Their Posts
- Once RLS is enabled, click the “Add RLS Policy” button.
- You’ll be taken to a page that lists all RLS policies for the posts table. Since no policies exist yet, the list will be empty.
- Click Create Policy.
- A side panel will appear where you can define your policy.
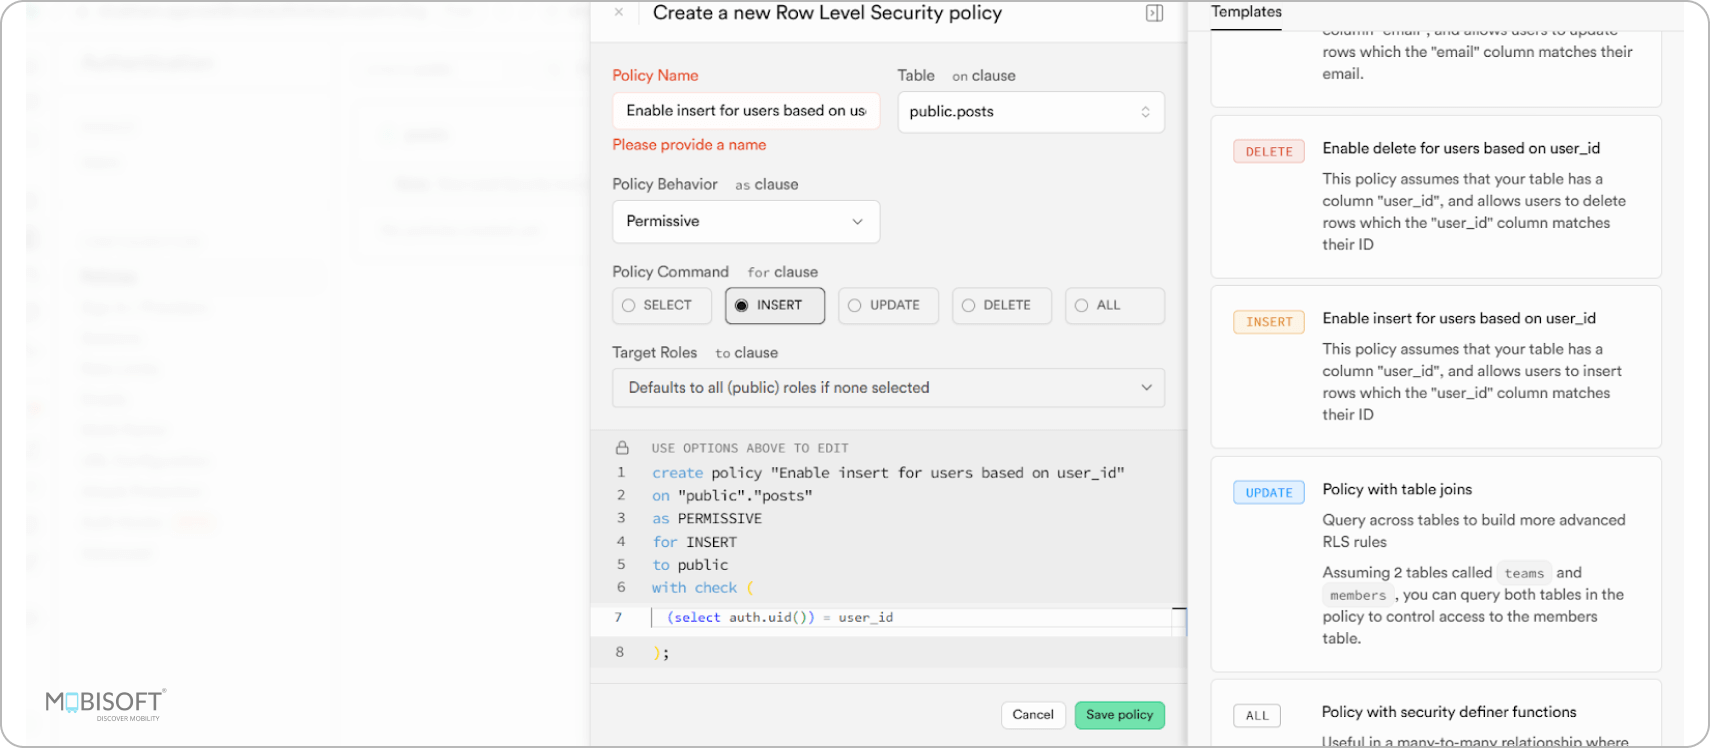
- Select the INSERT operation and choose the “Enable insert for users based on user_id” template.
- You can customize the policy if needed, or stick with the default.
- Click “Save Policy”.

- Follow the above Step 1 and Step 2 for enabling RLS and adding an Insert Policy for the user_followers table.
- Follow the above Step 1 for enabling RLS for the profiles table.
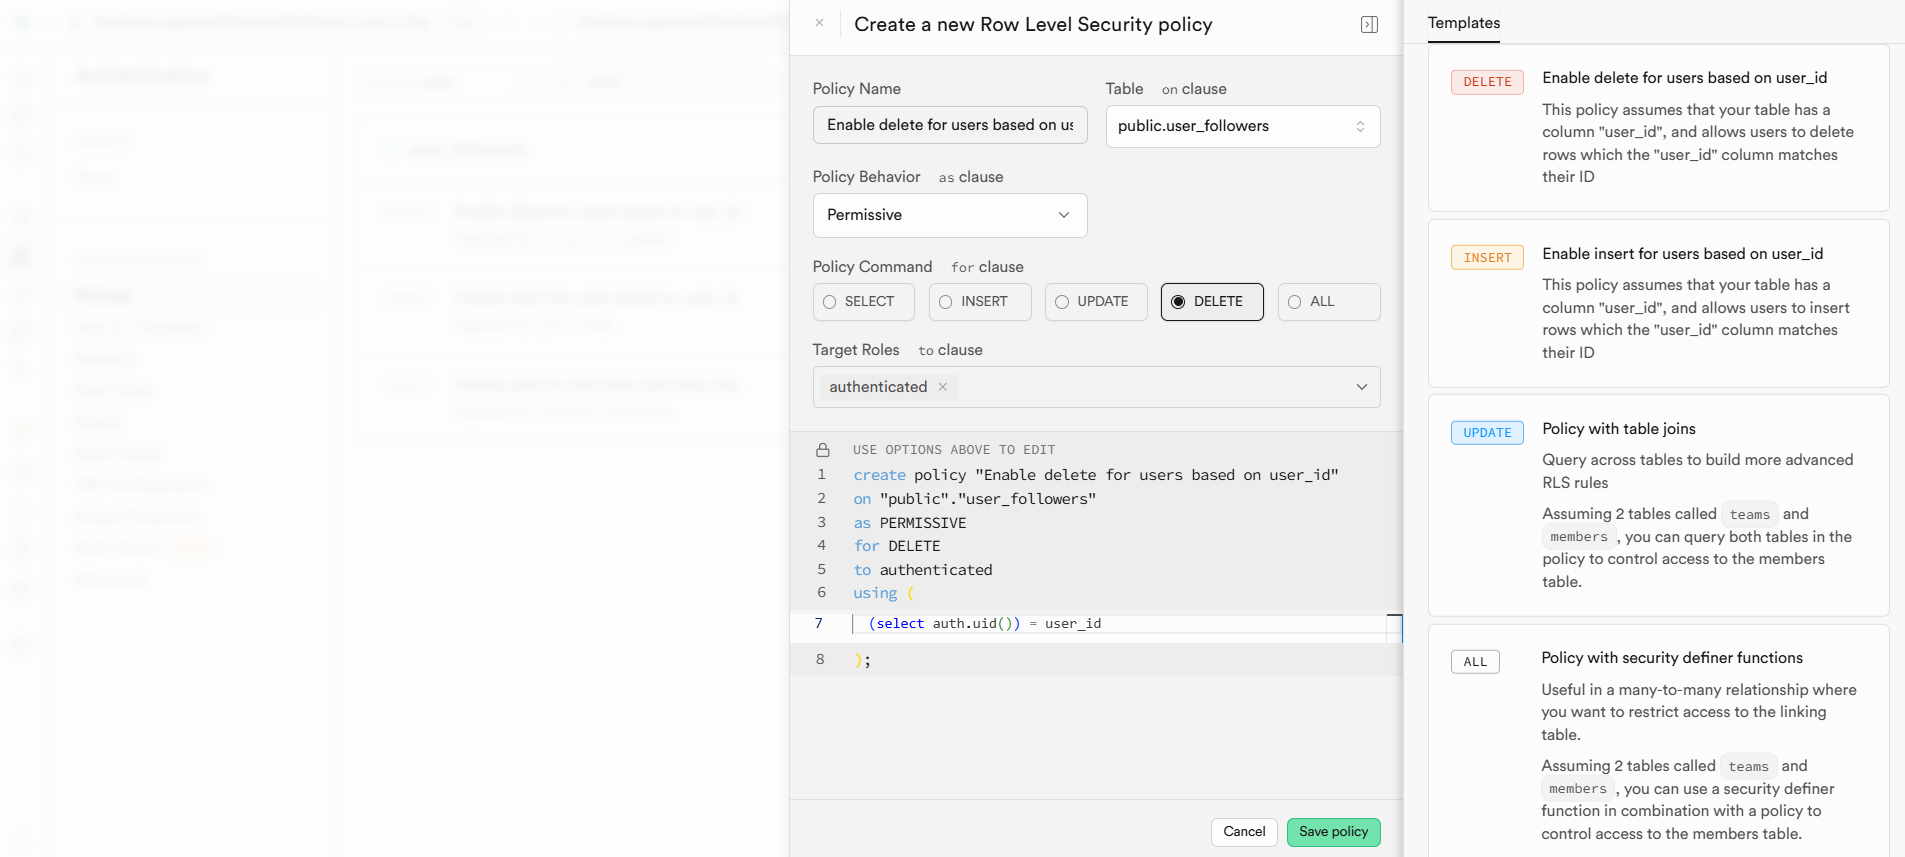
- Add a policy in the user_followers table - Enable delete for users based on user_id
- This policy will allow users to delete or unfollow users
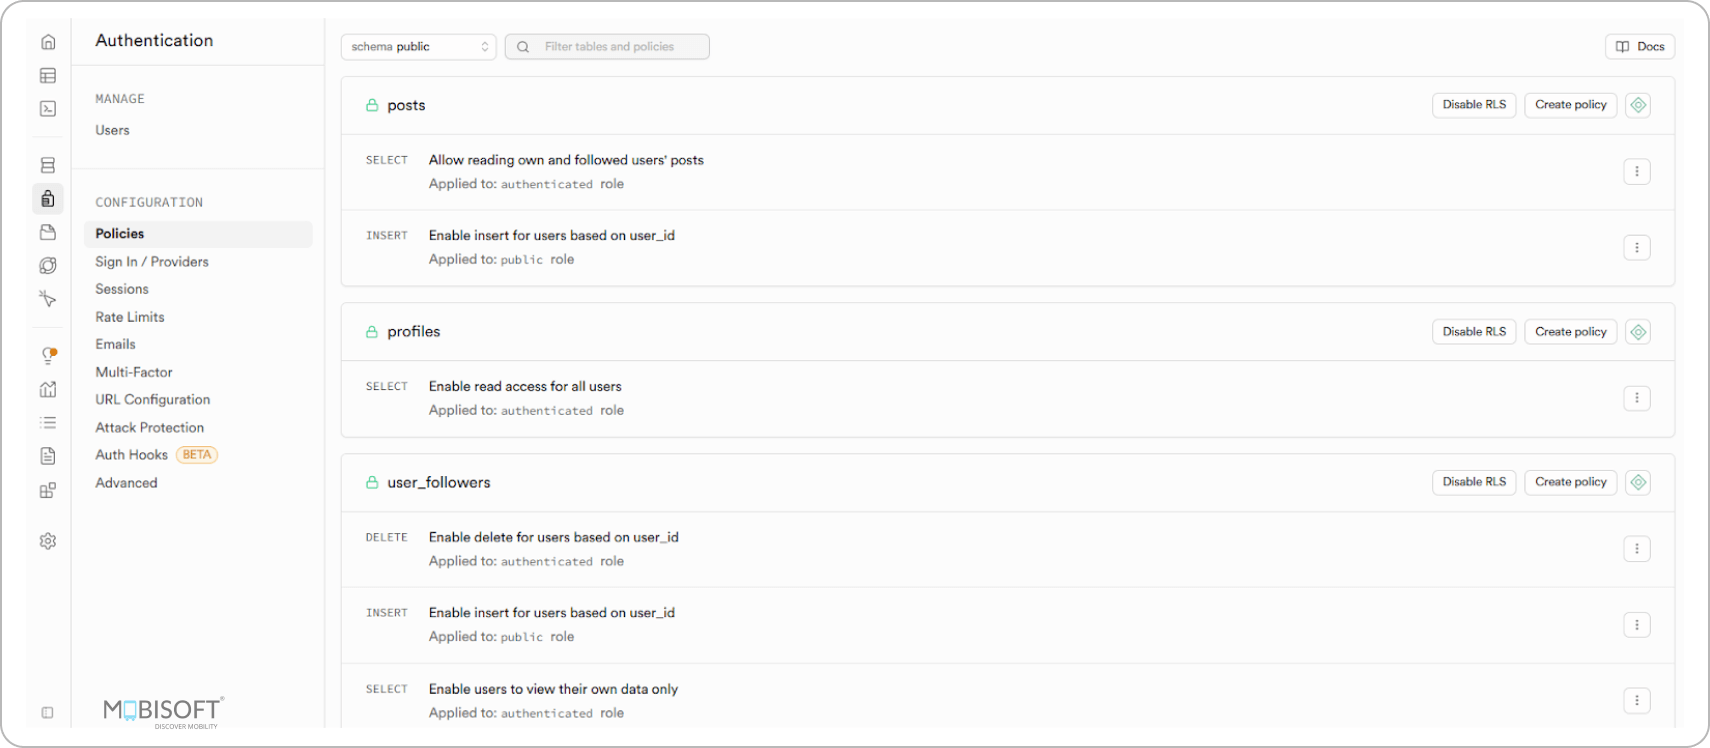
- Follow the similar steps to add a policy and refer to the image below

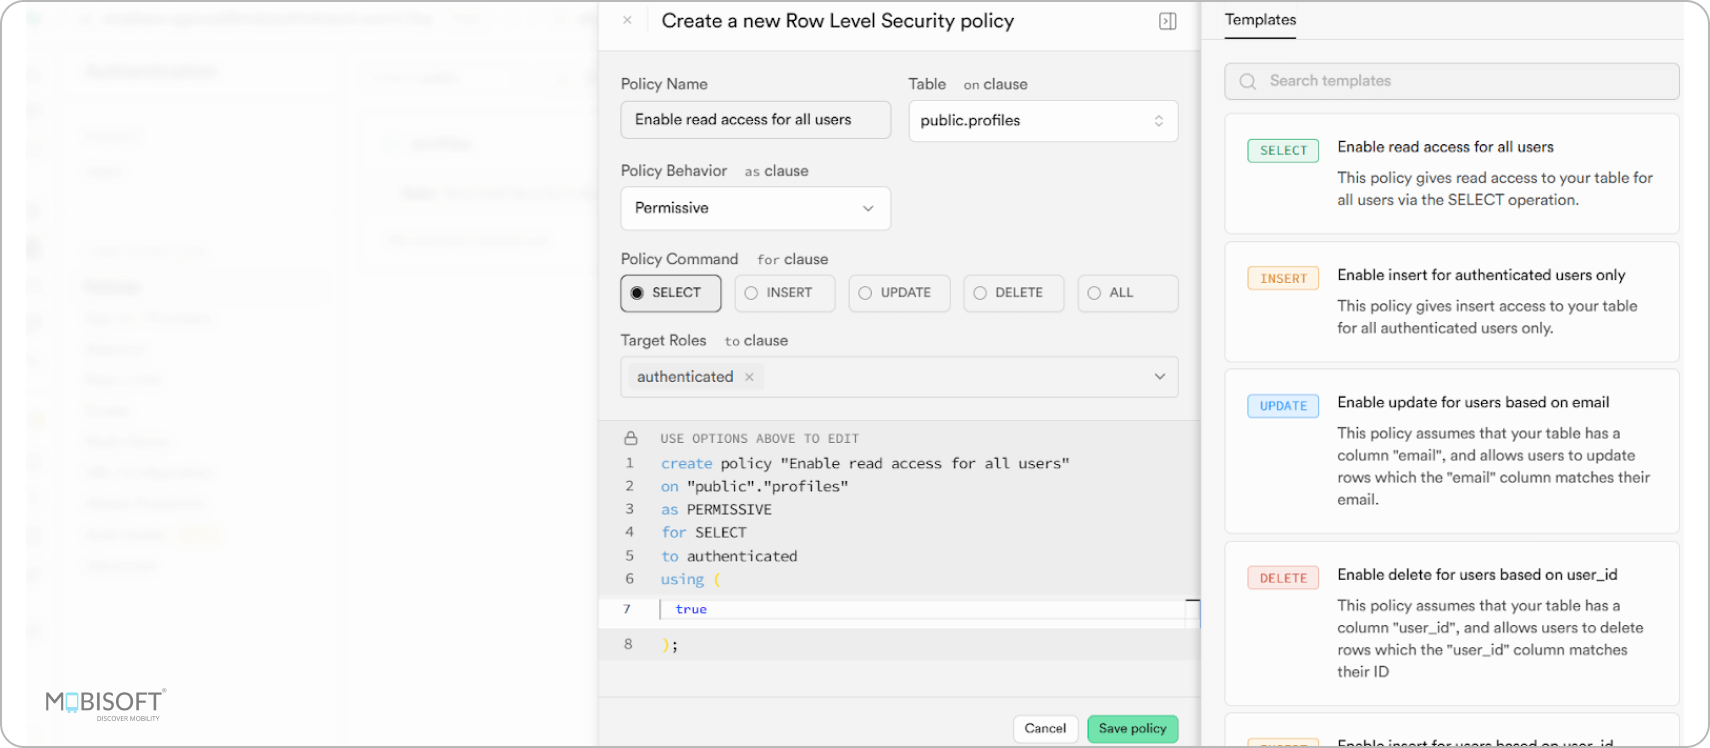
- Add a policy in the profiles table - Enable read access for all users with the Authenticated role.
- Follow the similar steps, but here select template “Enable read access for all users” and set Target Roles as authenticated, and refer to the image below

- Follow the similar steps, but here select template “Enable read access for all users” and set Target Roles as authenticated, and refer to the image below
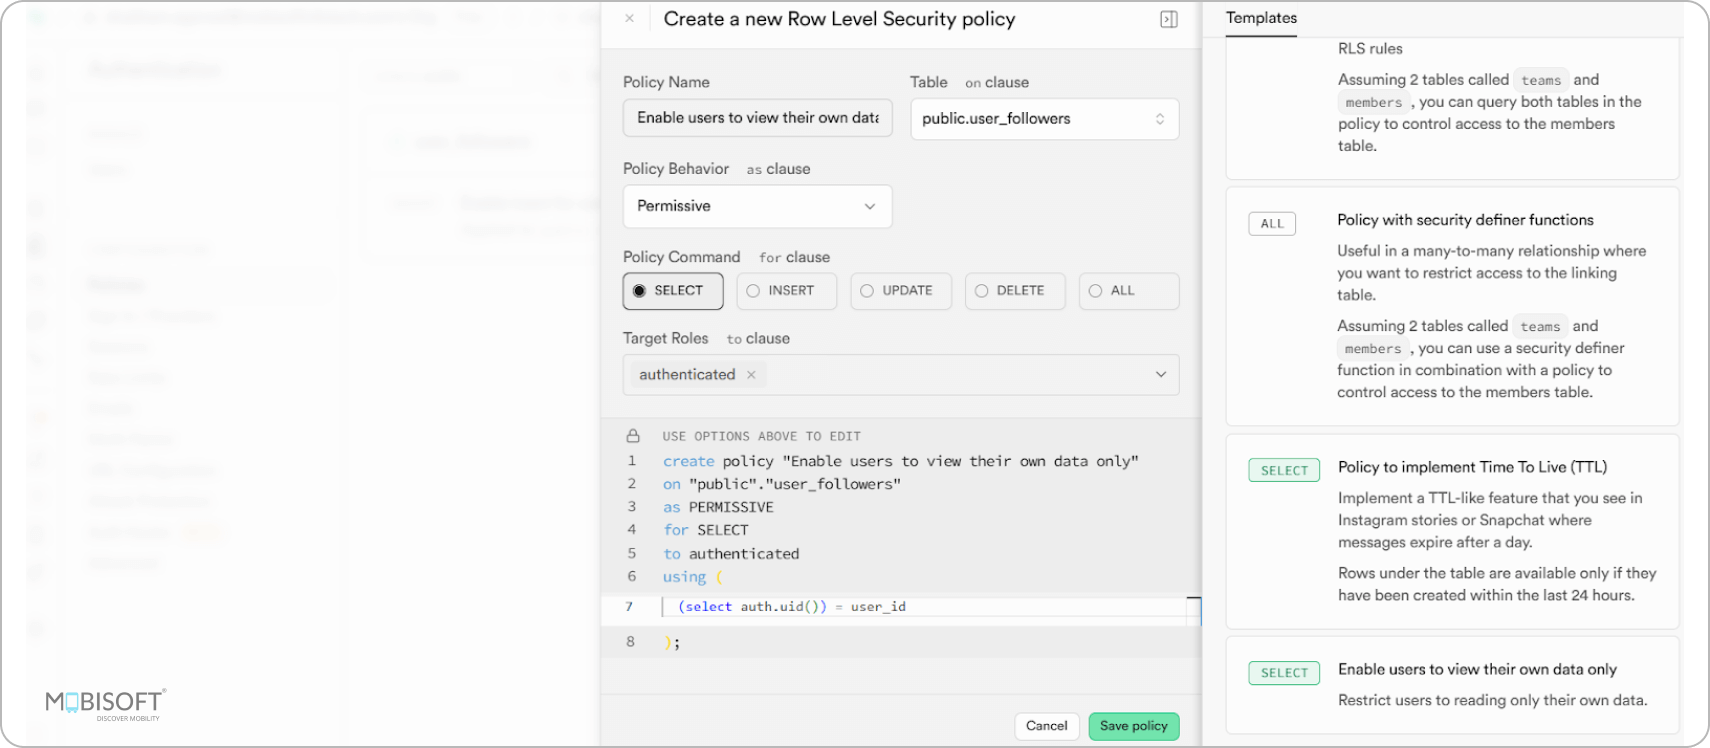
- Add a second policy in the user_followers table - Enable users to view their data only
- Click “Add RLS Policy” again.
- Choose the “SELECT” operation.
- Pick the “Enable users to view their own data only” template.
- Click “Save Policy.”

- Now, add a second policy in the posts table - Allow users to read posts created by themselves or users they follow
- Go to the SQL Editor
- Copy and paste the following code in the SQL editor for creating an RLS policy for the posts table.
create policy "Allow reading own and followed users' posts"
on posts for select
using (
  auth.uid() = user_id OR
  exists (
    select 1 from user_followers
    where user_id = auth.uid()
    and following_id = posts.user_id
  )
);
- Click on the “Run” button
- Your new policy will be created for the posts table. Now go to the policies page to verify all the policies.

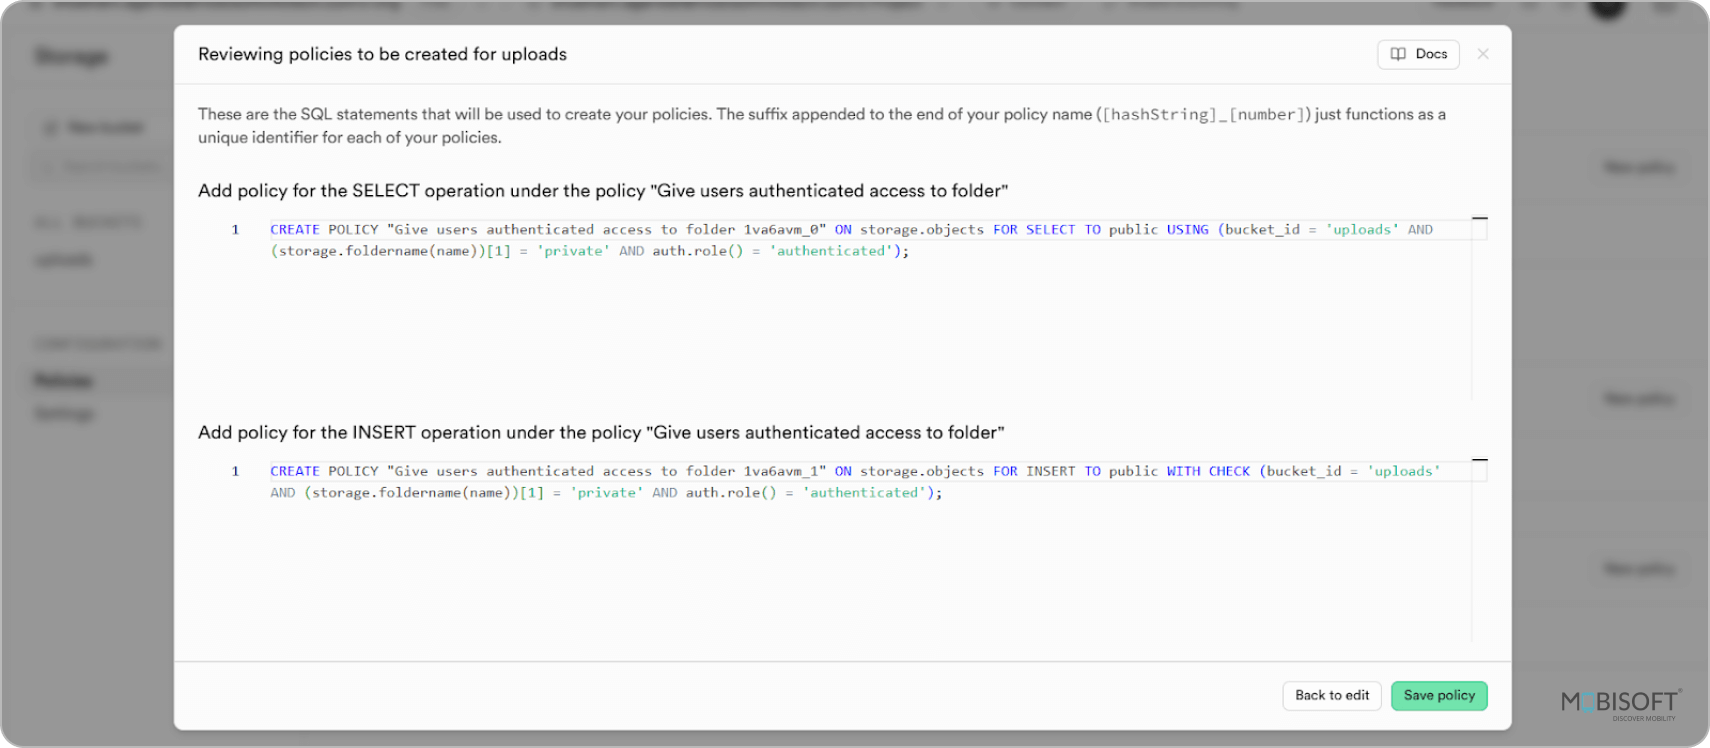
- Add last policy to the uploads storage bucket - Only authenticated user can fetch and upload into the storage bucket
- Go to Storage
- Click on “Policies” under configuration
- Click on “New Policy” for the uploads storage bucket
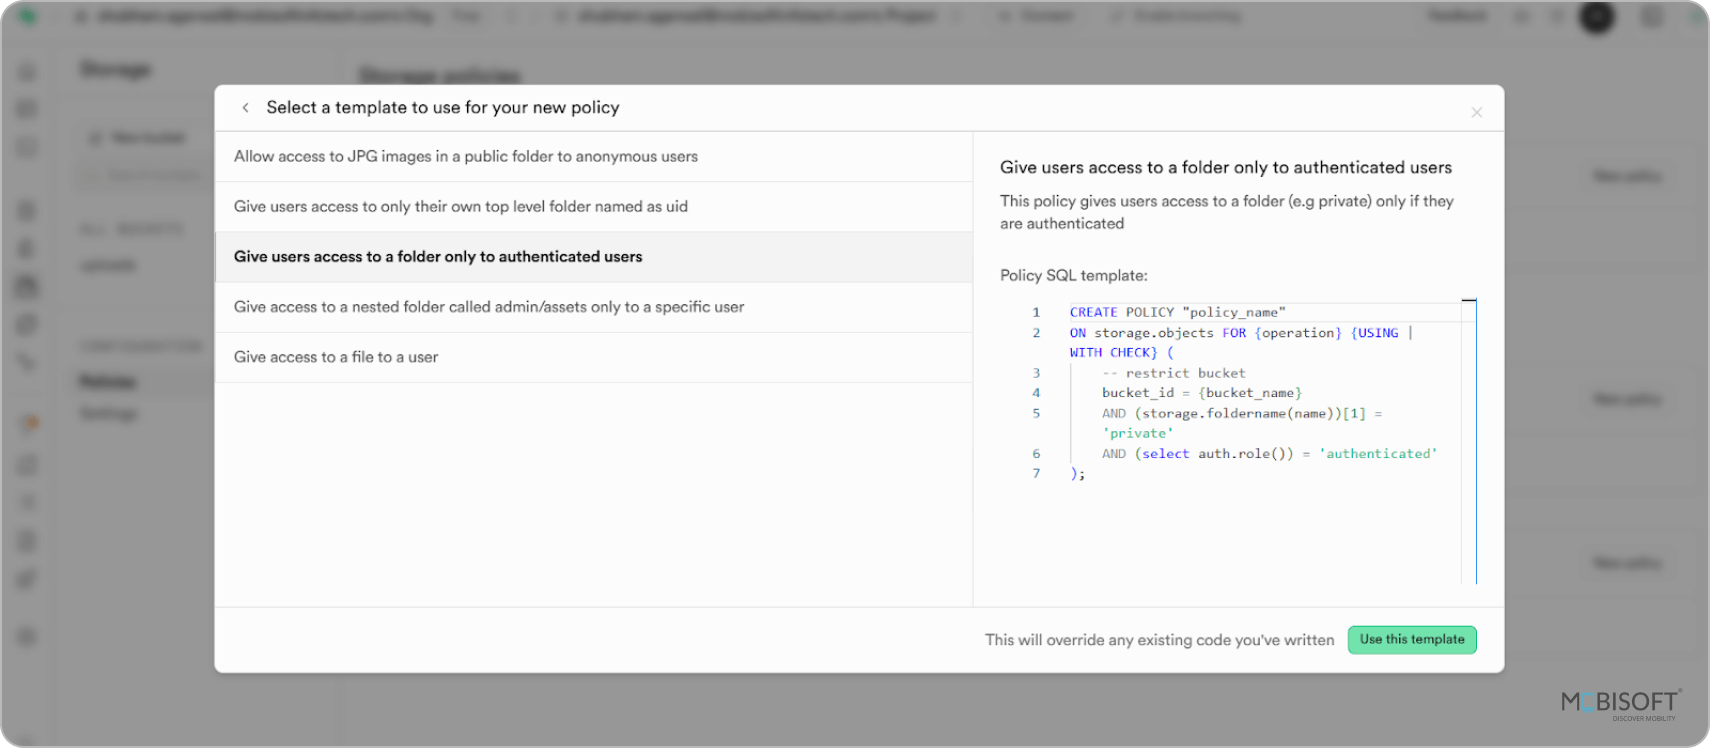
- Click on “Get started quickly” to create a policy from a template
- Now select “Give users access to a folder only to authenticated users” template
- Click on “Use this template” button

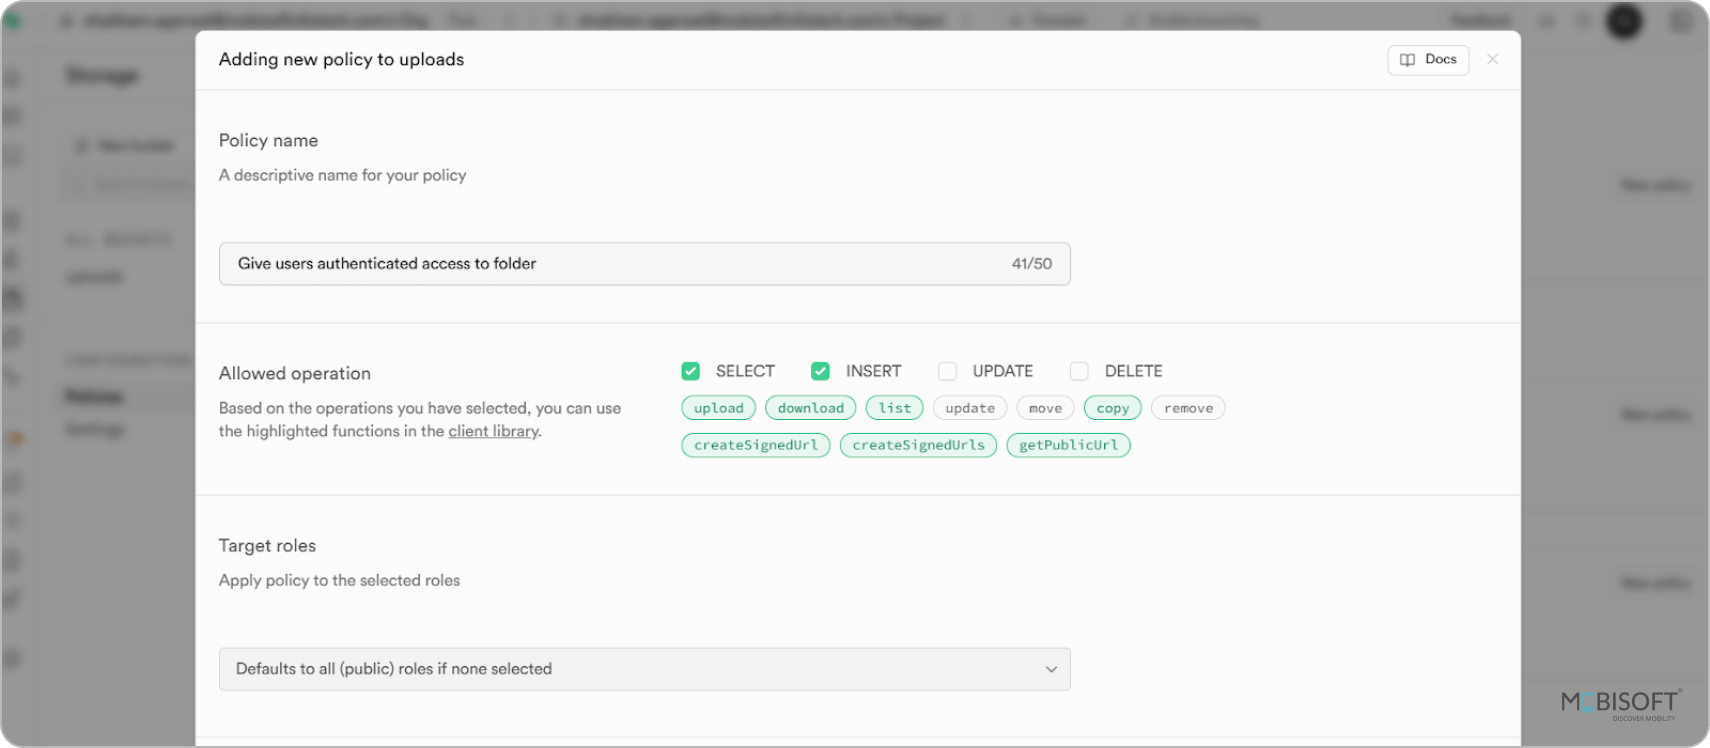
- Click on “Select” and “Insert” check box in Allowed Operations
- Click on “Review” button

- Click on “Save Policy” Button

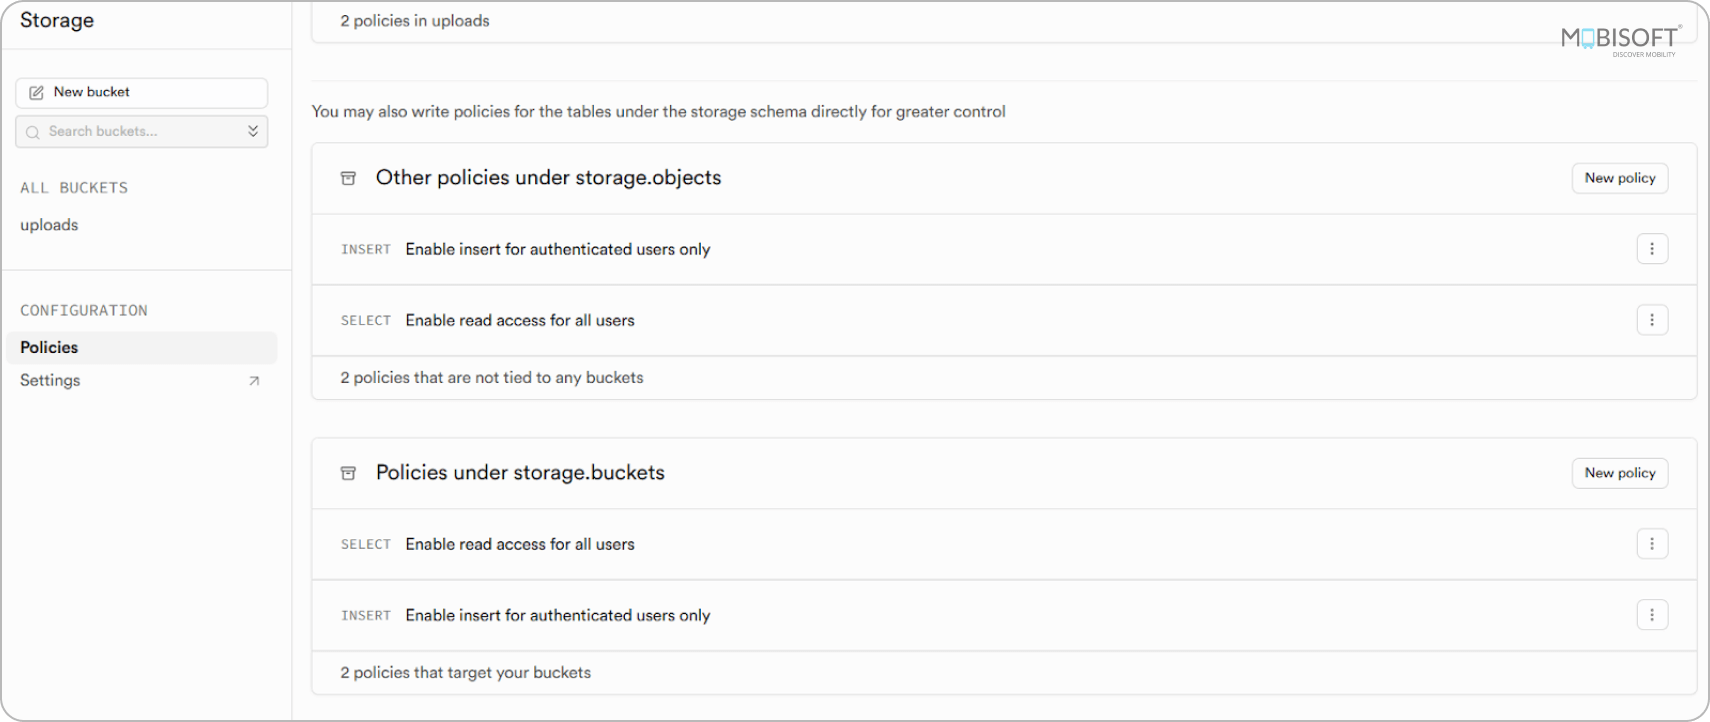
- Similarly, add Policies for “Other policies under storage.objects” and “Policies under storage.buckets” options as per the below image.

Step 10: Start the App
Now that everything is set up, it's time to run your app.
In your terminal, use the following command:
npm run devThis will start the development server. You can now open your browser and go to http://localhost:5173 to see your Supabase-powered React app in action.
You should now see your Supabase-powered React app live and running.
Try signing up using an email and password. Supabase will automatically send a confirmation email to verify your address. After confirming your email, you’ll be able to log in using the same credentials.
Now, after logging in, you can start creating posts by adding a title, content, and uploading an image. All your posts will be saved and automatically displayed on the same screen, giving you a real-time view of your content, a clear example of Supabase real-time React usage.
If you’d like to take this a step further and enhance your file upload UX with progress indicators, check out our React File Uploader with Progress Bar Tutorial using Node.js and TypeScript.
You can also navigate to the Followers page to view a list of users who follow you.
Recap: What You Learned About Supabase
- Set up a Postgres database with API access
- Used Supabase Auth to sign up/in users
- Added file uploads with Supabase Storage
- Subscribed to real-time changes
- Used Row Level Security to protect data
- Built a full-stack app without writing a single backend route
Final Thoughts
Supabase gives you the power of a full backend, with the simplicity of modern tooling. Whether you're a solo developer or part of a team, it scales with you and keeps things transparent and open source.
You now have a solid foundation to build more powerful apps. Try adding user profiles, likes, comments, or even edge functions next.
To explore the complete source code for this tutorial or contribute to improvements, feel free to check out the project on GitHub





 June 6, 2025


