Docker image optimization is not a widely followed practice. The issue is that excessively large Docker files tend to slow down the process. They can even result in weakened Docker image security, which can compromise deployments. Optimizing Docker images not only boosts performance but also enhances overall container security.
Let’s understand the effective strategies for enhancing Docker performance optimization and how to implement them. By adhering to these best Docker practices, one can minimize Docker image size, achieve a reduction in image layers, and simultaneously accelerate deployment processes while bolstering security measures.
First, we'll look at methods that enhance the effectiveness and security of Docker containers in real-world scenarios. If you want expert guidance, explore our DevOps experts for Docker container management.
Why are Large Docker Images a Problem in Container Deployments?
When Docker images grow large, they cause several issues:
- Slower Build Times: Larger images naturally take time to process, increasing the time taken by your CI/CD pipeline.
- Increased Storage Costs: The larger the image, the more space is required in your Docker registry. This results in higher storage costs.
- Higher Deployment Latency: Just like construction, larger Docker images take more time to deploy.
- Security Risks: larger images have more room for cyberattacks. They may ship with software or parts not required otherwise, weakening the overall security.
Common Mistakes That Lead to Oversized Docker Images
Some of the mistakes that contribute to oversized images include:
- Using heavy base images like
ubuntu:latestwithout considering alternatives. - Including temporary files, caches, and unnecessary dependencies in the final image.
- Not using multi-stage builds or ignoring Dockerfile optimization techniques.
To avoid these mistakes, adopting end-to-end DevOps solutions for Docker optimization can be a game-changer.
Tools to Analyze Docker Image Size for Faster Deployment
Here are some tools to help analyze and optimize Docker images:
- docker images: View image sizes and tags.

- Dive: Inspect and analyze Docker layers to pinpoint inefficiencies. bash
⇒ sudo apt-get install dive
⇒ dive my-django-app:latest
- Docker Slim: Automatically minimizes images by removing unnecessary files and libraries.
Scripted Install
You can also use this script to install the current release of Slim on Linux (x86 and ARM) and macOS (x86 and Apple Silicon)
⇒ curl -sL https://raw.githubusercontent.com/slimtoolkit/slim/master/scripts/install-slim.sh | sudo -E bash -⇒ docker-slim build my-django-app:latest
⇒ docker images

Best Practices for Optimizing Docker Images
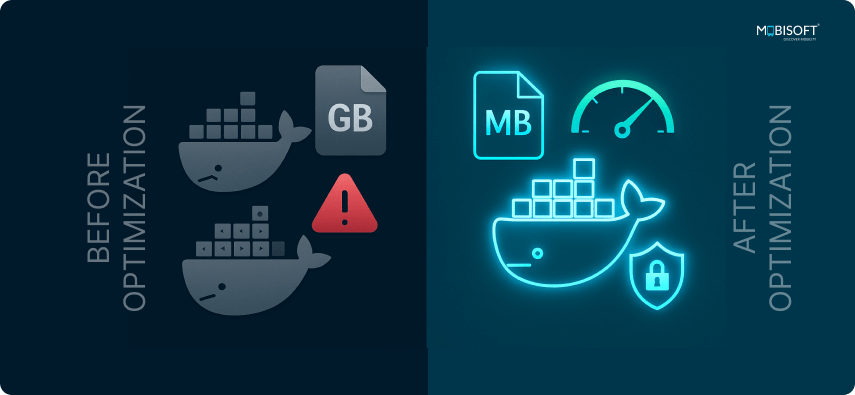
Here are the most efficient methods you can implement for streamlining Docker build optimization. These methods are compatible with various programming languages such as Java Spring, Node.js, and Python Django.
Use Minimal Base Images
Choosing the right base image is crucial. This minimises the use of unnecessary elements, which directly influences your Docker image.
Why it matters: Slim base images like Alpine Docker image or Distroless reduce the image size significantly compared to larger images like Ubuntu.
Example Comparison:
Ubuntu (over 78MB):
dockerfile
FROM ubuntu:latestbash
⇒ docker build -f Dockerfile -t test-ubuntu .
Alpine (just 5MB):
dockerfile
FROM alpine:latest
bash
⇒ docker build -f Dockerfile -t test-alpine .
Cons of using Alpine:
Alpine is proficient in minimising Docker images. However, it does have some drawbacks:
- Compatibility issues: Alpine uses musl libc for faster processing. But since it is minimal, it isn’t fully compatible with software/libraries.
- Debugging and troubleshooting: Images are made smaller by removing most of the built-in tools, making troubleshooting difficult.
- Performance differences: In specific workloads, musl libc can be slower than glibc.
- Community support: Not all important packages are included in Alpine’s default package repository. Installing them might involve extra steps, potentially slowing down the process.
If you want quicker deployment and smaller images, Alpine is the right choice. For bigger projects or old dependencies, however, Ubuntu or comparable base images are more suitable.
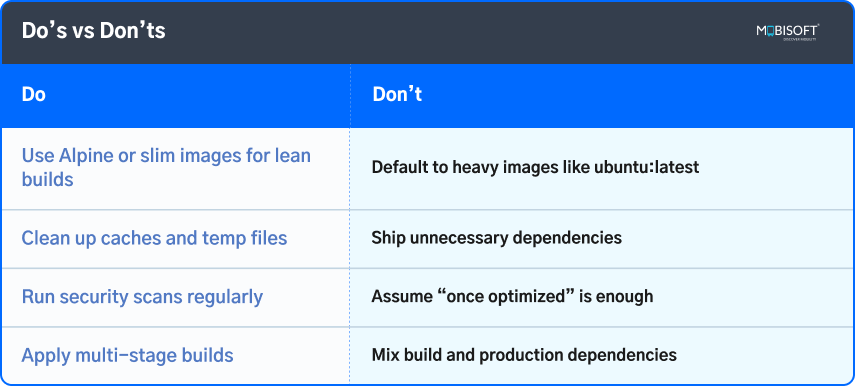
Do’s vs Don’ts
Reduce Layers and Unnecessary Files
Each command in a Dockerfile represents another layer in the image. For efficiency, you should aim for as few layers as possible.
Best Practices:
- Combine commands into a single
RUNstatement to minimize layers. - Clean up any unnecessary files after installation.
Example:
dockerfile
RUN apt-get update && apt-get install -y \
curl \
vim \
&& rm -rf /var/lib/apt/lists/*
Use Multi-Stage Builds
Multi-stage builds help to keep the resulting final image small by letting only the minimal elements of your application be included, such as the compiled code. Any build dependencies that may have been present get omitted.
Example:
Docker file
# Build stage
FROM golang:1.18 AS builder
WORKDIR /app
COPY . .
RUN go build -o main .

# Final stage
FROM alpine:latest
WORKDIR /app
COPY --from=builder /app/main .
CMD ["./main"]
In this example, only the compiled main file is included in the final image, keeping it small.
Leverage .dockerignore for Faster Builds
Just like .gitignore keeps unnecessary files out of your Git repository, .dockerignore keeps unnecessary files out of your Docker build context. This speeds up builds and improves Docker cache optimization.
Example .dockerignore file:
.git
node_modules
*.log
.env
Steps to Use .dockerignore for Faster Docker Builds:
- Navigate to your project directory (where your
Dockerfileis located).
Bash
⇒ cd your-project-directory/- Create a .dockerignore file (if not already present).
Bash
⇒ touch .dockerignore- Add unnecessary files and folders to exclude, for example:
Plaintext
.git
Node_modules
*.log
.env
This will:
- Exclude your Git folder (no need in the image)
- Skip bulky
node_modules(often rebuilt inside the container) - Ignore all
.logfiles - Prevent secrets in
.envfrom being copied into your Docker image
- Build your Docker image as usual:
Bash
⇒ docker build -t your-image-name.You'll notice the build context is smaller, and the build is faster if your .dockerignore is optimized.
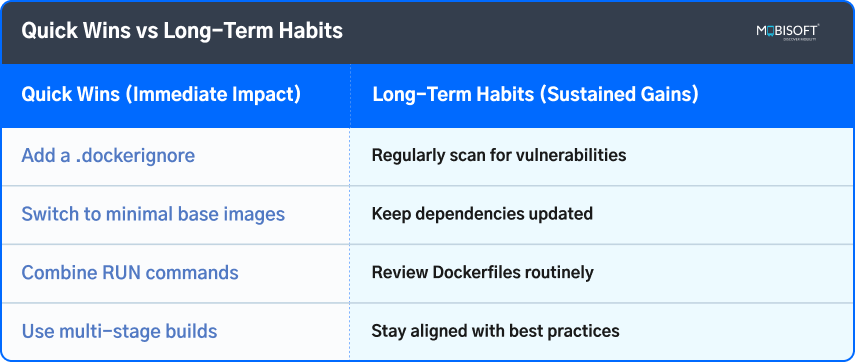
Quick Wins vs Long-Term Habits
Why This Works
With each Docker build, Docker moves the entire directory as "build context" to the Docker daemon. Large/unused files (e.g., node_modules, .git, etc.) make it slow. Using .dockerignore keeps the context lean and builds quickly.
Here's a simple Node.js project example with a Dockerfile, .dockerignore, and a basic app you can test right away.
Folder Structure
Pgsql
my-node-app/
├── Dockerfile
├── .dockerignore
├── package.json
├── server.js
├── .env
├── debug.log
└── node_modules/  (this will be ignored)
1. server.js
js
const express = require('express');
const app = express();
const PORT = process.env.PORT || 3000;

app.get('/', (req, res) => {
  res.send('Hello from Dockerized Node.js app!');
});

app.listen(PORT, () => {
  console.log(`Server running on port ${PORT}`);
});
2. package.json
Json
{
  "name": "my-node-app",
  "version": "1.0.0",
  "main": "server.js",
  "scripts": {
    "start": "node server.js"
  },
  "dependencies": {
    "express": "^4.18.2"
  }
}
3. Dockerfile
# Use an official Node.js base image
FROM node:18

# Set working directory
WORKDIR /app

# Copy only necessary files first
COPY package*.json ./

# Install dependencies
RUN npm install

# Copy the rest of the app
COPY . .

# Expose the app port
EXPOSE 3000

# Start the application
CMD ["npm", "start"]
4. .dockerignore
plaintext
node_modules
npm-debug.log
*.log
.env
.git
How to Build & Run
# Step into the project folder
⇒ cd my-node-app# Build the Docker image
⇒ docker build -t my-node-app .# Run the Docker container
⇒ docker run -p 3000:3000 my-node-appThen open your browser at:
http://localhost:3000
You should see: "Hello from Dockerized Node.js app!"

Bonus Tips
- You can preview the build context size with:
Bash
⇒ du -sh.Then compare before and after adding .dockerignore.
- Want to test what files are included in the context? Run:
Bash
⇒ docker build -o out.
⇒ ls out
This saves the output to a folder and lets you inspect it.
For complete lifecycle insights, check our blog on Docker image and container lifecycle explained.
Django Project Template
Below is an operational starter Django project that you can run with Docker support. You can start right away by simply copying and pasting it.
Project Structure: my-django-app
bash
my-django-app/
├── Dockerfile
├── .dockerignore
├── requirements.txt
├── manage.py
├── .env
├── myproject/
│   ├── __init__.py
│   ├── settings.py
│   ├── urls.py
│   └── wsgi.py
└── db.sqlite3 (ignored via .dockerignore)
Dockerfile
Dockerfile
# Use official Python image
FROM python:3.11-slim

# Set environment variables
ENV PYTHONDONTWRITEBYTECODE=1
ENV PYTHONUNBUFFERED=1

# Set working directory
WORKDIR /app

# Install dependencies
COPY requirements.txt .
RUN pip install --no-cache-dir -r requirements.txt

# Copy project files
COPY . .

# Expose port
EXPOSE 8000

# Run Django dev server
CMD ["python", "manage.py", "runserver", "0.0.0.0:8000"]
.dockerignore
plaintext
__pycache__
*.pyc
*.pyo
*.pyd
env/
.venv/
*.db
*.sqlite3
*.log
.env
.git
requirements.txt
txt
Django>=4.2,<5.0
python-dotenv
manage.py
Python
#!/usr/bin/env python
import os
import sys
from dotenv import load_dotenv

if __name__ == "__main__":
    load_dotenv()
    os.environ.setdefault("DJANGO_SETTINGS_MODULE", "myproject.settings")
    try:
        from django.core.management import execute_from_command_line
    except ImportError as exc:
        raise ImportError("Couldn't import Django.") from exc
    execute_from_command_line(sys.argv)
myproject/settings.py
Python
import os
from pathlib import Path

BASE_DIR = Path(__file__).resolve().parent.parent

SECRET_KEY = os.getenv("SECRET_KEY", "fallback-secret-key")
DEBUG = os.getenv("DEBUG", "True") == "True"
ALLOWED_HOSTS = os.getenv("ALLOWED_HOSTS", "localhost,127.0.0.1").split(",")

INSTALLED_APPS = [
    "django.contrib.admin",
    "django.contrib.auth",
    "django.contrib.contenttypes",
    "django.contrib.sessions",
    "django.contrib.messages",
    "django.contrib.staticfiles",
]

MIDDLEWARE = [
    "django.middleware.security.SecurityMiddleware",
    "django.contrib.sessions.middleware.SessionMiddleware",
    "django.middleware.common.CommonMiddleware",
    "django.middleware.csrf.CsrfViewMiddleware",
    "django.contrib.auth.middleware.AuthenticationMiddleware",
    "django.contrib.messages.middleware.MessageMiddleware",
    "django.middleware.clickjacking.XFrameOptionsMiddleware",
]

TEMPLATES = [
    {
        'BACKEND': 'django.template.backends.django.DjangoTemplates',
        'DIRS': [],  # Add template dirs here if you have any
        'APP_DIRS': True,  # Looks for templates inside app directories
        'OPTIONS': {
            'context_processors': [
                'django.template.context_processors.debug',
                'django.template.context_processors.request',
                'django.contrib.auth.context_processors.auth',
                'django.contrib.messages.context_processors.messages',
            ],
        },
    },
]

ROOT_URLCONF = "myproject.urls"
WSGI_APPLICATION = "myproject.wsgi.application"

DATABASES = {
    "default": {
        "ENGINE": "django.db.backends.sqlite3",
        "NAME": BASE_DIR / "db.sqlite3",
    }
}

LANGUAGE_CODE = "en-us"
TIME_ZONE = "UTC"
USE_I18N = True
USE_TZ = True

STATIC_URL = "/static/"
Build & Run
bash
# Step into the project
⇒ cd my-django-app# Build the Docker image
⇒ docker build -t my-django-app .# Run the container
⇒ docker run -p 8000:8000 my-django-appThen open http://localhost:8000 and you’ll see:

For cloud-focused projects, see how we build cloud-native applications with Docker containers.
Sample Spring Boot App
Here's a simple Spring Boot "Hello World" app you can use right away. It's structured to work perfectly with the .dockerignore and Dockerfile we discussed.
Project Name: springboot-app
Folder Structure:
springboot-app/
├── Dockerfile
├── .dockerignore
├── mvnw
├── mvnw.cmd
├── .mvn/
│   └── wrapper/
│       ├── maven-wrapper.jar
│       └── maven-wrapper.properties
├── pom.xml
├── .env
├── src/
│   └── main/
│       └── java/
│           └── com/
│               └── example/
│                   └── demo/
│                       └── SpringbootAppApplication.java
│       └── resources/
│           └── application.properties
└── README.md
1. SpringbootAppApplication.java
Path: src/main/java/com/example/demo/SpringbootAppApplication.java
java
package com.example.demo;

import org.springframework.boot.SpringApplication;
import org.springframework.boot.autoconfigure.SpringBootApplication;
import org.springframework.web.bind.annotation.*;

@SpringBootApplication
@RestController
public class SpringbootAppApplication {

    public static void main(String[] args) {
        SpringApplication.run(SpringbootAppApplication.class, args);
    }

    @GetMapping("/")
    public String hello() {
        return "Hello from Dockerized Spring Boot App!";
    }
}
2. Dockerfile
A multi-stage Docker build lets you compile the Spring Boot app inside Docker. So you don't need Maven or Java installed locally, just Docker.
Dockerfile
# ---------- Stage 1: Build ----------
FROM maven:3.9.4-eclipse-temurin-17 as build
WORKDIR /app

# Copy all project files
COPY . .

# Build the JAR file
RUN mvn clean package -DskipTests

# ---------- Stage 2: Run ----------
FROM openjdk:17-jdk-slim
WORKDIR /app

# Copy the built JAR from the build stage
COPY --from=build /app/target/*.jar app.jar

EXPOSE 8080
ENTRYPOINT ["java", "-jar", "app.jar"]
3. .dockerignore
plaintext
.git
target
*.log
.env
.idea
*.iml
.mvn
4. Build & Run
bash
# Step 1: Navigate to the project
⇒ cd springboot-app# Step 2: Build the Spring Boot JAR
⇒ ./mvnw clean package# Step 3: Build the Docker image
⇒ docker build -t springboot-app .# Step 4: Run the container
⇒ docker run -p 8080:8080 springboot-app
Full sample projects for Node.js, Django, and Spring Boot are available in these GitHub repositories.
Benefits of Multi-Stage Build
- No need for Maven or Java locally.
- Clean, production-ready final image.
- Smaller image size (just JDK + JAR).
- Ideal for CI/CD with Docker pipelines.
Security Considerations in Docker Image Optimization
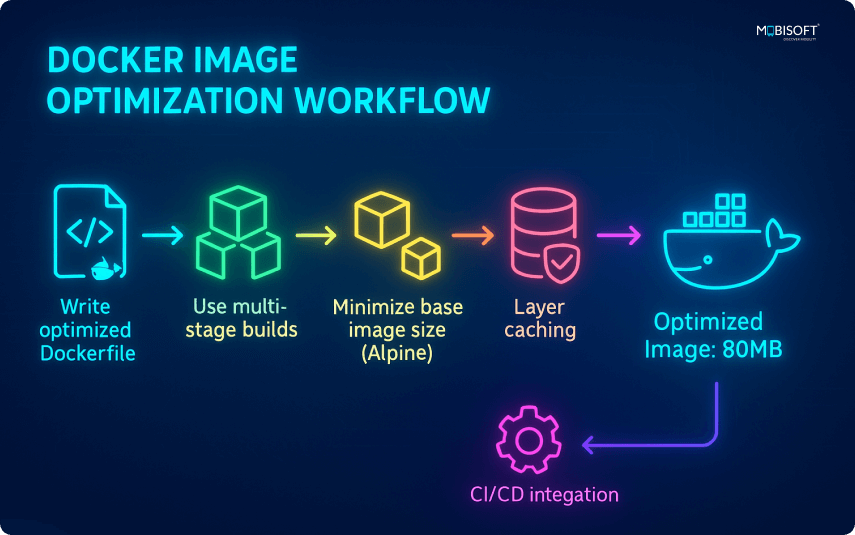
Docker image optimization requires two things: reducing the size and preventing security breaches. Let’s explore some proven container security best practices and setups with steps to install and use security tools. These will immensely help you with scanning Docker images for vulnerabilities.
1. Scan Images for Vulnerabilities
Regularly scan Docker images to identify known vulnerabilities. Below are popular container image scanning tools with installation and usage instructions:
Trivy
A fast and easy-to-use vulnerability scanner for Docker images.
Installation:
Bash
1. macOS (Homebrew)
⇒ brew install aquasecurity/trivy/trivy2. Ubuntu/Debian
Install necessary packages for adding a repository
⇒ sudo apt-get install wget apt-transport-https gnupg lsb-releaseDownload and add the Trivy public key
⇒ wget -qO - https://aquasecurity.github.io/trivy-repo/deb/public.key | gpg --dearmor | sudo tee /usr/share/keyrings/trivy.gpg > /dev/null
Add the Trivy repository to your sources list
⇒ echo "deb [signed-by=/usr/share/keyrings/trivy.gpg] https://aquasecurity.github.io/trivy-repo/deb generic main" | sudo tee -a /etc/apt/sources.list.d/trivy.listUpdate your package lists
⇒ sudo apt-get updateInstall Trivy
⇒ sudo apt-get install trivy3. Windows (via Chocolatey)
⇒ choco install trivyUsage:
Bash
⇒ trivy image my-django-app.slim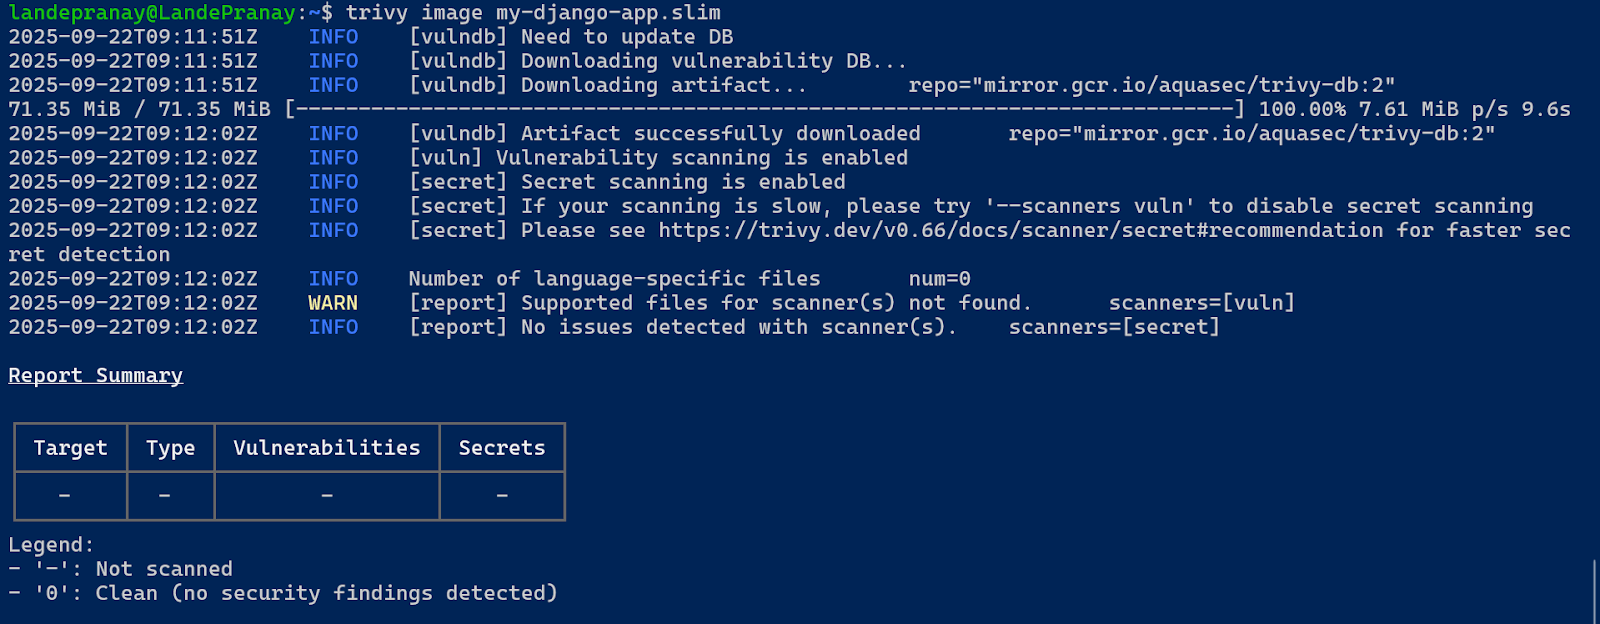
Anchore CLI (Syft + Grype)
Anchore uses Syft to generate SBOMs and Grype to scan for vulnerabilities.
Installation:
bash
# Install Syft
⇒ curl -sSfL https://raw.githubusercontent.com/anchore/syft/main/install.sh | sh -s -- -b /usr/local/bin# Install Grype
⇒ curl -sSfL https://raw.githubusercontent.com/anchore/grype/main/install.sh | sh -s -- -b /usr/local/binUsage:
Bash
# Install Syft
⇒ curl -sSfL https://get.anchore.io/syft | sudo sh -s -- -b /usr/local/bin# Install Grype
⇒ curl -sSfL https://get.anchore.io/grype | sudo sh -s -- -b /usr/local/bin⇒ syft my-django-app.slim:latest
⇒ grype my-django-app.slim:latest
Docker Scout
Docker’s built-in tool for image analysis and CVE tracking.
Installation:
No separate installation needed if using Docker Desktop v4.17+ or Docker CLI 23.0+
Usage:
Bash
⇒ docker scout quickview my-image:latest
⇒ docker scout cves my-image:latest
2. Use Non-Root Users
By default, Docker containers run as root, which is a security risk. It’s best practice in Docker deployment to create a non-root user for your application inside the container.
Example:
Dockerfile
RUN addgroup -S appgroup && adduser -S appuser -G appgroup
USER appuser
3. Keep Dependencies Up-to-Date
Regularly updating dependencies while keeping your image lean is crucial for Docker performance optimization and security. Use minimal base images and ensure that libraries are up-to-date. This prevents container image vulnerabilities.
For streamlined dependency updates and continuous integration, our CI/CD pipeline with Docker and an AWS approach can help.
Real-World Example:
Optimizing a Node.js Docker Image
Here’s an example of an unoptimized and optimized Dockerfile for a Node.js application:
Unoptimized Dockerfile:
dockerfile
FROM node:16
WORKDIR /app
COPY . .
RUN npm install
CMD ["node", "index.js"]
Issues:
- Development dependencies are included.
- The image size is over 900MB.
Optimized Dockerfile:
dockerfile
# Build stage
FROM node:16 AS builder
WORKDIR /app
COPY package*.json ./
RUN npm install --only=production
COPY . .

# Production stage
FROM node:16-slim
WORKDIR /app
COPY --from=builder /app .
CMD ["node", "index.js"]
Improvements:
- Uses multi-stage builds to exclude development dependencies.
- Reduces the image size to under 200MB.
Optimizing a Java Spring Boot Docker Image
Unoptimized Dockerfile:
Dockerfile
FROM openjdk:11
WORKDIR /app
COPY . .
RUN ./mvnw clean install
CMD ["java", "-jar", "target/app.jar"]
Optimized Dockerfile:
dockerfile
# Build stage
FROM maven:3.8.1-openjdk-11 AS builder
WORKDIR /app
COPY pom.xml .
RUN mvn dependency:go-offline
COPY src ./src
RUN mvn clean install

# Production stage
FROM openjdk:11-jre-slim
WORKDIR /app
COPY --from=builder /app/target/app.jar .
CMD ["java", "-jar", "app.jar"]
Improvements:
- Uses Docker build optimization with multi-stage builds to avoid unnecessary build dependencies.
- Reduces image size by using a slim base image.
For enterprises, we also provide securing Docker containers with expert cybersecurity services.
Optimizing a Python Django Docker Image
Django applications can also lead to large Docker images if not optimized.
Unoptimized Dockerfile:
dockerfile
FROM python:3.8
WORKDIR /app
COPY . .
RUN pip install -r requirements.txt
CMD ["python", "manage.py", "runserver"]
Optimized Dockerfile:
dockerfile
# Build stage
FROM python:3.8-slim AS builder
WORKDIR /app
COPY requirements.txt .
RUN pip install --no-cache-dir -r requirements.txt

# Production stage
FROM python:3.8-slim
WORKDIR /app
COPY --from=builder /app /app
CMD ["python", "manage.py", "runserver"]
Improvements:
- Uses multi-stage builds to keep the final image lean.
- Installs only necessary dependencies with
--no-cache-dirto avoid caching unnecessary files.
For continuous monitoring, explore our guide on Monitoring Docker containers using Prometheus and Grafana.
From Theory to Habit: Key Lessons for Developers
Starting with minimal base images keeps things lean and reduces vulnerabilities. Fewer Docker image layers and a properly configured .dockerignore file make your images smaller and faster to deploy.
As a final measure, maintain a practice of timely Docker image security scans. Following recommended practices for package installation will protect your apps more effectively.
The most important part of Docker container optimization is consistency. Keep updating your process with new methods, use Docker BuildKit where possible, and perform routine check-ups of your Dockerfiles.
Remember, Docker image optimization is not a one-time task; it’s a habit that should be followed regularly for secure and faster Docker deployments.
Key takeaways:
- Smaller images, faster pipelines: Smaller images require less processing time. Feels layers means minimal storage costs and quicker deployment.
- Don’t carry extra baggage: keep your image clean. Remove unused dependencies, caches, and temp files, as they are not only redundant but take up space.
- Employ appropriate tools: Use Docker Slim, dive, and Installable command. They help catch bottlenecks before they even appear.
- Multi-stage builds are beneficial to use: They allow you to keep only the necessary components for production. Thus making it efficient by getting rid of unnecessary build dependencies.
- Security is complementary to size: remove all root users, keep your dependencies updated, and optimize weak points for security.
- No common base image: Alpine is effective in building smaller images. For better compatibility and debugging, Ubuntu is a better pick.
- Practice optimization regularly: Have a fixed routine for Dockerfile check-ups. This will keep your image compact, safe, and aligned with the latest CI/CD pipelines.




 September 22, 2025


