
Real time data processing is the backbone of today’s smartest apps and services, and Apache Kafka is the engine that makes it all possible. Picture Kafka as a super charged message bus, whisking huge volumes of data from point A to point B in the blink of an eye. Whether you’re building Spring Boot Kafka microservices, live dashboards, or simply keeping an eye on your Kafka integration with Spring Boot, Kafka has your back. In this post, part of our Spring Boot Apache Kafka tutorial, we’ll demystify Kafka’s architecture and show you how to take your first steps with it.
What is Apache Kafka?
Imagine a system that can handle millions of events per second without breaking a sweat, that’s Kafka. Originally crafted at LinkedIn and now maintained by the Apache Software Foundation, Kafka is an open source platform built for:
- High throughput: It munches through vast streams of data.
- Rock solid durability: Your messages are safely stored across multiple servers.
- Seamless scaling: Easy to grow, whether you need one node or a thousand.
From powering Twitch chat to financial tick by tick trading feeds, Kafka is the go to for real time streaming and forms the backbone of many Spring Boot Kafka examples in production systems.

Key Concepts of Kafka
Before you dive in, let’s get cozy with Kafka’s core ideas:
Topics
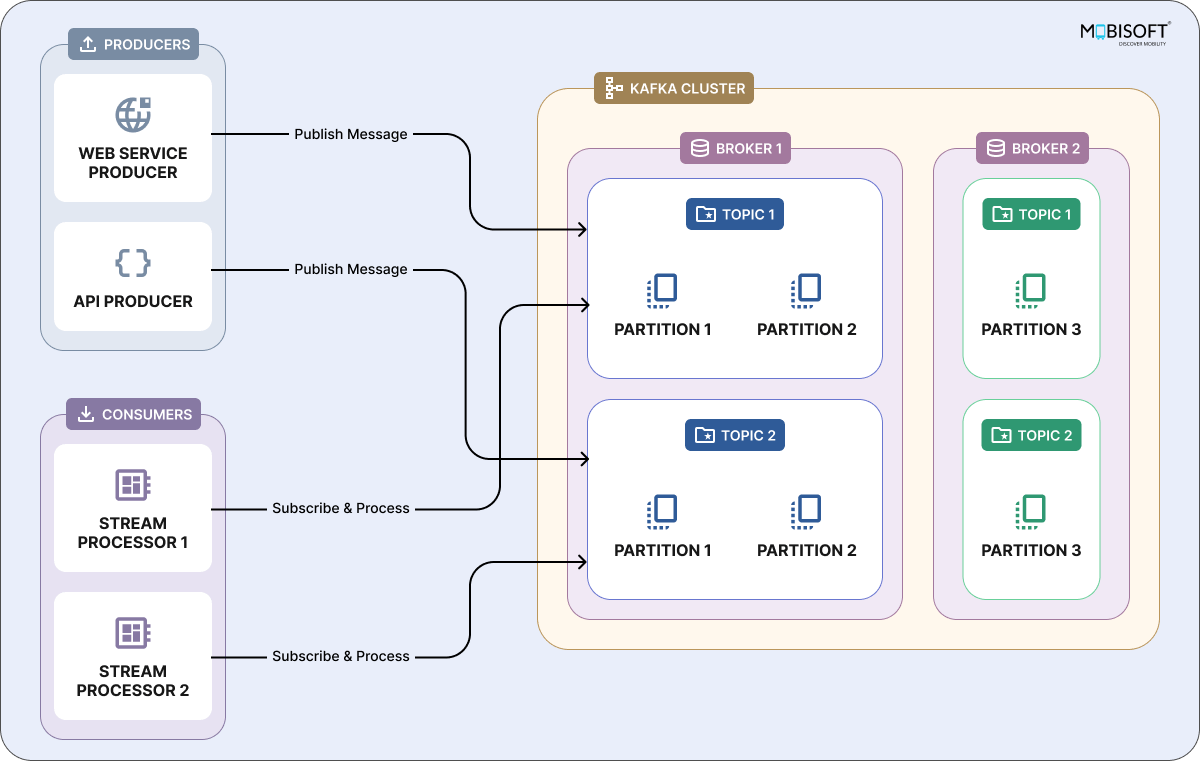
Think of a topic as a named channel on your data highway. Producers (the senders) publish messages into topics; consumers (the receivers) tune in and pull the messages out.
- Your data’s playlist: Each topic is like its own streaming playlist, “user activity,” “system alerts,” or “order events.”
- Built for scale and safety: When you push a message, Kafka automatically replicates it across the cluster. Even if a server goes down, your data stays safe.
- You control the replay: Topics keep messages around based on retention settings, so you can replay days (or weeks) of events if you need to.
Producers
Think of producers as the storytellers of your data world. These are the apps or devices like web servers logging clicks, IoT sensors streaming telemetry, or backend services firing off events that send messages into Kafka. Using Kafka’s producer API, you decide where and when to send data: choose a topic, pick a partition strategy (so related messages stay together in order), and opt for synchronous or asynchronous delivery. Built in retries and acknowledgments mean your messages get there reliably, even if the network hiccups. This mechanism forms the basis of a typical Spring Boot Kafka producer configuration.
Consumers
Consumers are the eager readers of those stories, subscribing to one or more topics and pulling in messages to process in real time (or later, if you prefer). Maybe they power analytics dashboards, trigger downstream workflows, or stash data in your database. Grouping consumers turns them into a cooperative team: Kafka will divide up partitions so each message is only handled once, balancing load and keeping everything fault tolerant. If one consumer drops out, the group seamlessly picks up its work with no data left behind.
Partitions
Partitions are Kafka’s secret sauce for scale and speed. By slicing each topic into multiple ordered “shards,” Kafka spreads data across brokers and lets consumers work in parallel massive throughput, no sweat. Within each partition, message order is guaranteed, so related events stay in sequence. Across partitions, order can vary, but that trade off unlocks the ability to handle huge data volumes without bottlenecks. As you grow, just add partitions (and brokers), and Kafka keeps humming along.
Brokers
Think of brokers as the backbone of your Kafka cluster. These servers store your data and handle every request from producers and consumers. Each broker owns a slice of topics and partitions, so when you publish a message, Kafka directs it to the right broker. Need more muscle? Just add brokers to scale horizontally. Thanks to built-in replication, copies of each partition live on multiple brokers, so if one goes down, another steps in without missing a beat. A good Spring Boot Kafka configuration ensures your brokers are efficiently utilized.
Consumer Groups
Consumer groups turn individual consumers into a synchronized team. Join a group, and Kafka devises topic partitions so each message is processed once no overlaps, no gaps. If you have more consumers than partitions, some will wait for their turn; if a consumer fails, Kafka automatically redistributes its workload. Plus, each group tracks its offsets, so you can pause, restart, or recover from crashes and pick up right where you left off.
ZooKeeper and the Raft
For years, ZooKeeper has been Kafka’s traffic cop, managing cluster metadata, broker registrations, topic configurations, and consumer group info. It keeps everyone in sync but adds deployment complexity.
Enter Raft mode: Kafka’s built in consensus system. Raft handles leader elections and metadata natively, slashing the need for an external ZooKeeper service. The result? A simpler, more resilient Kafka architecture that’s easier to scale and maintain.
Why Use Kafka?
Kafka brings a range of benefits to the table, making it a go to solution for real time data streaming:
Scalability
Need to handle more data? Just add brokers and partitions. Kafka grows with your needs.
Fault Tolerance
Our data stays safe, even if something goes wrong. Kafka replicates it across multiple brokers for peace of mind.
High Throughput
Kafka is built for speed. It’s designed to manage huge volumes of messages without breaking a sweat.
Durability
Kafka stores your data on disk, so you can replay events when needed and keep a historical record for analysis or recovery.
These benefits are foundational to nearly every Spring Boot Kafka example used in production grade applications.
Running Kafka Locally with Docker
Want to try Kafka without the added complexity of ZooKeeper? Kafka’s KRaft mode (Kafka Raft Metadata mode) lets you run it independently. Here’s how you can get started:
1. Create a Docker Compose File
Start by creating a docker-compose.yml file in your project directory with the necessary configuration.
2. Start Kafka
Use Docker to spin up the Kafka container. This launches Kafka in KRaft mode, skipping the need for ZooKeeper entirely.
3. Verify Everything is Running
Once it’s up, check that Kafka is running as expected. You’re now ready to send and receive messages locally.
This setup gives you a lightweight way to experiment with Kafka on your machine, ideal for development, testing, or just getting familiar with how it all works.
services:
 broker1:
   image: apache/kafka:latest
   container_name: broker1
   networks:
     - kafka-net
   ports:
     - "9092:9092"
     - "9093:9093"
     - "29092:29092"
   environment:
     KAFKA_NODE_ID: 1
     KAFKA_PROCESS_ROLES: broker,controller
     KAFKA_LISTENERS: PLAINTEXT://0.0.0.0:9092,CONTROLLER://0.0.0.0:9093,INTERNAL://0.0.0.0:29092,EXTERNAL://0.0.0.0:29093
     KAFKA_ADVERTISED_LISTENERS: PLAINTEXT://localhost:9092,INTERNAL://broker1:29092,EXTERNAL://broker1:29093
     KAFKA_LISTENER_SECURITY_PROTOCOL_MAP: CONTROLLER:PLAINTEXT,PLAINTEXT:PLAINTEXT,INTERNAL:PLAINTEXT,EXTERNAL:PLAINTEXT
     KAFKA_INTER_BROKER_LISTENER_NAME: INTERNAL
     KAFKA_CONTROLLER_LISTENER_NAMES: CONTROLLER
     KAFKA_CONTROLLER_QUORUM_VOTERS: 1@broker1:9093,2@broker2:9093,3@broker3:9093
     KAFKA_OFFSETS_TOPIC_REPLICATION_FACTOR: 3
     KAFKA_TRANSACTION_STATE_LOG_REPLICATION_FACTOR: 3
     KAFKA_TRANSACTION_STATE_LOG_MIN_ISR: 2
     KAFKA_GROUP_INITIAL_REBALANCE_DELAY_MS: 0
     KAFKA_NUM_PARTITIONS: 3


 broker2:
   image: apache/kafka:latest
   container_name: broker2
   networks:
     - kafka-net
   ports:
     - "9094:9092"
     - "9095:9093"
     - "29093:29092"
   environment:
     KAFKA_NODE_ID: 2
     KAFKA_PROCESS_ROLES: broker,controller
     KAFKA_LISTENERS: PLAINTEXT://0.0.0.0:9092,CONTROLLER://0.0.0.0:9093,INTERNAL://0.0.0.0:29092,EXTERNAL://0.0.0.0:29093
     KAFKA_ADVERTISED_LISTENERS: PLAINTEXT://localhost:9094,INTERNAL://broker2:29092,EXTERNAL://broker2:29093
     KAFKA_LISTENER_SECURITY_PROTOCOL_MAP: CONTROLLER:PLAINTEXT,PLAINTEXT:PLAINTEXT,INTERNAL:PLAINTEXT,EXTERNAL:PLAINTEXT
     KAFKA_INTER_BROKER_LISTENER_NAME: INTERNAL
     KAFKA_CONTROLLER_LISTENER_NAMES: CONTROLLER
     KAFKA_CONTROLLER_QUORUM_VOTERS: 1@broker1:9093,2@broker2:9093,3@broker3:9093
     KAFKA_OFFSETS_TOPIC_REPLICATION_FACTOR: 3
     KAFKA_TRANSACTION_STATE_LOG_REPLICATION_FACTOR: 3
     KAFKA_TRANSACTION_STATE_LOG_MIN_ISR: 2
     KAFKA_GROUP_INITIAL_REBALANCE_DELAY_MS: 0
     KAFKA_NUM_PARTITIONS: 3


 broker3:
   image: apache/kafka:latest
   container_name: broker3
   networks:
     - kafka-net
   ports:
     - "9096:9092"
     - "9097:9093"
     - "29094:29092"
   environment:
     KAFKA_NODE_ID: 3
     KAFKA_PROCESS_ROLES: broker,controller
     KAFKA_LISTENERS: PLAINTEXT://0.0.0.0:9092,CONTROLLER://0.0.0.0:9093,INTERNAL://0.0.0.0:29092,EXTERNAL://0.0.0.0:29093
     KAFKA_ADVERTISED_LISTENERS: PLAINTEXT://localhost:9096,INTERNAL://broker3:29092,EXTERNAL://broker3:29093
     KAFKA_LISTENER_SECURITY_PROTOCOL_MAP: CONTROLLER:PLAINTEXT,PLAINTEXT:PLAINTEXT,INTERNAL:PLAINTEXT,EXTERNAL:PLAINTEXT
     KAFKA_INTER_BROKER_LISTENER_NAME: INTERNAL
     KAFKA_CONTROLLER_LISTENER_NAMES: CONTROLLER
     KAFKA_CONTROLLER_QUORUM_VOTERS: 1@broker1:9093,2@broker2:9093,3@broker3:9093
     KAFKA_OFFSETS_TOPIC_REPLICATION_FACTOR: 3
     KAFKA_TRANSACTION_STATE_LOG_REPLICATION_FACTOR: 3
     KAFKA_TRANSACTION_STATE_LOG_MIN_ISR: 2
     KAFKA_GROUP_INITIAL_REBALANCE_DELAY_MS: 0
     KAFKA_NUM_PARTITIONS: 3


networks:
 kafka-net:
   driver: bridge
1. Run Docker Compose
Open a terminal in the directory where you created the docker-compose.yml file and execute the following command to start the Kafka service:
docker-compose up
2. Access Kafka
Once the containers are running, you can connect using any Kafka client or producer/consumer tool.
Ensure you're using the correct broker address and port, which may vary based on whether you're connecting from within the Docker network or from your host machine.
- Broker 1:
localhost:9092 - Broker 2:
localhost:9094 - Broker 3:
localhost:9096
From inside Docker (e.g., using kafka topics.sh from a broker container)
- Broker 1:
broker1:29093 - Broker 2:
broker2:29093 - Broker 3:
broker3:29093
Make sure to specify the appropriate port when connecting to each broker to ensure successful communication with the Kafka cluster.
Kafka's architecture is designed with fault tolerance in mind. By distributing data across multiple brokers, Kafka ensures that if one broker fails, the data remains available through other brokers. Each partition of a topic can have multiple replicas, which are stored on different brokers.
This replication mechanism allows Kafka to maintain data integrity and availability even in the event of broker failures. When a broker goes down, Kafka can automatically redirect requests to the available replicas, ensuring that the system continues to function smoothly and that no data is lost. This fault tolerance is a key feature that makes Kafka a reliable choice for distributed data streaming and underpins many resilient spring boot kafka producer and consumer example implementations.
3. Create Topics and Produce/Consume Messages
You can use Kafka command line tools or any Kafka client library to create topics and send/receive messages.
Below, I have shown you how to use the command
kafka-topics.sh# SSH to docker container broker1

# Create topic
docker exec -it broker1 /opt/kafka/bin/kafka-topics.sh --create --topic kafkademo --bootstrap-server localhost:9092,localhost:9094,localhost:9096 --partitions 3 --replication-factor 3# List topics
docker exec -it broker1 /opt/kafka/bin/kafka-topics.sh --list --bootstrap-server localhost:9092,localhost:9094,localhost:9096# Describe topic
docker exec -it broker1 /opt/kafka/bin/kafka-topics.sh --describe --topic kafkademo --bootstrap-server localhost:9092,localhost:9094,localhost:9096# Delete topic
docker exec -it broker1 /opt/kafka/bin/kafka-topics.sh --delete --topic kafkademo --bootstrap-server localhost:9092,localhost:9094,localhost:9096
Springboot app to integrate Kafka to send and retrieve messages
Prerequisites
Before you start, ensure you have the following installed on your machine:
1. Java Development Kit (JDK)
Make sure you have JDK 11 or later installed. You can check your Java version by running:
java -version2. Apache Maven
You need Maven to build and manage your Spring Boot project. Check if Maven is installed by running:
mvn -version3. Docker
Ensure Docker is installed and running on your machine, as you will be using it to run Kafka. A proper Docker setup is essential for testing spring boot kafka microservices locally.
4. Kafka Running
Follow the previous instructions to set up and run Kafka locally using Docker without Zookeeper.
Follow the previous instructions to set up and run Kafka locally using Docker without Zookeeper.
If you're preparing for deployment, check out our DevOps services for Kafka based Spring Boot deployments to streamline your CI/CD workflows.
Step 1: Set Up Your Spring Boot Project
1. Create a New Spring Boot Project
You can use Spring Initializr (https://start.spring.io/) to generate a new Spring Boot project. Select the following dependencies:
- Spring Web
- Spring for Apache Kafka
2. Download the Project
Once you have selected the dependencies, click on "Generate" to download the project as a ZIP file. Extract it to your desired location and begin your spring boot kafka producer or consumer implementation.
Step 2: Configure Kafka Properties
Open the application.properties file (located in src/main/resources) and add the following configuration:
# Kafka properties
spring.application.name=kafkademo
spring.kafka.bootstrap-servers=localhost:9092,localhost:9094,localhost:9096
spring.kafka.consumer.group-id=my-group
spring.kafka.consumer.auto-offset-reset=earliest
spring.kafka.producer.key-serializer=org.apache.kafka.common.serialization.StringSerializer
spring.kafka.producer.value-serializer=org.apache.kafka.common.serialization.StringSerializer
Step 3: Create a Kafka Producer
Create a new class named MessageProducerService to send messages to Kafka:
import org.springframework.beans.factory.annotation.Autowired;
import org.springframework.kafka.core.KafkaTemplate;
import org.springframework.stereotype.Service;


@Service
public class MessageProducerService {


   private final KafkaTemplate<String, String> kafkaTemplate;


   @Autowired
   public MessageProducerService(KafkaTemplate<String, String> kafkaTemplate) {
       this.kafkaTemplate = kafkaTemplate;
   }


   public void sendMessage(String topic, String message) {
       kafkaTemplate.send(topic, message);
   }


}
Step 4: Create a Kafka Consumer
Create another class named MessageConsumerService to receive messages from Kafka:
import org.springframework.kafka.annotation.KafkaListener;
import org.springframework.stereotype.Service;


@Service
public class MessageConsumerService {

   @KafkaListener(topics = "test-topic", groupId = "my-group")
   public void consumeMessageLister(String message) {
       System.out.println("Message received: " + message);
   }
}
Step 5: Create a REST Controller
Create a REST controller to expose an endpoint for sending messages:
import org.springframework.http.ResponseEntity;
import org.springframework.web.bind.annotation.PostMapping;
import org.springframework.web.bind.annotation.RequestMapping;
import org.springframework.web.bind.annotation.RequestParam;
import org.springframework.web.bind.annotation.RestController;


import com.mobisoftinfotech.kafkademo.services.MessageProducerService;


@RestController
@RequestMapping("/api/kafka")
public class MessageController {


   private final MessageProducerService messageProducerService;


   public MessageController(MessageProducerService messageProducerService) {
       this.messageProducerService = messageProducerService;
   }


   @PostMapping("/send")
   public ResponseEntity<String> sendMessage(@RequestParam String message) {
       messageProducerService.sendMessage("test-topic", message);
       return ResponseEntity.ok("Message sent successfully");
   }


}
Step 6: Run Your Application
1. Build and Run the Application
Use your IDE to run the Spring Boot application or use the command line:./mvnw spring-boot:run
For deployment-ready workflows, explore how to integrate your Spring Boot Kafka app with a CI/CD pipeline using Docker and AWS to automate builds and releases.
2. Send Messages
You can send messages to Kafka by making a POST request to the endpoint. For example, you can use curl:
curl -X POST "http://localhost:8080/api/kafka/send?message=HelloKafka"
3. Receive Messages
The messages sent to the test-topic will be printed in the console where your Spring Boot application is running.

You can download the above example source code from our repository spring-boot-kafka-example
Various Practical Usages of Kafka
Kafka is a powerful event streaming platform used across industries to handle real time data efficiently. Here are some of its most common and practical applications for spring boot kafka example use cases.
1. Basic Kafka Usage
Kafka works as a messaging system where producers send data to topics. These topics organize data into streams. Brokers store and manage the data, while consumers read and process it. This decouples producers from consumers, making data flow more flexible and scalable, commonly seen in spring boot kafka configuration setups.
example.

2. Microservices Communication
In a microservices setup, Kafka acts as the messaging backbone. Each service sends messages to Kafka topics to represent events or data updates. Other services listen to these topics and consume messages asynchronously. This setup lets services respond to events without being tightly linked to the ones that produce them. As a result, the system becomes more resilient and easier to scale or maintain.
This setup lets services respond to events without being tightly linked to the ones that produce them. To build a strong foundation, it’s worth taking time to learn the core principles of Spring Boot microservices for scalable Kafka systems.

3. Data Ingestion Pipeline
Kafka plays a key role in data ingestion pipelines. It collects data from multiple sources like IoT devices or web apps and buffers it to manage traffic spikes. Stream processing tools then handle the data in real time, applying transformations or aggregations as needed. Once processed, the data moves to a final destination, such as a database or data lake, for storage and analysis.

4. Event Driven Systems
Kafka powers event driven systems by letting services react to real time events. Producers send events, like state changes or user actions to Kafka topics. Consumers subscribe to these events and act on them immediately, triggering workflows or updating databases. This approach creates responsive systems that adapt quickly to change, boosting overall agility.

5. Real-Time Analytics
Kafka is widely used for real time analytics. It ingests and buffers continuous data streams from multiple sources. Stream processors handle this data instantly filtering, aggregating, or transforming it on the fly. The processed results feed into dashboards, giving teams up-to-date insights and helping them make fast, informed decisions, often with a spring boot kafka producer and consumer example setup.

Wrapping Up
Think of Kafka as the secret sauce that brings real time data to life. It turns your streams into organized channels, topics and keeps everything moving smoothly between producers, brokers, and consumers. The result? Lightning fast, reliable, and endlessly scalable data flows.
We walked you through spinning up Kafka with Docker and plugging it into a Spring Boot app. In just a few steps, you’re sending and receiving messages in real time perfect for live dashboards, microservices chatting, or on the fly analytics, based on common spring boot apache kafka tutorial workflows.
In a world where data moves at warp speed, Kafka is the toolkit you need to keep pace. Whether you’re starting fresh or giving your existing platform a turbo boost, Kafka lets you handle whatever comes at you today, tomorrow, and beyond.Curious to see what real time streaming can do for your project? Dive in, experiment with Kafka’s powerful features, and watch your data driven apps take off. The future’s streaming, and you’re in the driver’s seat. You can also hire expert DevOps engineers to assist with Kafka integration, scaling, and automated deployment.


Pratik Kale
Read more
Pratik Kale leads the Web and Cloud technology team at Mobisoft Infotech. With 14 years of experience, he specializes in building complex software systems, particularly focusing on backend development and cloud computing. He is an expert in programming languages like Java and Node.js, and frameworks like Spring Boot. Pratik creates technology solutions that not only solve current business problems but are also designed to handle future challenges.
 May 23, 2025


