To setup nginx as reverse proxy, we are going to use Ubuntu 16.04. A reverse proxy is a server that is between a user and the web or app server. It is typically used to load balance the traffic to multiple app server.
For this tutorial we are going to put apache tomcat server behind the nginx server. Here, we have already created a ubuntu 16.04 server at (52.55.150.107) IP address. I have setup tomcat on that server using the instructions given in ‘Setting up a Java server’ tutorial. I have setup JDK8 and tomcat 8.5.
Let’s get started
Step 1: Fulfilling The Requirement Of Ports 80 And 8080
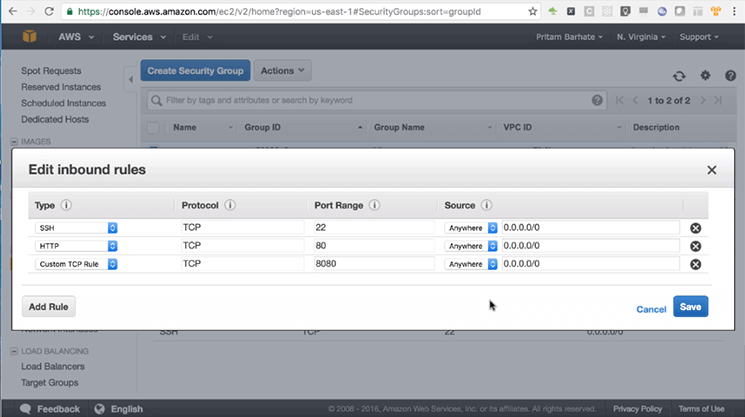
As we are going to use web server and tomcat in addition to regular SSH port 22, we are going to need ports 80 and 8080. For that let’s go to ‘ic2’ management console.
In the description of our instance, you can see the security group is ‘Nignx’.
- Under ‘Network and Security’
- Go to ‘Security Group’ and select ‘Nignx’
- Go to ‘Inbound Port’ and click on ‘Edit’
- Click on ‘Add Rule’ and select ‘HTTP’
- Again click on ‘Add Rule’ and now select ‘Custom TCP Rule’
- In the ‘Port Range’ of ‘Custom TCP Rule’ add ‘8080’
- Click on ‘Save’
Note: Here for both, HTTP and Custom TCP Rule, we are going to allow traffic from anywhere.
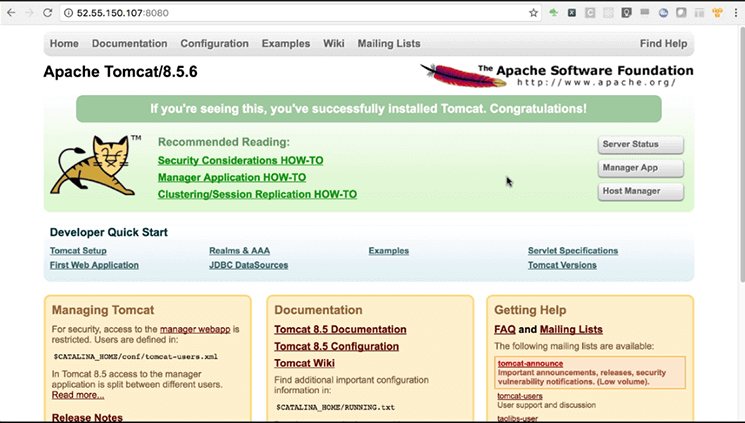
Step 2: Check If Tomcat Is Accessible From The Internet
Now since port 8080 is open, we will try to access tomcat. Try to access: http://52.55.150.107:8080/
- as you can see in the below image that it is working.
Now, our security group is set.
Step 3: Setting Up Nginx
Command for this is
$ sudo apt-get install -y nginx
Note: Here ‘-y’ means that you are sure that you want to install, so the installation will not prompt you once again
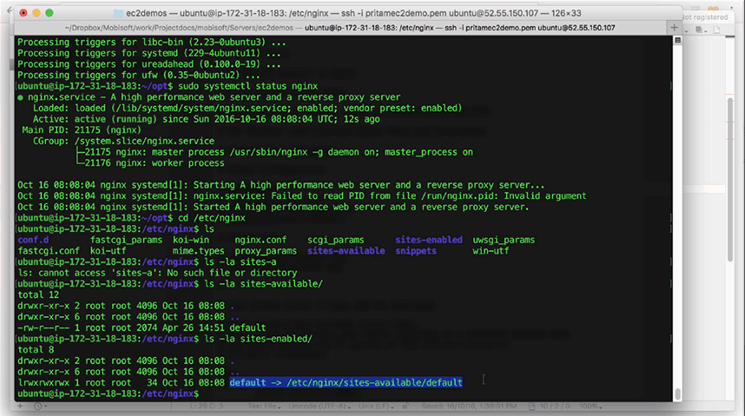
To check the status for nginx you can use the command:
$ sudo systemctl status nginx
If it’s running you can go for a final check
Since it runs on port 80, you do not need to specify port in your IP address
For example, I tried to access: http://52.55.150.107/. If it shows ‘Welcome to nginx!’ this means that nginx is running
Note: By default, nginx server configuration is stored in ‘etc/nginx’ and the main file is nginx.conf. Whereas, each of the sites that we enable is available in ‘sites-available’.
It is not necessary to enable all the sites that are available, you can enable and disable some sites that you are serving using nginx. So the sites which are enabled they get symlinked in the sites-enabled.
Step 4: Look At All The Sites That Are Available And Enabled
- For this use the command:
$ cd /etc/nginx
- You can see the nginx.conf, and the sites that are available and sites that are enabled
- You can also see the number of sites that are available and enabled, for this use
$ ls -la sites-available/
- Here, there is only one site as default and to check if it is enabled
$ ls -la sites-enabled/
- And you will see default site is enabled.
Note: Here we are not going to do multiple site setup so this default configuration is sufficient for us.
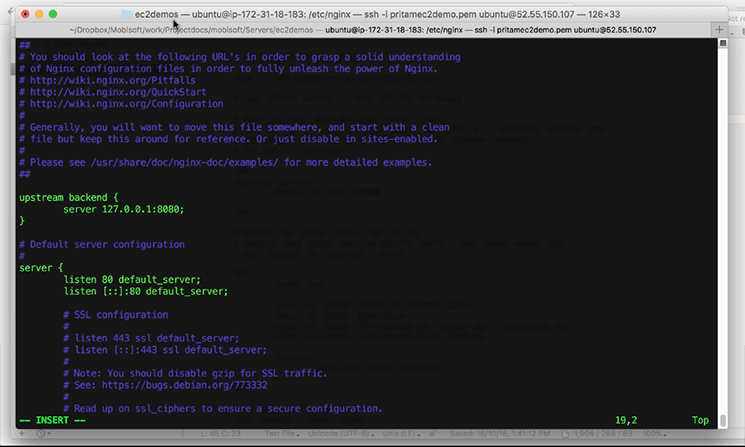
Step 5: Editing Nginx Configuration
- To edit nginx configuration run the following command:
$ sudo vi /etc/nginx/sites-available/default
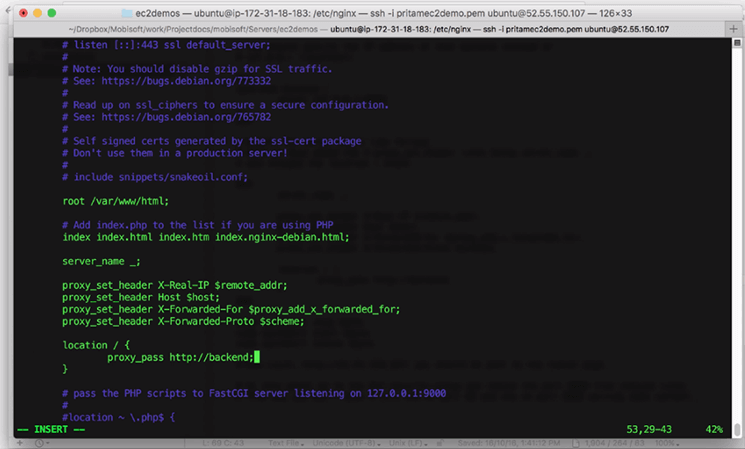
Step 6: Adding Upstream Section And Using Proxypass Setting To Pass The Traffic
Now we need to add upstream section where we define our backend. Later we will use proxypass setting to pass the traffic that is coming to port 80 to the tomcat running on the localhost at port 8080.
Note: It is not necessary for the tomcat to be running on the same server. In Fact, in production setup where you have multiple tomcats, you will be running tomcats and nginx instances on different servers, in that case you will need to add the IP address or cname for the tomcat servers that are running.
- You can have multiple server lines in order to specify multiple servers
- Add the following just before the server line:
upstream backend {
        server 127.0.0.1:8080;
        }
Now we need to add proxy header to the server block. For this copy the following and add it the server block:
proxy_set_header X-Real-IP $remote_addr;
proxy_set_header Host $host;
proxy_set_header X-Forwarded-For $proxy_add_x_forwarded_for;
proxy_set_header X-Forwarded-Proto $scheme;
Step 7: Modifying Location Block And Adding Proxypass Setting
- Copy the below given command and add it in the server under location, as given in the below image
{
     	proxy_pass http://backend;
     }
That’s all, this is the only setup that is required
Step 8: Stopping And Starting Nginx
Use the following command to stop, start nginx and to check it’s status
sudo systemctl stop nginx
sudo systemctl start nginx
sudo systemctl status nginx
- If it is running properly, it means that you have not done any mistake in your configuration
- Now we need to visit the main IP address to see if we get tomcat page instead of nginx page.
- Here, for example we have used:
- If you see the tomcat page, it means that all the traffic that is coming to the route location is being passed to the tomcat, that is setup at the backend
- Sometimes, you might not want to send all the traffic. But you would want to send the traffic that is limited to a sub-folder, this is also possible to do, but since we use only one server for one project, we don’t really require that.
- You can see that port 8080 need not be opened, because you can access its content via port 80
Step 9: Blocking The Unwanted Port 8080
- For this you can go to ‘Security Group’ and select ‘Nginx’ under group name
- Under ‘Inbound’ select ‘Edit’ option
- The new tab appears and under that you can delete the route which allows the access to port 8080
- This gives us an extra layer of security where we don’t keep an unwanted port open.
Note: Also it is important to block port 8080 if you have a site which has public facing content, which you want to be indexed by search engine
- In these cases, if you serve content from port 80 and port 8080 for Google, then those are two different addresses
- It means that it will think that one of your sites serving duplicate content and it might get penalized in search engine results. Hence, it is important just to keep port 80 open instead of port 8080
- At last you will see that your browser is not able to reach port 8080
This is how we setup nginx as reverse proxy.
Author’s Bio

Pritam Barhate, with an experience of 10+ years in technology, heads Technology Innovation at Mobisoft Infotech. He has a rich experience in design and has been a consultant for a variety of industries and startups. At Mobisoft Infotech, he primarily focuses on technology resources and develops the most advanced solutions. Follow him @pritambarhate