
Welcome to Part 2!
Haven’t read Part I yet? Start here to understand how the AI-powered code review agent was built. We built all the core components for our AI agent example
Now in Part 2, we'll bring it all together by building the MCP server, configuring Claude Desktop, and testing our complete AI agent.
Table of Contents
- Building the MCP Server
- Configuring Claude Desktop
- Testing Your Agent
- Troubleshooting Common Issues
- Next Steps
Building the MCP Server
Now we create the MCP server that ties everything together as part of a scalable MCP server implementation strategy. This is the primary entry point through which Claude Desktop communicates.
What it does:
Exposes code review functionality as MCP tools, which Claude Desktop can call using natural language.
How it works:
- Initializes FastMCP server with tool definitions
- Each tool is decorated with @mcp.tool() to register it
- Tools receive arguments, execute logic, and return JSON responses
- Global state tracks active reviews for status queries
Available tools:
- detect_tech: Identifies programming language from project file
- get_available_checklists: Lists available YAML checklists
- get_checklist: Retrieves specific checklist details
- review_code: Executes full code review with progress tracking
- get_review_status: Checks status of active/completed reviews
This process supports MCP server integration and helps streamline workflows in AI-powered software development.
Example tool implementation:
from mcp.server.fastmcp import FastMCP

mcp = FastMCP(name="Code Reviewer")
active_reviews = {}

@mcp.tool()
def detect_tech(project_path: str) -> str:
    """
    Detect technology stack from a project file (e.g., package.json, pyproject.toml).

    Args:
        project_path: Absolute path to a project configuration file (not a directory)

    Returns:
        JSON string with detected technology, frameworks, and confidence
    """
    try:
        path = Path(project_path)
        if path.is_dir():
            return json.dumps({"error": "project_path must be a file, not a directory. ..."})

        if not path.exists():
            return json.dumps({"error": f"File does not exist: {project_path}", ...})

        # Get the parent directory for detection
        project_dir = str(path.parent)
        result = detect_technology(project_dir)
        return json.dumps(result, indent=2)
    except Exception as e:
        return json.dumps({"error": str(e), ...})

# Entry point
if __name__ == "__main__":
    mcp.run()

Create the file:
Create main.py with the complete MCP server implementation, including all five tools:
- detect_tech() (shown above as full example)
- get_available_checklists() - Similar pattern, calls ChecklistEngine
- get_checklist() - Similar pattern, loads and formats YAML
- review_code() - Main review tool with progress callbacks
- get_review_status() - Queries active_reviews dictionary
Note: Full implementation available in the GitHub repository.
After setting up your MCP server and exploring the available tools, learn how to integrate and test your MCP server setup with real-world AI agents through our expert MCP server development consultation services.
Configuring Claude Desktop

Now we need to tell Claude Desktop how to launch our MCP server
Step 1: Find Your Configuration File
The config file location depends on your operating system:
Windows:
%APPDATA%\Claude\claude_desktop_config.jsonmacOS:
~/Library/Application Support/Claude/claude_desktop_config.jsonLinux:
~/.config/Claude/claude_desktop_config.jsonStep 2: Add Your MCP Server
Edit the config file and add this configuration. Adjust the path to match your actual project location:
For Windows:
{
  "mcpServers": {
    "mcp-code-reviewer": {
      "command": "uv",
      "args": [
        "--directory",
        "C:\\Users\\YourUsername\\code\\mcp-code-reviewer",
        "run",
        "mcp-code-reviewer"
      ],
      "env": {
        "DANGEROUSLY_OMIT_AUTH": "true"
      }
    }
  }
}
For macOS/Linux:
{
  "mcpServers": {
    "mcp-code-reviewer": {
      "command": "uv",
      "args": [
        "--directory",
        "/Users/yourname/code/mcp-code-reviewer",
        "run",
        "mcp-code-reviewer"
      ],
      "env": {
        "DANGEROUSLY_OMIT_AUTH": "true"
      }
    }
  }
}
Configuration Notes:
- Replace the path with your actual project directory
- On Windows, use double backslashes (\) in paths
- On macOS/Linux, use forward slashes (/)
- The --directory flag tells uv where your project is located
- The run mcp-code-reviewer part matches the entry point in pyproject.toml
Step 3: Restart Claude Desktop
After saving the config file:
- Quit Claude Desktop completely, from Task Manager as well
- Restart the application
- Your MCP server will start automatically when Claude Desktop launches
You can verify the connection by looking for your MCP server in Claude Desktop’s interface.
Go to the Settings

Settings will look like this, and click on the Developer option

You can verify by running the status of your local MCP server.
If the status is Failed, check the config file, close the Claude app from Task Manager, and start again.
This confirms your MCP server is properly configured and running.
Follow Docker optimization strategies to ensure smooth MCP server deployment for your AI-powered system.
Testing Your Code Review Agent
You have two ways to test your code review agent: using the MCP Inspector for debugging, or through Claude Desktop for production use.
Both methods ensure your AI agent integration works smoothly before going live using scalable MCP software development frameworks.
Option 1: Testing with MCP Inspector (Development)
Before integrating with Claude Desktop, you can test your MCP server using the built-in inspector. This is useful for development and debugging.
Start the MCP server in development mode:
uv run mcp dev main.py
This will start the MCP proxy server and inspector. You'll see output similar to:
Starting MCP inspector...
Proxy server listening on 127.0.0.1:6277
Session token: 79be2f530f51620ccfdc0a8b43f2c7bb31ac57b09a8649820ee8e4630f596b32
Use this token to authenticate requests or set DANGEROUSLY_OMIT_AUTH=true to disable auth


Open inspector with token pre-filled:
   http://localhost:6274/?MCP_PROXY_AUTH_TOKEN=79be2f530f51620ccfdc0a8b43f2c7bb31ac57b09a8649820ee8e4630f596b32


MCP Inspector is up and running at http://127.0.0.1:6274
Understanding the Output:
- Proxy server runs on port 6277 (handles MCP communication)
- Inspector UI runs on port 6274 (your browser interface)
- Session token is generated for authentication
- The URL includes the token pre-filled for convenience
Using the Inspector:
- Open the provided URL in your browser (with token pre-filled)


- You'll see a web interface. Now click on Connect

- Click on the Tools tab and then click List Tools

- Select a tool (like detect_tech or review_code)
- Enter the parameters
- Click "Run" to execute and see the results
- Check for errors, test edge cases, and verify outputs
This is an excellent way to debug your tools before deploying to Claude Desktop.
Option 2: Testing with Claude Desktop (Production)
Once Claude Desktop restarts with your MCP server configured, you can test it using natural language.
Example 1: Detect Technology
You: "Can you detect what technology is used in my project? The main config file is at /path/to/project/package.json"
Claude will:
- Use the detect_tech tool
- Analyze the file and project structure
- Return the detected technology, frameworks, and confidence level


- You can click Always allow or Allow Once

Example 2: Get Available Checklists
You: "What code review checklists do you have available?"
Claude will:
- Use the get_available_checklists tool

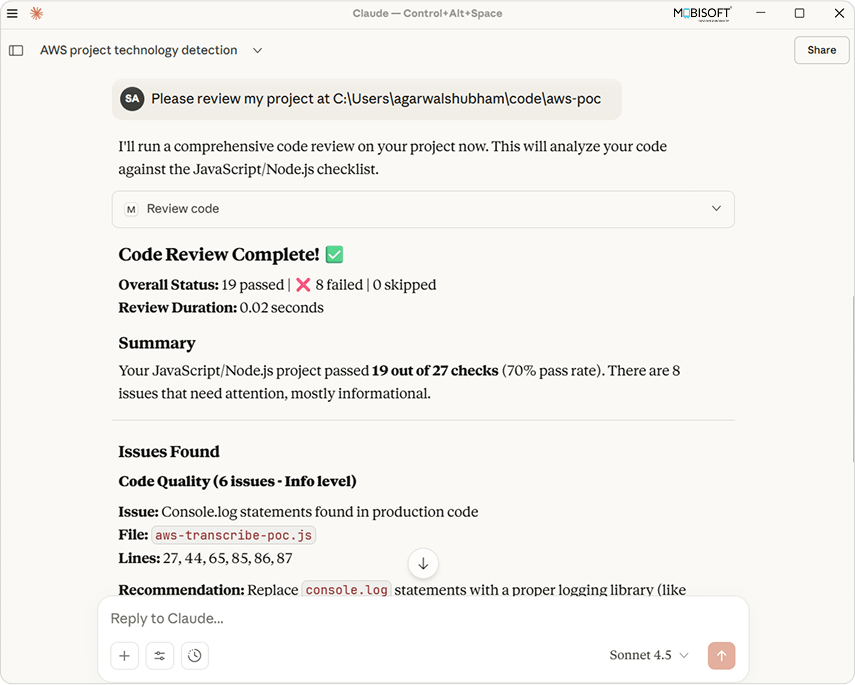
Example 3: Review Code
You: "Please review my project at /home/user/myproject"
Claude will:
- Detect the technology (JavaScript)
- Load the JavaScript checklist
- Execute all checks
- Present a summary with pass/fail counts and detailed findings
Example 5: Give me a detailed summary report

Example 4: Get Specific Checklist
You: "Show me what checks are included in the JavaScript checklist."
Claude will:
- Use the get_checklist tool
- Display all categories and checks for JavaScript


See how our AI services support end-to-end development, testing, and deployment of custom agents to accelerate your AI projects.
Troubleshooting Common Issues
Here are solutions to common problems you might encounter.
Issue 1: MCP Error -32001 (Request Timed Out)
Problem: The detect_tech tool times out when you pass a directory path like.
Why it happens: Recursive file scanning with rglob() can be very slow on large directories, especially if there are many files or nested directories like node_modules.
Solution: Our implementation requires a file path instead of a directory path. Pass a specific file like:
- /path/to/project/package.json for JavaScript
- /path/to/project/pyproject.toml for Python
- /path/to/project/pom.xml for Java
The detector will use the file's parent directory for analysis, which is much faster.
Issue 2: YAML Parsing Errors
Problem: YAML parser fails with an error like "expected block end, but found ']'"
Why does it happen:
- Using single quotes with brackets or special characters
- Not escaping backslashes in regex patterns
- Mixing block and inline array syntax
Solution:
- Always use double quotes for strings with special characters
- Double-escape backslashes: \b becomes \\b
- Be consistent with array syntax (use block format throughout)
Correct YAML:
patterns:
  - "\\beval\\("
  - "password\\s*=\\s*[\"'][^\"']+[\"']"
Incorrect YAML:
patterns:
  - '\beval\('   # Single quotes with special chars
  - 'password\s*='  # Not enough escaping
Issue 3: Virtual Environment Conflicts
Problem: Error message "failed to remove file .venv/lib64: Access is denied"
Why it happens: Windows does not support Linux-based symlinks. And so when the .venv directory is created in the WSL (Linux), the Claude Desktop (Windows) attempts to utilize it, resulting in an error.
Solution:
# Delete the existing .venv directory
rm -rf .venv

# Restart Claude Desktop
# It will create a fresh Windows-compatible virtual environment
Issue 4: ImportError or Entry Point Issues
Problem: Error like "cannot import name 'main' from 'main'" or "ImportError"
Why it happens: The entry point in pyproject.toml doesn't match the actual code structure.
Solution: Make sure your pyproject.toml has the correct entry point:
[project.scripts]
mcp-code-reviewer = "main:mcp.run"
This points directly to the run() method on the mcp object in main.py. After changing this, delete .venv and restart Claude Desktop.
Issue 5: Module Not Found Errors
Problem: ModuleNotFoundError: No module named 'yaml' or similar
Why it happens: The virtual environment utilized by Claude Desktop does not have the required dependencies.
Solution:
# Navigate to your project directory
cd mcp-code-reviewer

# Delete existing virtual environment
rm -rf .venv

# Reinstall dependencies
uv sync

# Restart Claude Desktop
Issue 6: Server Won't Start
Problem: Claude Desktop shows the server as disconnected or not starting
Solution:
- Check the Claude Desktop logs:
- Windows: %APPDATA%\Claude\logs\
- macOS: ~/Library/Logs/Claude/
- Linux: ~/.config/Claude/logs/
- Look for error messages in the log files
- Common fixes:
- Verify the path in your config is correct
- Ensure uv is installed and in your PATH
- Check that all Python files have no syntax errors
- Verify that pyproject.toml is properly formatted
Next Steps and Extensions
Now that you have a working code review agent, here are ways to extend and improve it:
1. Add More Programming Languages
Create new checklist files for other languages:
- Ruby: checklists/ruby.yaml
- PHP: checklists/php.yaml
- C++: checklists/cpp.yaml
- C#: checklists/csharp.yaml
Update technology_detector.py to recognize these languages.
2. Create Custom Validators
Implement specialized validators for:
- Cyclomatic complexity analysis
- Dependency vulnerability checking
- Code duplication detection
- Performance profiling
3. Add Auto-Fix Capabilities
Extend the MCP server with tools that can automatically fix issues:
- Remove unused imports
- Fix formatting issues
- Update deprecated API calls
- Add missing type hints
4. Integrate with CI/CD
Run code reviews automatically in your build pipeline:
- Add a GitHub Actions workflow
- Create a pre-commit hook
- Set up GitLab CI integration
5. Generate Reports
Add reporting features:
- HTML reports with charts
- PDF export
- Integration with issue trackers (Jira, GitHub Issues)
- Metrics dashboards
6. Team-Specific Customization
Customize checklists for your team:
- Add company-specific coding standards
- Create project-specific rules
- Implement architecture guidelines
- Add documentation requirements
Looking to align AI agent deployment with your business goals? Explore our AI strategy consulting for guidance.
Conclusion
Congratulations! You have successfully built an AI-powered code review agent that integrates with Claude Desktop using the Model Context Protocol (MCP).
This tool demonstrates the potential of MCP server development for creating custom artificial intelligence agents, which is why many organizations partner with an experienced MCP server development company. You have learned how to:
- Structure a modular Python application
- Implement the Model Context Protocol
- Create flexible validation systems
- Design YAML-based configuration
- Integrate with Claude Desktop
The modular structure of the agent makes it easy to roll out updates, allowing for customization over time. It will automate the review process through code review automation, consistently providing quality feedback and saving you time.
Key Takeaways:
- MCP enables powerful AI integrations without complex setup
- Modular design makes the system maintainable and extensible
- YAML checklists allow non-programmers to define review criteria
- Local execution ensures code never leaves your system
You can find the complete source code and follow along with the implementation on GitHub
Build your own agent and share the experience with other developers in the community. You can customize as per your requirements and even add improvements if you like.
Learn how to build and customize AI agents using the CrewAI framework before integrating them into real-world workflows.
Questions or Feedback?
If you have any queries regarding this guide or wish to share improvements:
- Go to the GitHub repository, open a new issue
- Share your feedback on social media platforms
- Suggest refinements in the project
Happy coding and happy reviewing your AI-powered code review agent!
Series Recap
Part 1: Understanding & Building Core Components
- Model Context Protocol fundamentals
- Project architecture and setup
- Technology detector implementation
- Validation system (base, pattern, and file validators)
- Progress tracking
- Checklist engine
- YAML checklist creation
Part 2: Integration, Testing & Deployment
- MCP server implementation
- Claude Desktop configuration
- Testing with MCP Inspector
- Testing with Claude Desktop
- Troubleshooting common issues
- Extension ideas and next steps
Thank you for following along with this comprehensive tutorial on building AI agents


Shubham Agarwal
Read more
Shubham Agarwal is a Principal Software Engineer at Mobisoft Infotech with nearly a decade of experience in building high-performance web applications and designing scalable software architectures. While he specializes in Python, Node.js, and React, his expertise spans a wide range of technologies across the full stack. Over the years, Shubham has led the end-to-end development of several successful products translating complex ideas into clean, maintainable, and future-ready solutions. He brings a strong product mindset, a deep understanding of systems design, and a passion for writing code that solves real-world problems.
 October 17, 2025


