Model Context Protocol (MCP) is an open standard developed by Anthropic that enables AI assistants to connect with external tools and data sources. If you've ever desired to enhance the abilities of AI assistants such as Claude, GPT, or Gemini with personalized features, the MCP server implementation is the way to do it.
Starting from the very beginning, this guide will teach you how to set up the MCP server and use it effectively. We will walk through a hands-on MCP server tutorial using a practical example of a Maven vulnerability scanner that flags security issues in your Java projects. By the end of this guide, you will have a thorough understanding of:
- What MCP is and how it works
- How to create your own MCP server
- How to connect clients to your MCP server
- How to integrate MCP with popular LLMs like Claude, GPT, and Gemini
For enterprises looking to streamline AI tool integration, explore our MCP Server development and consultation services to build scalable, production-ready solutions.

What is Model Context Protocol (MCP)?
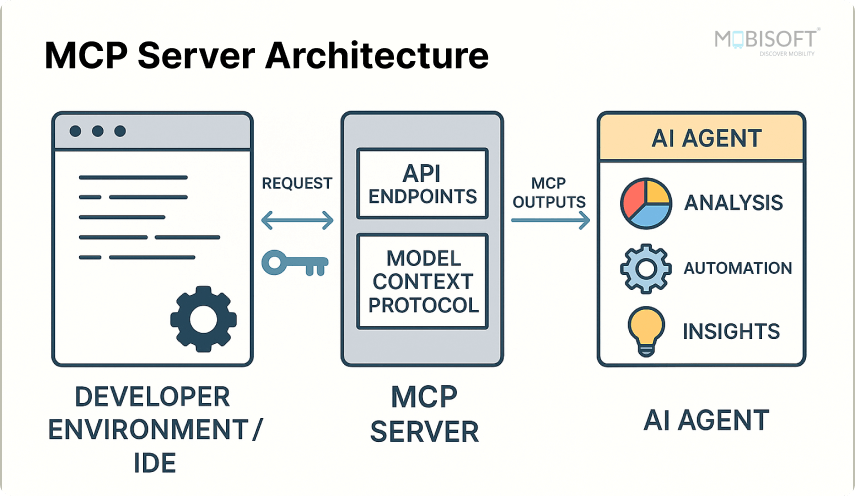
The model context protocol MCP server is a uniform protocol enabling AI assistants to engage with external tools and services. It acts as a bridge between the real users and AI models, allowing consistent and secure communication.
Key Benefits
- Standardized Communication: One protocol works with multiple AI assistants
- Extensible: Create custom tools for your specific needs
- Built-in Features: Progress tracking, logging, and error handling
- Transport Agnostic: Works with all sorts of transport mechanisms, such as HTTP and stdio.
- Language Support: Available in Python, TypeScript, and other languages
How MCP Works
MCP follows a client-server architecture:
- MCP Server: Exposes tools (functions) that perform specific tasks
- MCP Client: Connects to the server and calls tools
- AI Assistant: Uses the client to invoke tools and process results
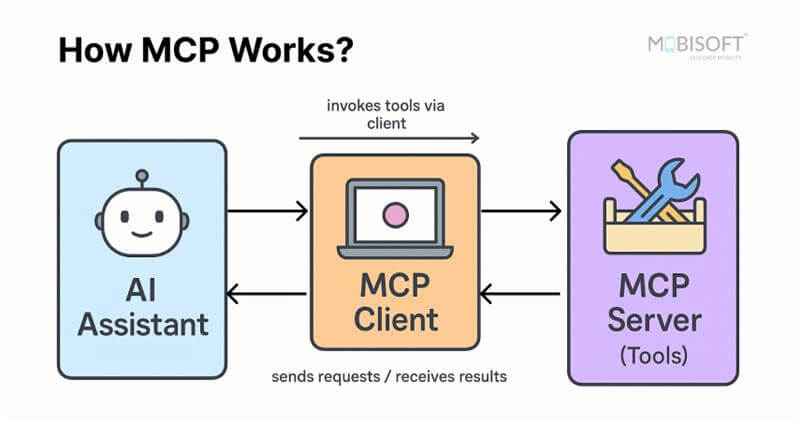
This MCP server configuration ensures that your AI assistant can handle complex tasks without relying on multiple APIs or middleware.
Learn how MCP enhances intelligent workflows through our AI agent development and integration services designed for scalable automation.
Setting Up Your Development Environment for MCP Server Implementation
Prerequisites
Before we start, make sure you have:
- Python 3.10 or higher
- pip (Python package manager)
- A text editor or IDE
- API key for Gemini or OpenAI (for the chat client)
This setup helps ensure a smooth MCP server setup experience before we move into building and testing phases.
Installing MCP SDK to Begin AI Agent Server Setup
Set up a virtual environment and start working in a new project directory:
mkdir maven-vulnerability-scanner
cd maven-vulnerability-scanner
python3 -m venv venv
source venv/bin/activate

Install the required packages:
pip3 install -r requirements.txt
Project Structure
Create the following structure:
maven-vulnerability-scanner/
├── server.py
├── lightllm_maven_scanner.py
├── scan_pom.py
├── requirements.txt
├── .env
└── sample-pom.xml
Building Your First MCP Server for AI Integration
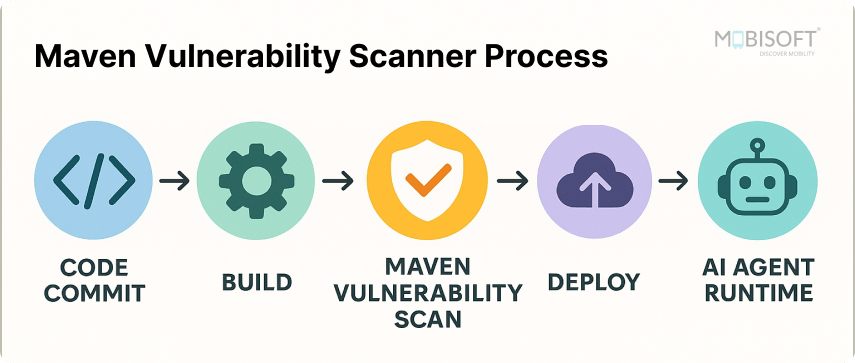
Let’s build an MCP server model context protocol that scans Maven pom.xml files for security vulnerabilities using the OSV (Open Source Vulnerabilities) database.
Step 1: Create the Server Base
Create server.py and start with the basic server setup:
from mcp.server import Server
from mcp.types import Tool, TextContent
import mcp.server.stdio
import asyncio
import xml.etree.ElementTree as ET
import httpx

server = Server("maven_vulnerability_scanner")
This creates an MCP server named "maven_vulnerability_scanner".
You can also refer to our in-depth article on AI Agent Development with MCP Server for additional hands-on examples and real-world deployment insights.
Step 2: Define Your Tool
MCP servers expose tools that clients can call. Let's define our vulnerability scanning tool:
@server.list_tools()
async def handle_list_tools():
    return [
        Tool(
            name="scan_pom_vulnerabilities",
            description="Scans a Maven pom.xml file for vulnerable dependencies using OSV database",
            inputSchema={
                "type": "object",
                "properties": {
                    "pom_content": {
                        "type": "string",
                        "description": "The complete content of the pom.xml file to scan"
                    }
                },
                "required": ["pom_content"]
            }
        )
    ]
This tells clients that our server has one tool called scan_pom_vulnerabilities that accepts pom_content as input.
Step 3: Implement Tool Logic
Now implement the actual scanning functionality:
def parse_pom_xml(pom_content: str):
    root = ET.fromstring(pom_content)

    namespaces = {'maven': 'http://maven.apache.org/POM/4.0.0'}
    if root.tag.startswith('{'):
        ns = root.tag[1:root.tag.index('}')]
        namespaces['maven'] = ns

    dependencies = []
    deps = root.findall('.//maven:dependency', namespaces

    for dep in deps:
        group_id = dep.find('maven:groupId', namespaces)
        artifact_id = dep.find('maven:artifactId', namespaces)
        version = dep.find('maven:version', namespaces)

        if group_id is not None and artifact_id is not None and version is not None:
            dependencies.append({
                'groupId': group_id.text,
                'artifactId': artifact_id.text,
                'version': version.text
            })

    return dependencies

async def check_vulnerability_osv(group_id: str, artifact_id: str, version: str):
    package_name = f"{group_id}:{artifact_id}"

    async with httpx.AsyncClient(timeout=30.0) as client:
        response = await client.post(
            "https://api.osv.dev/v1/query",
            json={
                "package": {
                    "name": package_name,
                    "ecosystem": "Maven"
                },
                "version": version
            }
        )

        if response.status_code == 200:
            data = response.json()
            vulnerabilities = data.get('vulns', [])

            return {
                'groupId': group_id,
                'artifactId': artifact_id,
                'version': version,
                'vulnerable': len(vulnerabilities) > 0,
                'vulnerabilities': vulnerabilities
            }
Step 4: Handle Tool Calls with Progress Tracking
One of MCP's powerful features is built-in progress tracking. Implement the tool handler:
@server.call_tool()
async def handle_call_tool(name: str, arguments: dict):
    if name != "scan_pom_vulnerabilities":
        raise ValueError(f"Unknown tool: {name}")

    pom_content = arguments.get("pom_content")
    if not pom_content:
        raise ValueError("pom_content is required")

    await server.request_context.session.send_progress_notification(
        progress_token="scan_progress",
        progress=0,
        total=100
    )

    dependencies = parse_pom_xml(pom_content)
    total_deps = len(dependencies)

    await server.request_context.session.send_log_message(
        level="info",
        data=f"Found {total_deps} dependencies to scan"
    )

    results = []
    for idx, dep in enumerate(dependencies):
        await server.request_context.session.send_log_message(
            level="info",
            data=f"Scanning {idx + 1}/{total_deps}: {dep['groupId']}:{dep['artifactId']}"
        )

        result = await check_vulnerability_osv(
            dep['groupId'],
            dep['artifactId'],
            dep['version']
        )
        results.append(result)

        progress = 10 + int((idx + 1) / total_deps * 80)
        await server.request_context.session.send_progress_notification(
            progress_token="scan_progress",
            progress=progress,
            total=100
        )

    vulnerable_count = sum(1 for r in results if r['vulnerable'])

    report = f"Scan Complete\n\n"
    report += f"Total Dependencies: {total_deps}\n"
    report += f"Vulnerable Dependencies: {vulnerable_count}\n\n"

    if vulnerable_count > 0:
        report += "Vulnerabilities Found:\n\n"
        for result in results:
            if result['vulnerable']:
                report += f"- {result['groupId']}:{result['artifactId']} v{result['version']}\n"
                for vuln in result['vulnerabilities']:
                    report += f"  - {vuln.get('id', 'N/A')}: {vuln.get('summary', 'No summary')}\n"

    return [TextContent(type="text", text=report)]
Step 5: Start the Server
Add the main entry point:
async def main():
    async with mcp.server.stdio.stdio_server() as (read_stream, write_stream):
        await server.run(
            read_stream,
            write_stream,
            server.create_initialization_options()
        )

if __name__ == "__main__":
    asyncio.run(main())
Your MCP server is now ready!
Creating MCP Clients for Seamless AI Agent Communication
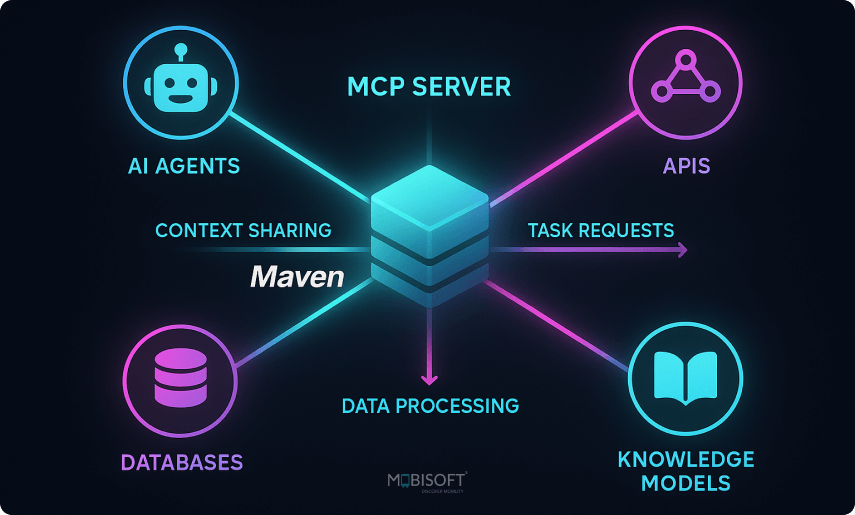
Now that we have a server, let's create a client to use it with LLM integration.
For projects requiring tailored integration or automation solutions, explore our Custom MCP Server Development insights to learn how to design flexible and secure AI infrastructures.
Interactive Chat Client with LLM Integration Using MCP Server
This is the most powerful client - it combines MCP with LLMs for natural language interaction.
Create lightllm_maven_scanner.py:
import asyncio
import os
import sys
import re
from pathlib import Path
from dotenv import load_dotenv
import litellm
from litellm import experimental_mcp_client
from mcp import ClientSession, StdioServerParameters
from mcp.client.stdio import stdio_client

load_dotenv()

LLM_PROVIDER = "GEMINI"
GEMINI_MODEL = "gemini/gemini-2.0-flash-exp"
OPENAI_MODEL = "gpt-4o"

def get_model_config():
    if LLM_PROVIDER == "GEMINI":
        return {
            "model": GEMINI_MODEL,
            "api_key": os.getenv("GEMINI_API_KEY"),
            "provider_name": "Gemini 2.0 Flash"
        }
    elif LLM_PROVIDER == "OPENAI":
        return {
            "model": OPENAI_MODEL,
            "api_key": os.getenv("OPENAI_API_KEY"),
            "provider_name": f"OpenAI {OPENAI_MODEL}"
        }

def is_file_path(user_input: str) -> bool:
    stripped = user_input.strip()
    return (
        stripped.startswith("/") or
        stripped.startswith("~") or
        stripped.startswith("./") or
        stripped.startswith("../")
    )

def read_pom_file(file_path: str) -> str:
    path = Path(file_path).expanduser().resolve()
    with open(path, 'r') as f:
        return f.read()

async def process_tool_calls(session: ClientSession, tool_calls: list, messages: list):
    for tc in tool_calls:
        name = tc.function.name
        args = eval(tc.function.arguments)

        print(f"[MCP] Calling MCP server tool: {name}")
        result = await session.call_tool(name, args)

        result_text = result.content[0].text

        messages.append({
            "role": "tool",
            "tool_call_id": tc.id,
            "name": name,
            "content": result_text,
        })

async def chat_loop(session: ClientSession, llm_tools: list):
    model_config = get_model_config()

    messages = [{
        "role": "system",
        "content": "You are a security expert assistant. You help analyze Maven dependencies for vulnerabilities. When users provide file paths, automatically load and scan them."
    }]

    print("\nYou can ask questions, provide file paths, or paste pom.xml content.")
    print("Type 'exit' to quit.\n")

    while True:
        user_input = input("You: ").strip()

        if user_input.lower() in ['exit', 'quit']:
            break

        if is_file_path(user_input):
            try:
                pom_content = read_pom_file(user_input)
                user_input = f"Please scan this pom.xml file for vulnerabilities:\n\n{pom_content}"
                print(f"[File loaded: {user_input}]")
            except Exception as e:
                print(f"Error reading file: {e}")
                continue

        messages.append({"role": "user", "content": user_input})

        response = await litellm.acompletion(
            model=model_config["model"],
            messages=messages,
            tools=llm_tools,
            tool_choice="auto",
            temperature=0.1,
            api_key=model_config["api_key"]
        )

        response_message = response.choices[0].message
        messages.append(response_message)

        if response_message.tool_calls:
            await process_tool_calls(session, response_message.tool_calls, messages)

            follow_up = await litellm.acompletion(
                model=model_config["model"],
                messages=messages,
                temperature=0.1,
                api_key=model_config["api_key"]
            )

            assistant_message = follow_up.choices[0].message
            messages.append(assistant_message)
            print(f"\nAssistant: {assistant_message.content}\n")
        else:
            print(f"\nAssistant: {response_message.content}\n")

async def chat_with_maven_scanner():
    model_config = get_model_config()

    print("=" * 80)
    print("[MCP] Maven Vulnerability Scanner MCP Integration")
    print(f"[LLM] Using: {model_config['provider_name']}")
    print("=" * 80)

    server_params = StdioServerParameters(
        command=sys.executable,
        args=["server.py"],
        env=None,
    )

    async with stdio_client(server_params) as (read, write):
        async with ClientSession(read, write) as session:
            await session.initialize()

            llm_tools = await experimental_mcp_client.load_mcp_tools(
                session=session,
                format="openai"
            )

            await chat_loop(session, llm_tools)

if __name__ == "__main__":
    asyncio.run(chat_with_maven_scanner())
Setting Up Environment Variables
Create a .env file:
GEMINI_API_KEY=your-gemini-api-key-here
OPENAI_API_KEY=your-openai-api-key-here
Using Your MCP Server
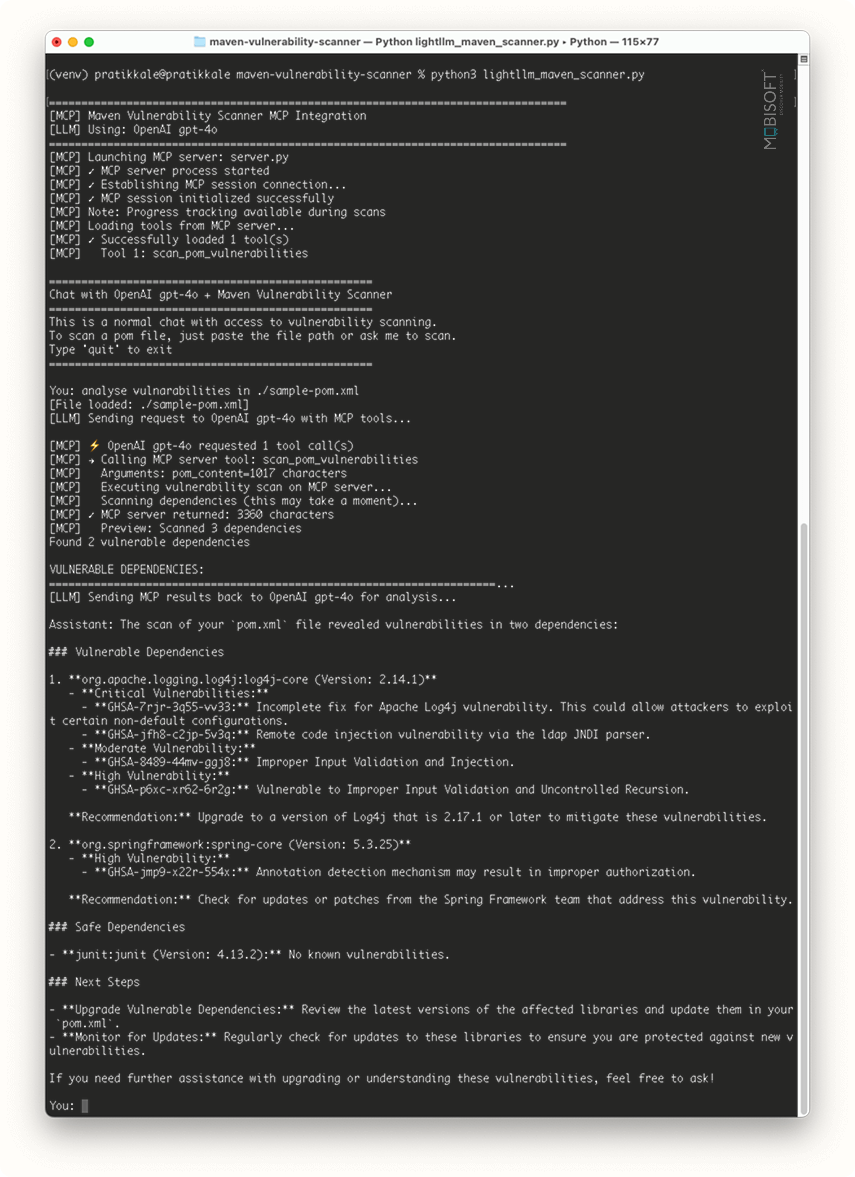
Start the interactive client:
python3 lightllm_maven_scanner.pyExample conversation:
Unlocking AI Tools and Automation: Full MCP Server Setup Guide
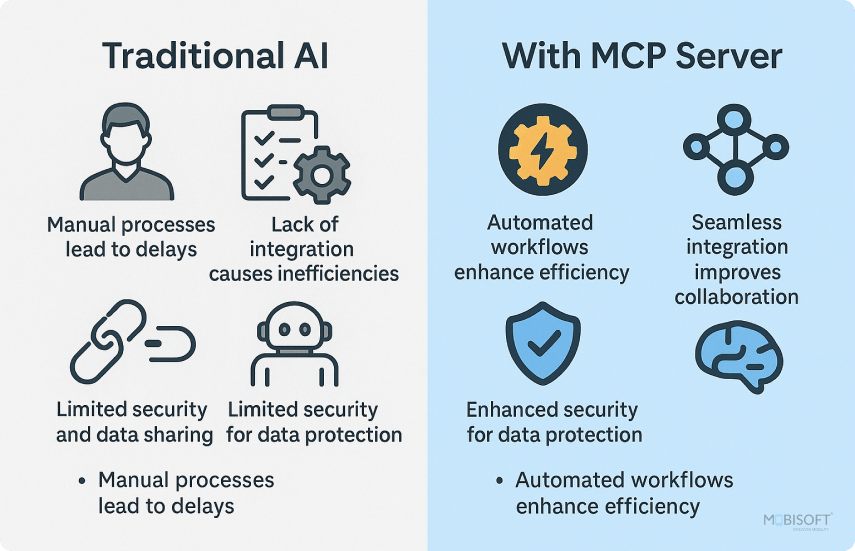
It is a smarter way to connect AI and engineering for faster, cleaner automation. You now understand how simple it is to build and run an MCP server from the ground up. The Maven vulnerability scanner example proved how useful and expandable this setup can be. What makes MCP stand out is how it creates a standard for AI to connect with your tools, eliminating the need for complicated APIs or middleware.
Here's what you have learnt:
- MCP servers allow you to build custom, AI-compatible tools that fit right into your workflow.
- The Maven vulnerability scanner shows a real-world application of this integration using Maven dependency management and Java vulnerability scanner tools.
- MCP helps you create a standard for AI to talk to your systems, without needing extra APIs.
It offers a more efficient way to link AI and engineering, leading to quicker and smoother automation.
Want to extend your project further? Learn how to Build AI Agents with CrewAI Framework to scale automation and collaboration efficiently.You can explore the complete code implementation and learn how to configure the MCP server tutorial in detail through the GitHub repository here.




 October 28, 2025


