What is WebSocket in Flutter?
A WebSocket is a protocol that enables bidirectional, real-time communication between a client and a server through a single, persistent TCP connection. Unlike standard HTTP, which establishes a new connection for every request and response, WebSockets in Flutter maintain a continuous connection, allowing for ongoing, real-time data transfer in your Flutter app. This means both the client and server can send and receive messages at any time without the need to re-establish connections continually.
Flutter WebSockets are commonly used in applications that require live updates or continuous interaction—such as online games, real-time chat apps in Flutter, stock market feeds, or collaborative tools. The process begins with an HTTP handshake to initiate the connection. Once established, the communication transitions to the WebSocket protocol, enabling efficient data transfer without the need to repeatedly open and close connections.
Conceptually, WebSocket in Flutter is just a layer on top of TCP.
If you're interested in building scalable real-time applications, partnering with a Flutter application development company can help streamline your development process.
How is TCP Different from HTTP in Flutter WebSocket Communication?
HTTP creates a new connection for each request, which places an extra load on the server as it needs to perform a new handshake for every interaction. After a request is fulfilled, the connection is terminated. In contrast, a TCP connection remains open and persistent as long as neither the client nor the server interrupts or ends the communication.
How Does WebSocket Work in Flutter Apps?
WebSocket works by establishing a persistent, two-way connection between a client and a server, allowing both to send and receive data at any time. Here’s how it works:
Handshake
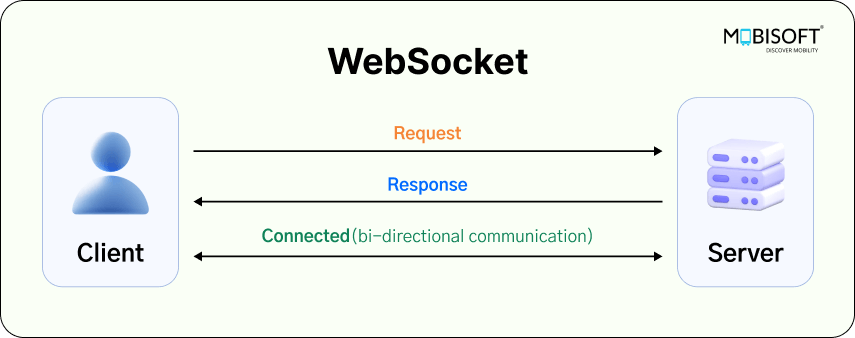
The process begins with the client sending an HTTP request to the server, requesting to upgrade the connection to a WebSocket. This request includes a special header indicating that the client wants to use the WebSocket protocol. The server responds, confirming its agreement to proceed with the upgrade.
Upgrade to WebSocket
Once the server agrees, the connection switches from HTTP to WebSocket. At this point, the connection is persistent, meaning it remains open as long as the client and server need to communicate. From this point on, the data is transmitted using the WebSocket protocol rather than HTTP.
Bi-directional Communication
Once the upgrade is complete, both the client and server can send and receive messages autonomously. This is in contrast to the traditional request-response model of HTTP, where the client always has to initiate communication. WebSockets in Flutter allow for real-time, continuous data flow in both directions.
Data Transfer
Data sent over WebSockets is broken down into smaller frames, which can include text, binary data, or control information. These frames are efficiently transmitted, which helps reduce overhead compared to HTTP.
Connection Persistence
The WebSocket connection remains open as long as both sides want to keep it. This allows for instant communication without the need for repeated handshakes. The connection is only closed when either the client or server decides to end it.
Closing the Connection
When either the client or server wants to terminate the connection, they send a special frame to gracefully close the WebSocket connection. When the connection is closed, the communication concludes, and the resources it utilized are released.

Why Do We Need WebSocket in Flutter Applications?
WebSockets are essential for real-time, bidirectional communication in applications where frequent updates or constant interaction between the client and server are needed. Traditional methods like HTTP are request-response based, which means the client has to keep making requests to the server to check for updates. This can lead to delays and inefficiency—especially in dynamic applications like real-time chat apps in Flutter, online games, or financial trading platforms.
With Flutter WebSockets, once the connection is established, both the client and server can send messages to each other at any time without the need to repeatedly initiate requests. This makes WebSocket in Flutter ideal for scenarios where instant feedback or data synchronization is crucial, such as live notifications, collaborative editing, or monitoring real-time data streams.
By maintaining a persistent connection, WebSocket-based communication in Flutter reduces the overhead of repeatedly opening and closing connections, providing faster communication, lower latency, and a more efficient way to handle real-time data exchange.
If you're building a backend to support your Flutter app’s real-time features and need an efficient server solution, Node.js development could help scale your project.
When Should We Use WebSocket in Flutter Apps?
WebSocket in Flutter should be used when your application requires real-time, low-latency communication where both the client and server need to send and receive data continuously or at unpredictable intervals. It’s ideal in scenarios where frequent updates or instant feedback are essential and traditional HTTP polling would be inefficient or slow.
When Should We Avoid Using WebSocket in Flutter?
WebSockets in Flutter are not ideal for scenarios where real-time communication isn't necessary or when the cost of maintaining an open connection exceeds the advantages.
Low Traffic or Infrequent Updates
If your app only needs occasional or one-time data exchanges (like simple form submissions or infrequent page refreshes), using WebSockets would introduce unnecessary complexity and resource consumption. In these situations, traditional HTTP requests are a better fit.
Static or Simple Content
For websites or applications that serve mostly static content with minimal need for dynamic updates (e.g., blogs or news sites), WebSockets are overkill, and regular HTTP/HTTPS would be more efficient.
Resource Constraints
Devices or environments with limited system memory or processing power (e.g., IoT devices or low-end smartphones) may struggle with maintaining multiple open WebSocket connections in Flutter, especially when the app scales to many users.
Security Concerns
Improper implementation of WebSocket in Flutter apps could lead to vulnerabilities like man-in-the-middle attacks. If the environment or application lacks proper security mechanisms, it’s better to rely on more secure, stateless protocols like HTTPS.
Complexity in Scaling
WebSocket connections are stateful, requiring each client to keep a connection open. In applications with heavy traffic, handling and scaling WebSocket connections can be more challenging than with stateless protocols such as HTTP.
Advantages of Using WebSocket in Flutter Apps
Using Flutter WebSockets brings a variety of advantages that make them ideal for real-time app development:
Instant Data Exchange
WebSockets enable real-time, bidirectional communication between the client and server, allowing messages to be sent and received instantly as events occur.
Faster Communication
Since the connection stays open, there's no need to reconnect for each interaction. This minimizes the delays common in request-response models, resulting in faster and more responsive communication for Flutter real-time app development.
Reduced Resource Consumption
By maintaining a persistent connection, WebSockets in Flutter apps reduce the need for repeated requests and responses, conserving bandwidth and easing the load on servers.
Efficiency in High Traffic
WebSockets excel in environments with high-frequency interactions, such as Flutter real-time chat apps, live updates, or multiplayer games, providing scalable performance.
Seamless User Experience
Users get instant notifications and updates without the need to refresh pages or request new data, creating a smoother and more engaging experience.
Bandwidth Savings
The protocol transmits data in smaller, more efficient packets, cutting down unnecessary data usage compared to traditional polling or repeated requests.
Improved Interaction
The server and client can transmit data independently, making WebSockets in Flutter perfect for collaborative tools, live streams, or interactive applications that require continuous user input and immediate responses.
Ideal for Large-Scale, Interactive Apps
WebSockets are perfect for applications like gaming, real-time stock tracking, and collaborative platforms, where ongoing interaction is essential.
Disadvantages of WebSocket in Flutter Apps
While WebSockets in Flutter apps offer numerous advantages, there are also some potential drawbacks to consider:
Complexity in Setup
Implementing WebSockets in Flutter can be more complex compared to traditional HTTP protocols, especially when dealing with server configuration, handling connections, and managing long-lived connections.
Resource Intensive
Keeping Flutter WebSocket connections open can use up more server resources since each connection remains active. This can be problematic when scaling to large numbers of clients, particularly on servers with limited resources.
Network Issues
WebSocket connections are sensitive to network disruptions. If the connection is lost, it needs to be re-established, which can cause delays or require additional logic to handle reconnections effectively.
Security Concerns
WebSockets require proper security practices, such as using the wss:// (secure WebSocket) protocol. If not secured properly, they can be vulnerable to attacks like man-in-the-middle or denial-of-service attacks.
Limited Browser Support in Some Cases
Although WebSockets are supported by most modern browsers, compatibility issues may arise with older browsers or environments that don't support the protocol.
Not Always Necessary
If your application doesn't need real-time updates or regular data exchanges, the effort required to manage WebSocket connections in Flutter may be excessive. In such cases, traditional HTTP or alternative methods like long polling may be more suitable.
Difficult to Scale in Some Architectures
Managing WebSocket in Flutter connections across multiple servers or within large distributed systems can be difficult. Load balancing and session management often require specialized infrastructure.
Statefulness
WebSockets are stateful connections, meaning that the server needs to track each connection. This can lead to difficulties in scaling or managing connections in a fault-tolerant way.
Bringing WebSockets into your Flutter app is like giving it a direct line to the server—no more knocking on the door every few seconds asking, “Any updates?” Instead, your app and backend stay in constant conversation, making everything feel faster and more alive. Whether you’re building a chat app with WebSockets in Flutter, tracking live data, or syncing gameplay in real time, WebSockets help you do it smoothly.
If you need assistance integrating WebSockets for real-time features or hire Flutter developers to develop a custom solution, working with an experienced team can make the process much smoother.
Thanks to the web_socket_channel package, setting it up in Flutter is pretty straightforward. You open a connection, listen for updates, send messages it’s all super seamless. Think of it as a real-time hotline powered by Flutter WebSockets, keeping everything in sync without breaking a sweat. Your users will feel the difference.
Let’s dive into how to integrate WebSockets in your Flutter app.
Integrating WebSockets in Your Flutter App
Here we are using the package :web_socket_channel package from pub.dev and the package link is WebSocketChannel to implement the socket in flutter project. Please follow the following steps for complete installation and use.
Step 1: Installation
First, create a flutter project then add the web_socket_channel: ^3.0.2 package to the dependencies: section of your project’s pubspec.yaml file, and then run the command flutter pub get to install the dependency, as shown in the below screenshot.

Step 2: Create Singleton Class
Create a new directory under the lib folder and add a Dart file named socket_manager.dart. In this file, define a singleton class, SocketManager, to manage WebSocket methods, as demonstrated in the screenshots below. We are using a Singleton class to prevent the creation of multiple client-server connections.

Please see the code for the Singleton class below.
class SocketManager {
  static final SocketManager _shared = SocketManager._();

  //Singleton accessor;
  static SocketManager get shared => _shared;

  SocketManager._();

}
Step 3: Create Instance
Create an instance of WebSocketChannel named webSocketChannel and import the necessary path for WebSocketChannel as demonstrated below.
import 'package:web_socket_channel/web_socket_channel.dart';

class SocketManager {
  static final SocketManager _shared = SocketManager._();

  //Singleton accessor;
  static SocketManager get shared => _shared;

  SocketManager._();

   //Instance of WebSocketChannel
  WebSocketChannel? webSocketChannel;
}
Step 4: Set up Functions to Handle Your Socket Communication
Define each socket method individually within the SocketManager class to handle socket operations, as detailed below.
1. The connect() method in a socket is used to establish a connection between a client and a server over a network. Please replace valid socket url with text ‘your_socket_url’.
WebSocketChannel? webSocketChannel;

//TODO: Connect to a server
Future<void> connect() async {
  final wsUrl = Uri.parse('your_socket_url');
  try {
        webSocketChannel = WebSocketChannel.connect(wsUrl);
  } catch (exception) {
    print(exception);
  }
}
2. The sendMessage() method in a socket is used to send data from the client to the server over an established socket connection. It allows you to transmit messages or data as a sequence of bytes over the network.
//TODO: Send messages to the server
void sendMessage(String message) async {
  webSocketChannel?.sink.add(message);
}
3. The _listenToWebSocket() method in the context of WebSockets is used by the client to wait for incoming WebSocket connection requests from the server.
//TODO: Receive messages from the server
void _listenToWebSocket() {
  webSocketChannel?.stream.listen((message) {
    print(message);
  });
}
4. The _listenToWebSocketClosure() method in the context of WebSockets is used by the client to wait for connection close requests from the server. This method provides a callback in cases like the internet disconnected the app cbeing losed by the user.
//TODO: Perform actions when the WebSocket is closed.
void _listenToWebSocketClosure() {
  webSocketChannel?.sink.done.then((value) {
    //You will receive a callback here after the connection closes.
  }).catchError((error) {
    print(error);
  });
}
5. The disconnect() method in the context of WebSockets is used to close the WebSocket connection between the client and the server.
//TODO: Close connection with the server.
void disconnect() {
  webSocketChannel?.sink.close();
}
6. Call _listenToWebSocket() and _listenToWebSocketClosure() in the connect() method’s definition after the connection is established to initiate the listener as shown in the code.
//TODO: Connect to a server
Future<void> connect() async {
  final wsUrl = Uri.parse('your_socket_url');
  try {
       webSocketChannel = WebSocketChannel.connect(wsUrl);
    _listenToWebSocket();
    _listenToWebSocketClosure();
  } catch (exception) {
    print(exception);
  }
}
Step 5: WebSocket Workflow in Practice
We’ve implemented all the necessary methods in the SocketManager class. Now, let’s move on to an example that demonstrates how to use those methods.
Lets see with one simple chat example. To create a chat application we are going to use wss://echo.websocket.org url. The URL is a free public WebSocket echo server provided by the developers of the WebSocket protocol for testing and experimentation purposes.
The URL wss://echo.websocket.org is a WebSocket echo server, meaning it is primarily designed to echo any messages sent to it back to the sender. It doesn't broadcast messages to other clients. In other words, if you send a message to this WebSocket server, you will receive that same message back, but the server does not send the message to other connected clients.
If you're looking for a WebSocket server that supports broadcasting to multiple clients, you would need to use or set up a WebSocket server with broadcasting functionality. For instance, WebSockets Server in Node.js with Socket.io: A Complete Tutorial covers how to set up a WebSocket server using Node.js and Socket.io, which might be useful if you need more control and flexibility in your WebSocket server implementation.
The goal here is to demonstrate how to integrate a WebSocket and utilize its methods, including connecting to the WebSocket server, sending messages, and receiving messages from the WebSocket server.
Add wss://echo.websocket.org to this URL in your connect function. As shown in the code below.
//TODO: Connect to a server
Future<void> connect() async {
    final wsUrl = Uri.parse('wss://echo.websocket.org');
    try {
          webSocketChannel = WebSocketChannel.connect(wsUrl);
           _listenToWebSocket();
           _listenToWebSocketClosure();
          } catch (exception) {
    print(exception);
          }
}
1. Design UI
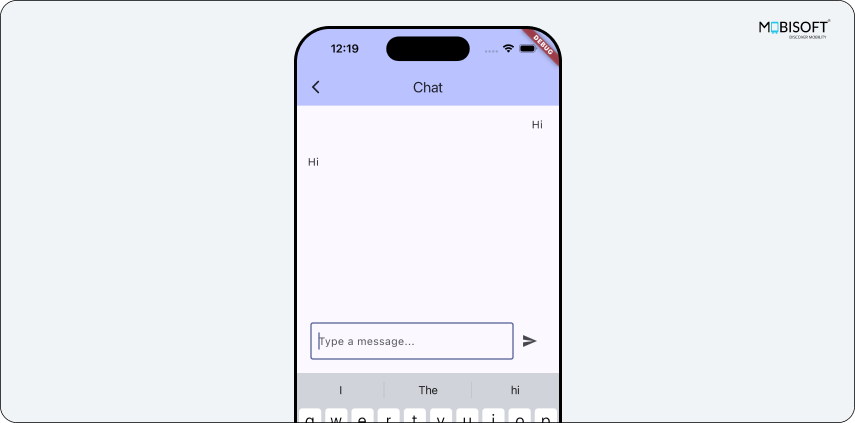
Let's Add Two Screens :The home screen and the chat screen, within the lib directory. A home screen for connecting to the server, accessing the chat interface, and disconnecting from the server. Chat screen for communicating with the WebSocket server and sending, receiving and displaying messages.

Implement three buttons on the home screen: one for connecting to the server, another for navigating to the chat screen, and a third for disconnecting from the server. On the chat screen, create a basic chat interface for sending and displaying messages, as shown in the screenshots below.
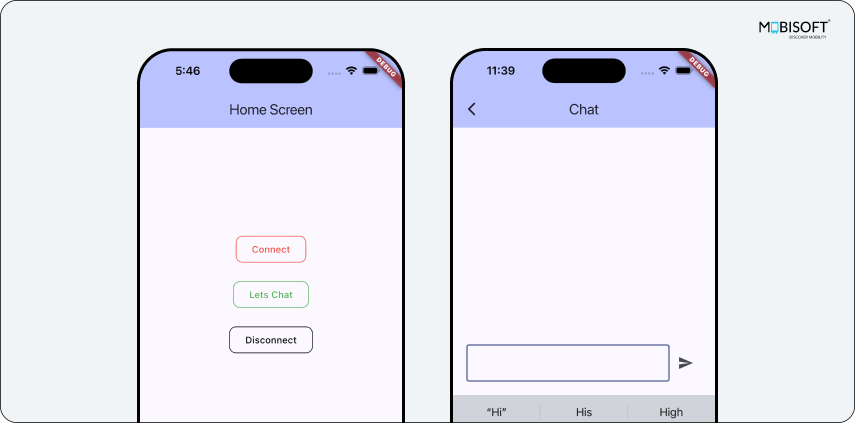
I've provided a link to the example code for the design at the end of the blog.
2. Create Helper Class
Let's create an additional file, named SocketHelper, to handle incoming messages from the WebSocket server and broadcast messages to update the screen.

For broadcasting, I used the fbroadcast: ^2.0.0 package. Add this package to the dependencies: section of your project’s pubspec.yaml file, and then run the command flutter pub get to install the dependency, as shown in the below screenshot.
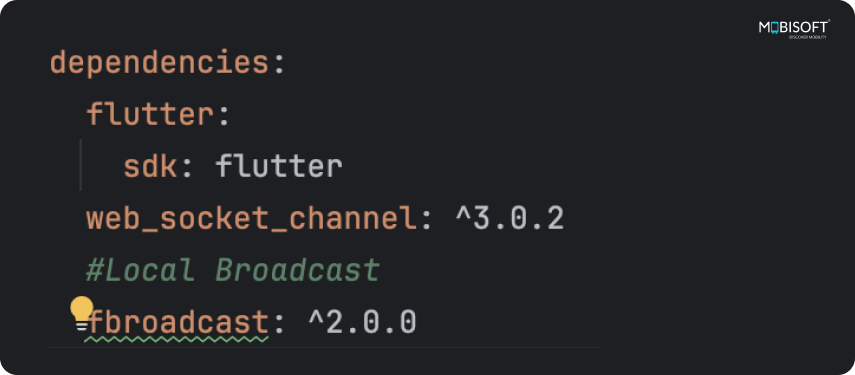
Write two methods in the SocketHelper class name as handleSocketResponse and sendLocal methods. handleSocketResponse is for distributing listened messages from the WebSocket server. sendLocal is for broadcasting messages.
Import fbroadcast: ^2.0.0 package’s path in the same file. Here is the reference code :
import 'package:fbroadcast/fbroadcast.dart';

class SocketHelper {
  static handleSocketResponse(String response) {
    var responseArray = response.split(':');
    if (responseArray.first == 'message') {
      sendLocal(responseArray.last);
    } else if (response.contains('Request served by')) {
      sendLocal('connected');
    } else if (response.isEmpty) {
      sendLocal('disconnected');
    }
  }

  static void sendLocal(String message) {
    FBroadcast.instance().broadcast("message_received", value: message);
  }
}
3. Make Connection
Tap the 'Connect' button to invoke the connect method we implemented in the SocketManager class.
onPressed: () {
  SocketManager.shared.connect();
},
Once the connection is established, we receive a callback message string from the WebSocket server in the _listenToWebSocket() method, such as Request served by <Id>.
Next, click the 'Let's Chat' button to navigate to the chat screen.
onPressed: () {
  Navigator.of(context).push(MaterialPageRoute(
      builder: (context) => ChatScreen()));
},
4. Send Message
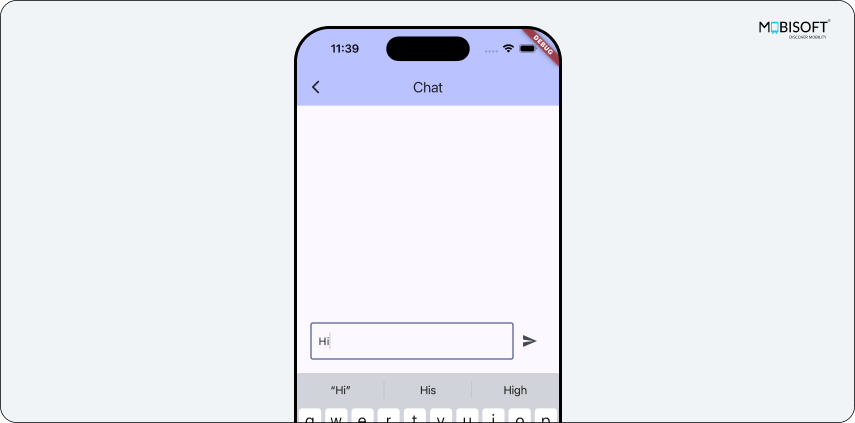
To send a message to the web server, type your message in the text box on the chat screen and tap the send button.
onPressed: _sendMessage,In the _sendMessage() method, I implemented the code to refresh the chat screen and called the _sendMessageToSocket(String message) method.
void _sendMessage() {
  if (_controller.text.isNotEmpty) {
    setState(() {
      var messagesData = ChatModel(message: _controller.text, type: "sent");
      _sendMessageToSocket(_controller.text);
      _messagesList.add(messagesData);
      _controller.clear(); // Clear the input after sending
    });
  }
}
In the _sendMessageToSocket(String message) method, I invoked the sendMessage() method of the SocketManager class, which is responsible for sending the message to the WebSocket server.
void _sendMessageToSocket(String message) {
  SocketManager.shared.sendMessage('message:$message');
}
After sending a message, we receive the same message back from the server. To differentiate it from other messages, I append the string 'message' to the actual typed message, as we also receive other types of messages in the listen method, such as connection or disconnection notifications. If the callback contains ‘message’ text, it is identified as a chat message. Additionally, I created a model to classify the message type, indicating whether it was sent or received.
class ChatModel {
  String message;
  String type;
  ChatModel({required this.message, required this.type});
}
Here, I defined two types of messages as below.
- "sent" : type sent means message from user to websocket server.
- "received" : type received means message from websocket server to user.
5. Receive Message
After sending a message, we immediately receive a callback from the WebSocket in the _listenToWebSocket() method. The message is then passed to the handleSocketResponse method for differentiation.
void _listenToWebSocket() {
  webSocketChannel?.stream.listen((message) {
    SocketHelper.handleSocketResponse(message);
    print(message);
  });
}
Next, a local broadcast is sent to refresh the chat screen.
static handleSocketResponse(String response) {
  var responseArray = response.split(':');
  if (responseArray.first == 'message') {
    sendLocal(responseArray.last);
  } else if (response.contains('Request served by')) {
    sendLocal('connected');
  } else if (response.isEmpty) {
    sendLocal('disconnected');
  }
}

static void sendLocal(String message) {
  FBroadcast.instance().broadcast("message_received", value: message);
}
A broadcast observer should be implemented on the chat screen to listen for local broadcasts.
void _addBroadcastObservers() {
  FBroadcast.instance().register(
    "message_received",
    context: this,
    (value, callback) {
      handleSocketBroadcast(value as String);
    },
  );
}


@override
void initState() {
  super.initState();
  _addBroadcastObservers();
}
Afterward, handle the broadcast response and refresh the chat screen with the following code:
void handleSocketBroadcast(String message) {
  setState(() {
    var messagesData = ChatModel(message: message, type: "received");
    _messagesList.add(messagesData);
  });
}
For added protection in production environments, consider reviewing best practices for secure data transmission, including techniques like SSL pinning as detailed in Enhancing Flutter App Security: A Guide to Implementing SSL Pinning.
6. Disconnect
To disconnect from the WebSocket server, navigate back from the chat screen to the home screen and tap the 'Disconnect' button. This will disconnect you from the server.
onPressed: () {
  	  SocketManager.shared.disconnect();
},
Summing It Up
I hope you found this tutorial on the step-by-step guide integrating WebSockets into your Flutter app useful. To explore the full source code and implementation, you can download the sample app directly from GitHub. Feel free to explore, clone, and contribute to the project!




 April 10, 2025


