In API automation testing, ensuring proper handling of headers, cookies, and parameters is essential for accurately simulating real-world API interactions. These elements carry crucial information between the client and the server, influencing the behavior and outcome of API requests and responses. Rest Assured provides convenient methods for setting headers, adding cookies, and specifying various types of parameters. API automation allows the execution of a large number of test cases in a short amount of time, reducing the overall testing cycle.
Headers:
Headers are a part of the HTTP request that contains additional information about the request. They are small pieces of information carrying significant weight in determining how data is transmitted, processed, and secured across the web. Headers are key-value pairs, where the key is a string that describes the type of information being provided, and the value is the actual data being provided.
Components of Headers:
- Content-Type: Specifies the format of the data (request body) being sent or received, such as JSON, XML, or plaintext.
- Authorization: Contains authentication credentials or tokens, ensuring secure access to protected resources.
- Accept: Indicates the preferred content type expected in the response. For example, the value of "application/json" indicates that the client prefers a response in JSON format.
- User-Agent: Identifies the client making the request and software version.
- Cache-Control: Controls caching behavior. It indicates whether responses can be cached and for how long. For example, a value of "no-cache" indicates that the response should not be cached.
- Please refer to the image below to define headers in Rest Assured.

Cookies:
Cookies are small pieces of data stored on the client's side by the web server. They are used to maintain user session state, track user behavior, and store user preferences. Cookies are sent by the client to the server with every subsequent request, allowing the server to identify and personalize the user experience.
Importance of Cookies in API Testing:
- 1. Authentication and Authorization: Many APIs require authentication to access protected resources. Cookies often play a role in this process, as they may contain session tokens or authentication credentials. Verifying that authentication cookies are correctly handled is crucial for testing access control mechanisms.
- 2. Session Management: Testing how cookies are created, managed, and invalidated throughout the session ensures that the API behaves as expected, maintaining session consistency and security.
- 3. Cookie-Based Flows: Some APIs employ cookie-based workflows, where certain actions or operations are triggered based on the presence or absence of specific cookies. Testing these workflows involves sending requests with appropriate cookies and verifying the API's response and behavior.

Parameters:
Parameters are additional details included in the URL along with the request.
Types of Parameters:
- 1. Path Parameters: Path parameters in REST APIs are placeholders in the URL that are replaced with actual values when making requests. They are commonly used to specify unique identifiers or resource names within the URL path. Path parameters are sent in the URL using curly braces {}.
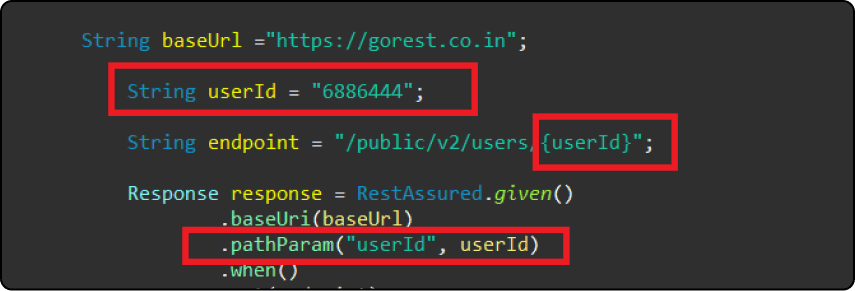
Example:
Retrieve the details of the employee whose id is “123”.
“api/employees/{id}”
Here {Id} is a path parameter.
Example: To fetch details of employee id 123, the request will be: “api/employees/123”
- 2. Query Parameters:
Query parameters appear after the question mark symbol ‘?’ in the URL.
These parameters help to get specific data from the API.
Example 1:
Retrieve a list of employees whose designation is QA Engineer.
/employee?designation=qa
In the above example, ?designation=qa is the query parameters.
The question mark denotes the start of a query parameter. There can be multiple query parameters in the URL. It can be achieved by separating parameters through an '&' sign.
Example 2:
Retrieve a list of employees whose designation is QA Engineer and experience is 3 years.
/ employee?designation=qa&exp=3
Uses of Query Parameters:
- Filtering: Query parameters can be used to filter data on specific criteria. Example: While shopping online, the user needs shoes in a certain color or within a specific price range.
- Pagination: APIs often return large collections of data, such as lists of users, posts, or products. Pagination query parameters enable clients to navigate through these collections by specifying the page number and the number of items per page.
Example: Query parameters help you navigate to the pages by telling the API which page of results you want to see and how many items to show per page.
- Searching: Query parameters are used for search functionality, allowing users to retrieve resources matching certain search terms or criteria. Example: The user search terms in Google. You can tell the API what you're searching for, and it'll give you back relevant results.
- Sorting: Query parameters can be used to sort the data returned by the API based on specific criteria. Example: If a user is browsing a list of products on an ecommerce site,Query parameters allow you to sort products by price, rating, or any other criteria you choose.
Project Configuration:
In this project, we are using TestNG 7.10.0, Selenium 4.20.0, Rest Assured 4.4.0, and Maven archetype 4.0.0. TestNG is used as a test runner as it helps in running the test scripts.
Step 1: Set Up Your Environment
- 1. Install Java Development Kit (JDK): Download and install the latest JDK from the official Oracle website.
- 2. Set Up IDE: Choose an Integrated Development Environment (IDE) like IntelliJ IDEA or Eclipse.
Step 2: Create a New Maven Project
- 1. 1. In Eclipse, Go to File -> New -> Project.
- 2. Select Maven -> Maven Project and click Next.
Step 3: Select Maven Archetype:
- a. Choose org.apache.maven.archetypes:maven-archetype-quickstart and click Next.
- b. Configure Maven Project:
- i. Fill in the required fields such as Group Id and Artifact Id.
- ii. Optionally, you can provide a version and a package name.
- iii. Click Finish.
Step 4: Configure Selenium WebDriver Dependency:
- 1. Once the Maven project is created, open the pom.xml file..
- 2. Add the Selenium WebDriver and TestNG dependency within the
section:(Please refer the image given below)
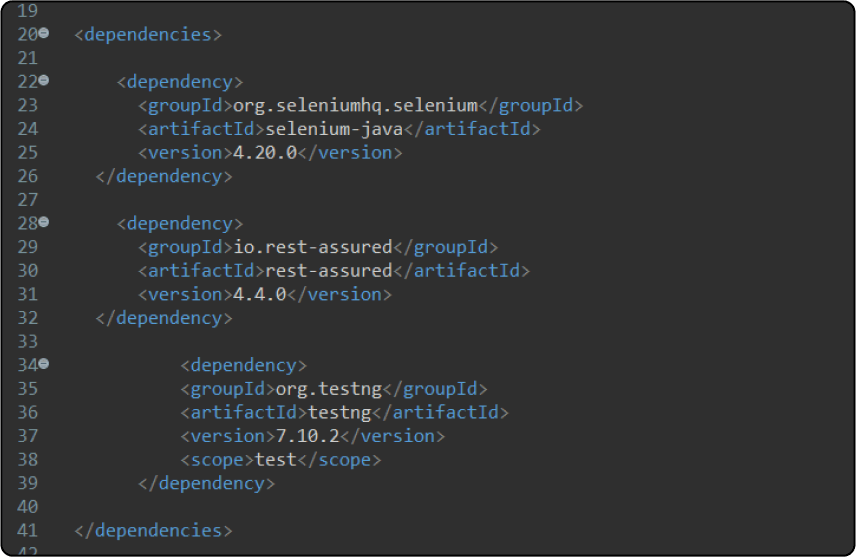
Step 5: Create Test Class to test query parameters
- 1.Create a new Java class under src/test/java. Right click on Package name → new → Class (Refer below image)
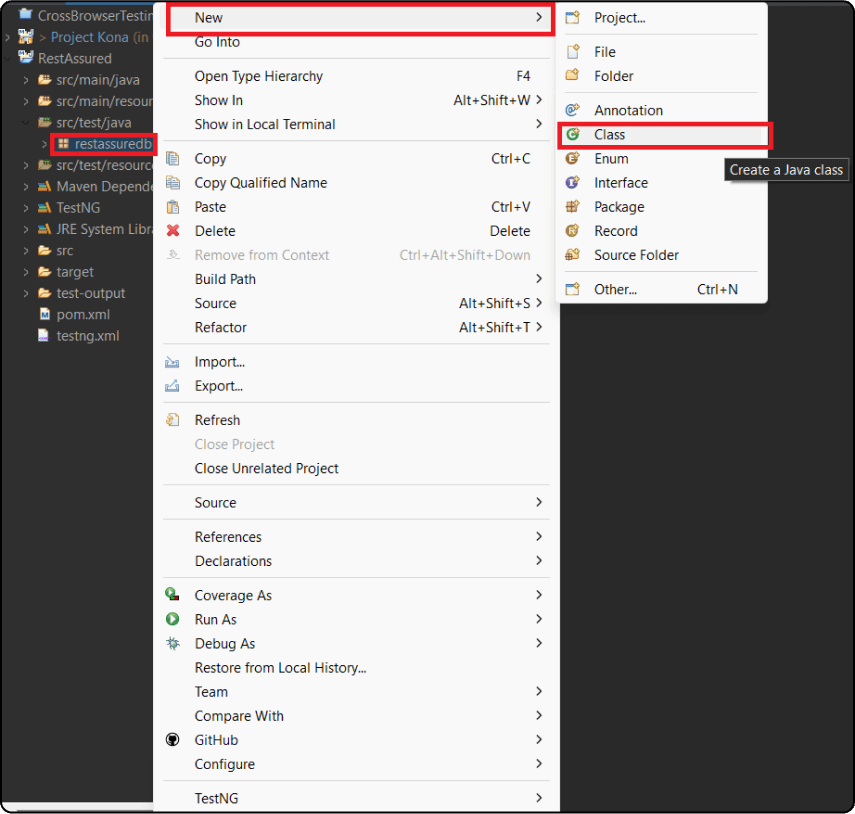
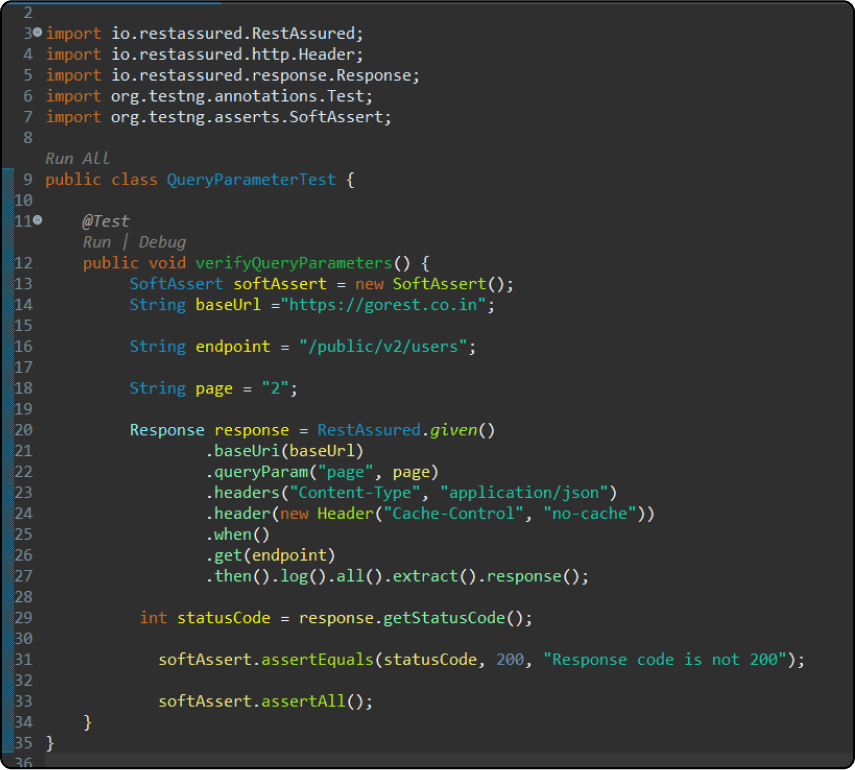
The code below utilizes the RestAssured library to test an API with query parameters.
Here, page=2 is a query parameter. This api will fetch the details of users in responses from page no 2.
The image below contains the response where we can see the query parameter has been passed through the URL.
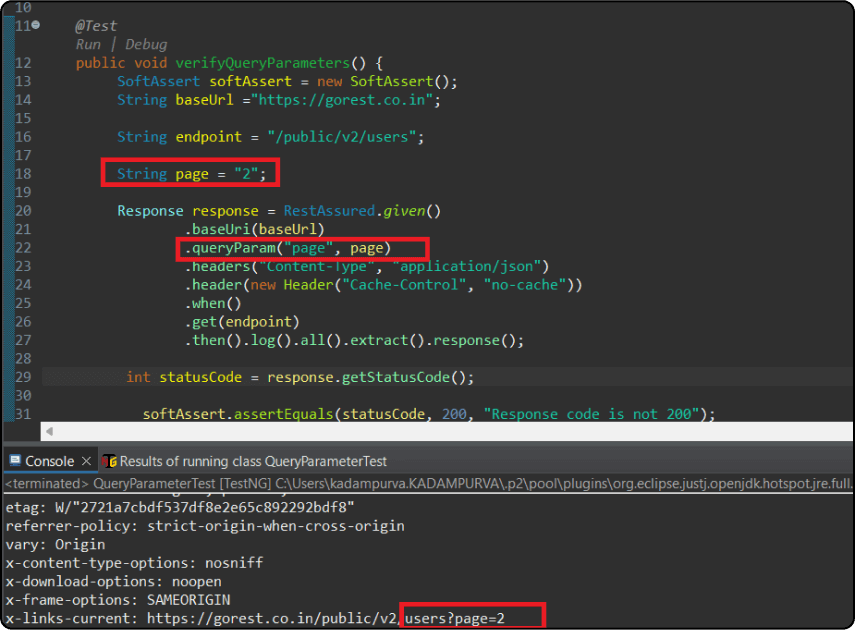
- public class QueryParameterTest(): It declares a Java class name.
- @Test: This annotation denotes that the following method is a test case to be executed by the testing framework (Here,TestNG framework has been used).
- public void verifyQueryParameters() : This method contains the actual test logic. It's named verifyQueryParameters().
- SoftAssert softAssert = new SoftAssert(): This creates an instance of SoftAssert. Soft assertions allow the test to continue running even if one or more assertions fail.
- String baseUrl ="https://gorest.co.in": This variable holds the base URL of the API.
- String endpoint = "/public/v2/users": This variable holds the specific endpoint of the API being tested.
- String page = "2": This variable holds a query parameter value for the page number.
- Response response = RestAssured.given(): It starts the construction of an HTTP request. Then, various methods (baseUri(), queryParam(), headers(), header()) are chained to it to specify details like the base URI, query parameters, and headers. Finally, the request is sent using the .when().get(endpoint) chain, which sends a GET request to the specified endpoint. The response is then captured and stored in the response variable.
- .then().log().all().extract().response(): This logs all details of the response and extracts it.
- int statusCode = response.getStatusCode(): This retrieves the status code from the response.
- softAssert.assertEquals(statusCode, 200, "Response code is not 200"): This checks if the status code equals 200. If it doesn't, it will record a failure with the message "Response code is not 200". However, because it's a soft assertion, the test will continue even if this assertion fails.
- softAssert.assertAll(): This line ensures that all soft assertions are evaluated. If any of them fail, it will throw an assertion error at the end of the test.
Step 6: Create Test Class as mentioned in step-5 to test path parameter
- Write a test method annotated with @Test that will contain your test logic.
The code below utilizes the RestAssured library to test an API with path parameters.
Here, {userId} is a path parameter. It will fetch the details of the user for the mentioned user Id.
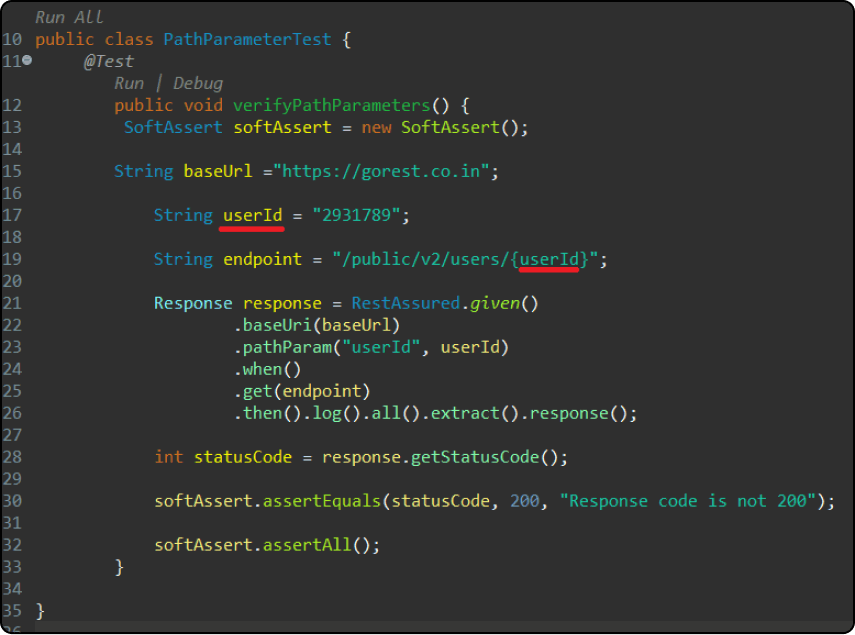
In the above code, .pathParam(“userId”,userId) is used to specify a path parameter named "userId" and its corresponding value. The first argument is the name of the path parameter, and the second argument is the value you want to assign to it.
Step 7:Create Test Class as mentioned in Step-5, to set cookies.
Please refer to the image below for the code, to set the cookies of the given url.
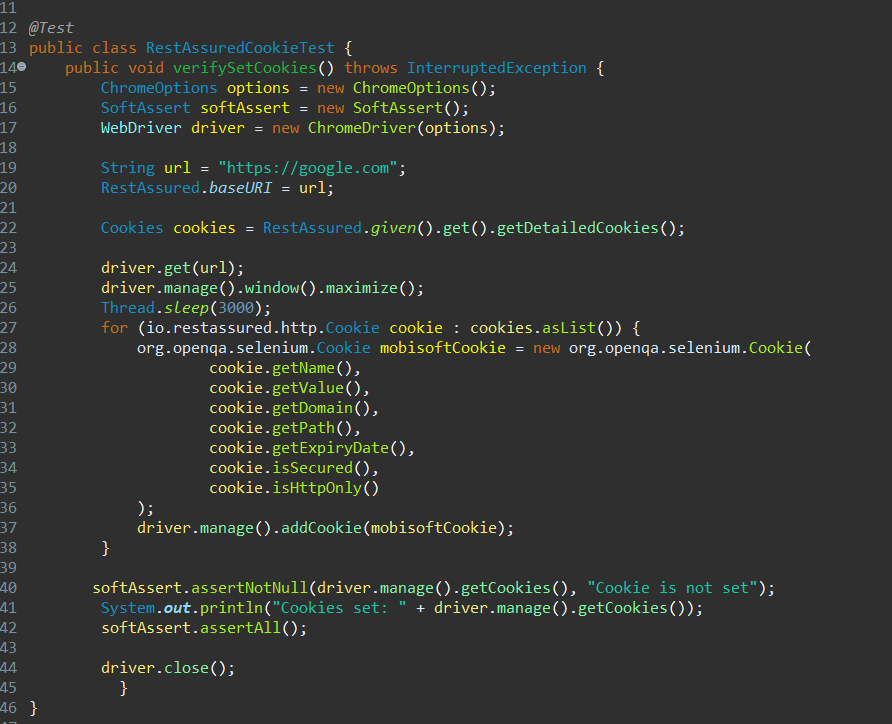
- 1. public class RestAssuredCookieTest : This line declares a Java class name.
- 2. public void verifySetCookies() throws InterruptedException: This line declares a method named verifySetCookies which doesn't return anything (void) and can throw an InterruptedException.
- 3. ChromeOptions options = new ChromeOptions(): This line creates an instance of ChromeOptions, which allows to specify various options and settings for ChromeDriver.
- 4. SoftAssert softAssert = new SoftAssert(): This line creates an instance of SoftAssert, which is used to perform soft assertions in the test. Soft assertions allow the test to continue running even if one or more assertions fail.
- 5. WebDriver driver = new ChromeDriver(options): This line creates an instance of ChromeDriver with the previously defined options. This initializes a new Chrome browser session.
- 6. String url = "https://google.com": This line declares a variable url and assigns it the value "https://google.com", which is the URL that will be tested.
- 7. RestAssured.baseURI = url: This line sets the base URI for RestAssured, which means all subsequent requests made with RestAssured will be relative to this URL.
- 8. Cookies cookies = RestAssured.given().get().getDetailedCookies(): This line sends a GET request to the base URL using RestAssured and retrieves the detailed cookies from the response.
- 9. cookie.getName(): It returns the name of the cookie. In HTTP cookies, the name is the identifier of the cookie.
- 10. cookie.getValue(): It returns the value of the cookie. It represents the content or the value associated with the cookie.
- 11. cookie.getDomain(): It returns the domain associated with the cookie. The domain specifies the domain for which the cookie is valid. This is typically the domain of the website that set the cookie.
- 12. cookie.getPath(): This method returns the path associated with the cookie. The path specifies the URL path for which the cookie is valid. It restricts the cookie to be sent only to URLs with that path or its subdirectories.
- 13. cookie.getExpiryDate(): This returns the expiry date of the cookie. The expiry date determines the lifetime of the cookie. Once the expiry date is reached, the cookie is considered expired and is deleted from the browser.
- 14. cookie.isSecured(): This method returns a boolean indicating whether the cookie is secured or not. If true, it means the cookie should only be sent over HTTPS connections.
- 15. cookie.isHttpOnly(): This method returns a boolean indicating whether the cookie is HTTP only or not. If true, it means the cookie can only be accessed via HTTP requests and cannot be accessed by client-side scripts such as JavaScript. This helps mitigate certain types of attacks, like cross-site scripting (XSS).
- 16. driver.get(url): This line navigates the Chrome browser to the specified URL.
- 17. driver.manage().window().maximize(): This line maximizes the browser window.
- 18. Thread.sleep(3000): It will pause the execution of the test for 3000 milliseconds (3 seconds). This is often used for demonstration purposes or in cases where waiting is required, but it's generally not recommended for regular test scripts.
- 19. for (io.restassured.http.Cookie cookie : cookies.asList()) : This line starts a loop iterating over each cookie retrieved by RestAssured.
- 20.org.openqa.selenium.Cookie mobisoftCookie = new org.openqa.selenium.Cookie(): Inside the loop, it creates an instance of org.openqa.selenium.Cookie, which is used to represent a browser cookie in Selenium WebDriver.
- 21. driver.manage().addCookie(mobisoftCookie): It adds the cookie to the browser session managed by WebDriver.
- 22. softAssert.assertNotNull(driver.manage().getCookies(), "Cookie is not set"): This checks if cookies are set in the browser using a soft assertion.
- 23. System.out.println("Cookies set: " + driver.manage().getCookies()): This line prints out the cookies that are set in the browser.
- 24. softAssert.assertAll(): It asserts all the soft assertions made in the test. If any of them fail, it will throw an assertion error.
- 25. driver.close(): This line closes the browser window and ends the WebDriver session.
Step 8: Configure TestNG
To configure testng.xml, Right click on Project→TestNG→ Convert to Testng (Please refer image given below)
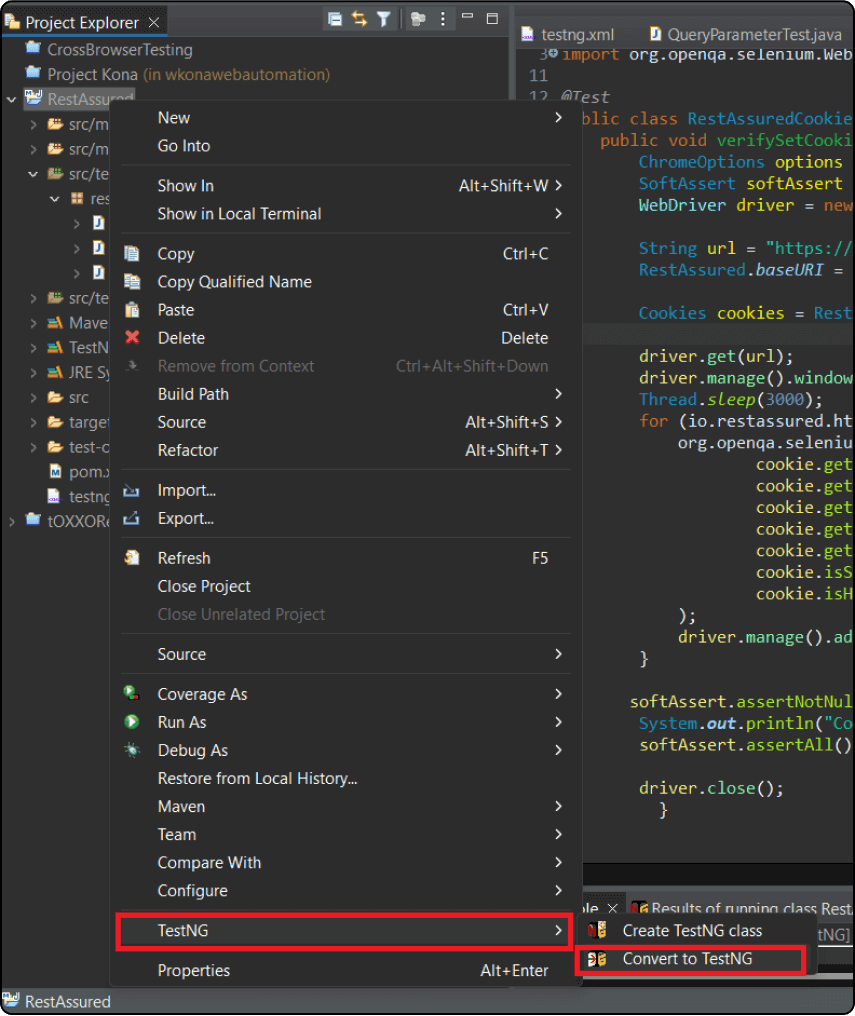
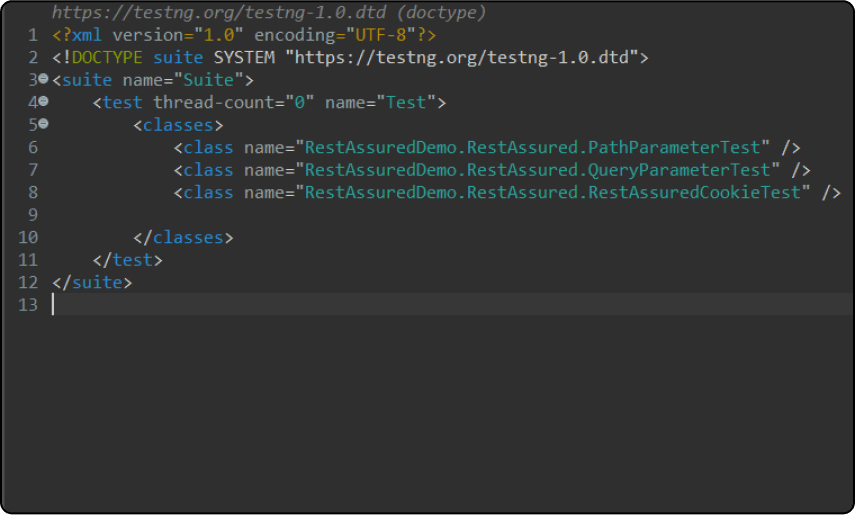
Once the TestNg.xml file is created. Include Test classes in the xml file.
Here in the XML configuration file below, defines a TestNG suite named "Suite" with one test named "Test", which includes three test classes: "PathParameterTest", "QueryParameterTest", and "RestAssuredCookieTest". When executed, TestNG will run the tests defined in these classes according to the specified settings.
Step 9: Run the Test:
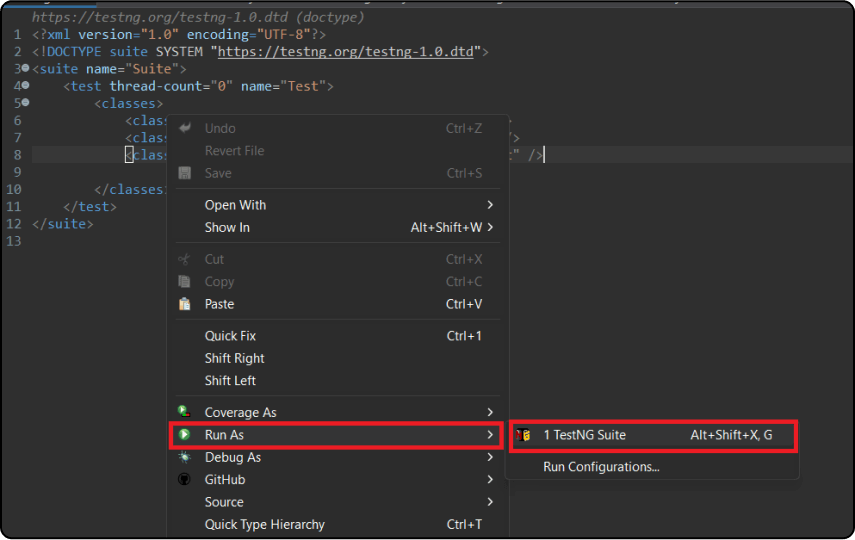
- Run test class as a TestNG test framework configuration.
Right click on testng.xml file→Run as→TestNg Suite (Refer below image)
That's it! We have created a RestAssured program using Selenium WebDriver in Java to test an API. This program sends an HTTP GET request to the specified endpoint, extracts response details, and performs Selenium actions on a webpage. Finally, it asserts the API response status code using TestNG assertions.
Conclusion:
Mastering the intricacies of headers, cookies, and parameters is paramount for ensuring the efficiency and accuracy of API automation testing. With Rest Assured as your ally, harnessing the power of automation becomes more accessible than ever.
At Mobisoft Infotech, we understand the importance of robust testing methodologies in delivering high-quality software solutions. Our expertise in API testing, coupled with cutting-edge tools like Rest Assured, empowers businesses to achieve seamless integration, superior performance, and unparalleled user experiences.
Explore our comprehensive range of services, including Automation Testing Services, to embark on a journey of innovation and excellence in software development. Partner with us today and unlock the full potential of your digital initiatives.
To download the source code for the sample , please click here.


 May 16, 2024


