The easiest way to process payment through Android application is by integrating PayPal. There are two ways to integrate PayPal into an Android application :

- Mobile Payment Library
- Mobile Express Checkout Library
Mobile Payment Library :
(For Android 1.5 and above-supported devices)
Using Mobile Payment Library we can process payment without leaving the android application. This Library controls the checkout experience –logging in, reviewing and completing the payment. In a few steps we can integrate mobile payment library in our application :
- To get Application ID for PayPal integration, login into www.x.com using your PayPal account and register your application under your account’s “My-application” tab. After completing registration, you will get an application ID.
You can also use PayPal SandBox testing environment for testing the application – where you will get Test Application ID and test PayPal account to transfer funds. The commonly used sandbox test application ID is “APP-80W284485P519543T “. - Download mobile payment library for Android from this link https://www.x.com/developers/paypal/documentation-tools/paypal-sdk-index and add PayPal_MPL.jar library file to your project classpath.
- Add the following permission and activity in your AndroidManifest file
Permission and Activity:[xml]<uses -permission android:name="android.permission.INTERNET"</uses> <uses -permission android:name="android.permission.READ_PHONE_STATE"></uses> <activity android:name="com.paypal.android.MEP.PayPalActivity" android:configChanges="keyboardHidden|orientation"android:theme="@android:style/Theme.Translucent.NoTitleBar"></activity> [/xml]
- PayPal Initialization:
In your activity for using PayPal, you need to initialize it.
To initialize PayPal add the following method
static public PayPal initWithAppID(Context context, String appID, int server)Parameter:
context: the context of your application
appID: appId of your application with which you have registered with PayPal.
server: PayPal server (if you are using testing mode for application use PayPal.ENV_SANDBOX or in case of PayPal production server, use PayPal.ENV_LIVE).
Value:
ENV_SANDBOX ( Testing purpose, Use PayPal testing server to obtain device token. )
ENV_LIVE (Not work on the emulator, Use PayPal production server to obtain device token. )
ENV_NONE (Do not use any PayPal servers to obtain device tokens. )
Ex.[java]PayPal ppObj = PayPal.initWithAppID(this.getBaseContext(), "APP- 80W284485P519543T", PayPal.ENV_SANDBOX);[/java]
- Pay With PayPal Button:After Initialization of PayPal add Pay with PayPal Button in application. To add this button use method
public CheckoutButton getCheckoutButton(Context context, int style, int textType)
This method returns Pay with PayPal button.Parameter:
context: required application context.
style : Size and appearance of Pay With PayPal Button
Allowed value:- PayPal.Button_152x33
- PayPal.Button_194x37
- PayPal.Button_278x43
- PayPal.Button_294x45
type : Type of button
Allowed value:- CheckoutButton.TEXT_PAY
- CheckoutButton.TEXT_DONATE
Ex.
[java]CheckoutButton launchPayPalButton = ppObj.getCheckoutButton(this, PayPal.BUTTON_278x43, CheckoutButton.TEXT_PAY);
RelativeLayout.LayoutParams params
= new RelativeLayout.LayoutParams(LayoutParams.WRAP_CONTENT, LayoutParams.WRAP_CONTENT);
params.addRule(RelativeLayout.ALIGN_PARENT_BOTTOM);
params.bottomMargin = 10;
launchPayPalButton.setLayoutParams(params);
launchPayPalButton.setOnClickListener(this);
((RelativeLayout)findViewById(R.id.RelativeLayout01)).addView(launchPayPal Button);[/java]
- On Click of Pay With PayPal Button start PayPal Library activity:
[java]PayPalPayment newPayment = new PayPalPayment();
newPayment.setSubtotal(10.f);
newPayment.setCurrency("USD");
newPayment.setRecipient("my@email.com");
newPayment.setMerchantName("My Company");
Intent paypalIntent = PayPal.getInstance().checkout(newPayment, this);
this.startActivityForResult(paypalIntent, 1);
[/java]
-
Get the result of activity started, or get status of Payment transferred.
[java]@Override
public void onActivityResult(int requestCode, int resultCode, Intent data) {
switch(resultCode) {
case Activity.RESULT_OK:
//The payment succeeded
String payKey = data.getStringExtra(PayPalActivity.EXTRA_PAY_KEY);
//Tell the user their payment succeeded
break;
case Activity.RESULT_CANCELED:
//The payment was canceled
//Tell the user their payment was canceled
break;
case PayPalActivity.RESULT_FAILURE:
//The payment failed -- we get the error from the EXTRA_ERROR_ID and EXTRA_ERROR_MESSAGE
String errorID = data.getStringExtra(PayPalActivity.EXTRA_ERROR_ID);
String errorMessage = data.getStringExtra(PayPalActivity.EXTRA_ERROR_MESSAGE);
//Tell the user their payment was failed.
}
}
[/java]
Activity.RESULT_OK
This result is returned when a PayPal payment succeeds. The pay key is available in the Intent data as PayPalActivity.EXTRA_PAY_KEY. The code to get the pay key as a string is: data.getStringExtra(PayPalActivity.EXTRA_PAY_KEY).
Activity.RESULT_CANCELED
This result is returned if the buyer cancels the payment during checkout.
paymentCanceled();
PayPalActivity.RESULT_FAILURE
This result is returned if the payment fails for any reason other than a buyer who cancels the payment during checkout. The error id and the buyer-friendly error message are available from the Intent data as PayPalActivity.EXTRA_ERROR_ID and PayPalActivity.EXTRA_ERROR_MESSAGE. - After successful Payment, PayPal library will return PayKey. Using PayKey you can implement a number of features like
- Instant Payment Notification
- PayPal Transaction Details
- Refund
- Mode of Payment: PayPal supports different modes of Payment
- Simple Payment:In Simple Payment, PayPal object supports only one recipient.
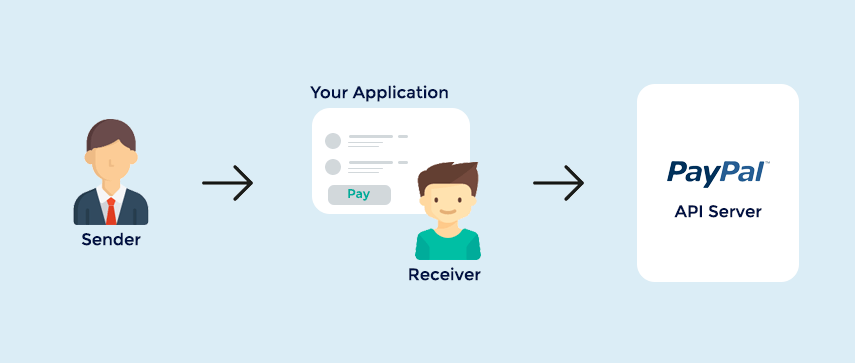

(Reference: https://www.x.com/developers/paypal)
- Parallel Payment:In Parallel Payment, PayPal Object support many recipients.
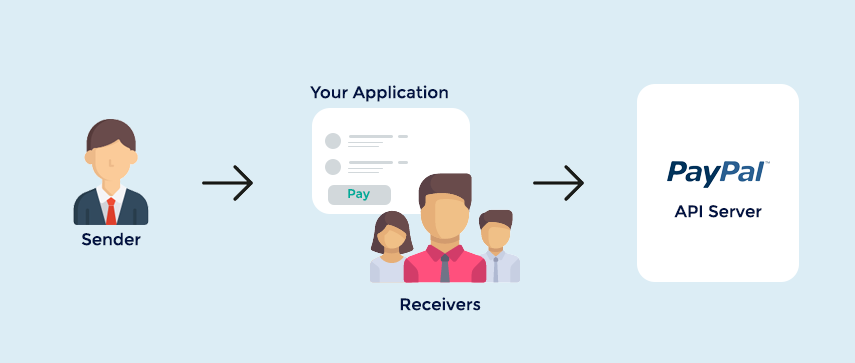
(Reference: https://www.x.com/developers/paypal) - Chained Payment:In chained payment, PayPal Object indirectly supports many receivers. PayPal sends payment to Primary receiver and the primary receiver sends payment to other recipients.


(Reference: https://www.x.com/developers/paypal)
- Simple Payment:In Simple Payment, PayPal object supports only one recipient.
Mobile Express Checkout Library:
There are two ways to integrate mobile checkout library with your application
- PayPal Button in your Mobile Application
- PayPal Button on your mobile Website
(Note: Download mobile payment library for Android from this link https://www.x.com/developers/paypal/documentation-tools/paypal-sdk-index and add library file to your project classpath.)
PayPal Button in your Mobile Application:
Place PayPal Button in your mobile application and load mobile express checkout library pages in a WebView.
- Fetch Device token before you place PayPal button in your mobile application screen.
And Include PayPal Listener. - Get PayPal Button from Library and place it in your mobile application screen.
- When Buyer clicks on PayPal Button
- Call the routine passing payment information to your mobile server
- On your mobile web server, send a SetExpressCheckout request with the payment information to PayPal.
- Pass the checkout token returned in the SetExpressCheckout response from your mobile web server to your mobile application.
- Open a web view, and redirect the browser to PayPal with the mobile command, the device token, and the checkout token as URL parameters.
https://www.paypal.com/cgi-bin/webscr?cmd=_express-checkout-mobile &drt= valueFromFetchDeviceReferenceTokenWithAppID &token=valueFromSetExpressCheckoutResponse
- Monitor the web view for a redirect from PayPal to your return or cancel URL.
- If PayPal redirects the web view to your return URL, call surrogate routines on your mobile web server that send GetExpressCheckoutDetails and DoExpressCheckoutPayment requests to PayPal to complete the payment.
Flow Diagram:
 (Reference: https://www.x.com/developers/paypal)

PayPal Button in your Mobile Website:
Place PayPal Button on your mobile website page if your checkout process begins and ends with mobile express checkout.
- Fetch device token from mobile express checkout library before beginning checkout process and add PayPal Listener that receives device token.
- Pass device token in URL and load URL in webview to begin the checkout process.
- 3. Monitor webview until it redirects to your website.


(Reference:https://www.x.com/developers/paypal)
Methods of Mobile Express Checkout Library:
- Get Device Token:
public static void fetchDeviceReferenceTokenWithAppID(Context context, String appID, int server, PayPalListener listener)
Parameter:
Context : activity or application context
appId: Application Id registered on www.x.com
server :ENV_SANDBOX
ENV_LIVE (Not support on emulator)
ENV_NONE - PayPal Button:public CheckoutButton getCheckoutButton(Context context, int style, int textType)Parameter:
Context: activity or application context
Style: style and appearance of PayPal Button
Allowed value:- PayPal.Button_152x33
- PayPal.Button_194x37
- PayPal.Button_278x43
- PayPal.Button_294x45
type : Type of button
Allowed value:- CheckoutButton.TEXT_PAY
- CheckoutButton.TEXT_DONATE
- PayPal Listener: Two Methods of PayPal Listener
[java]@Override
public void couldNotFetchDeviceReferenceToken() {
//Initialization failed and we didn't get a token
}
@Override
public void receivedDeviceReferenceToken(String token) {
//Initialization was successful
}[/java]
More information about PayPal integration with android refer https://www.x.com/developers/paypal.
Download source code from here.